DEMO AND CONSTRUCTION
It was early March in New York when I could no longer control my desire to begin working on the new coop. And I knew I was going to order my new chicks soon so I needed to get moving.
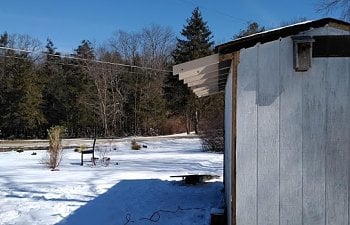
The first thing I had to do was remove all the trim, fascia and soffit boards.

I wanted to get the roof done first so I needed to install the rafter extensions I needed to get my 2 foot roof overhangs.
The quick method I used to determine the angle of the cuts was to clamp a piece of 2x4 onto a rafter tail then mark a plumb line on the end of the 2x4 using a bullet level. I then took the marked piece of 2x4 to the chop saw and moved the table until the laser line for the cut overlapped my mark. The front rafters were 13º and the rear rafters were 15º.
I didn't want to just trace the existing rafter tails as the shed was no longer perfectly level.
I shot ten 3" framing nails into each sistered rafter extension.
Front:
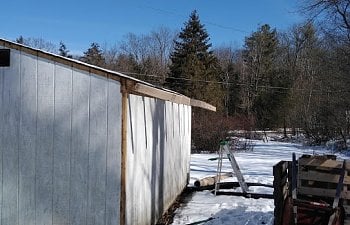
Rear:
I had an unexpected inspection just prior to the end of work that day. Thankfully, I passed!
After I installed the rafter extensions, I marked the rafters on the gable ends for the outriggers I needed to install to support the fly rafters for the 2' overhangs on the rakes. The outriggers were positioned over vertical support members in the gable walls.
Now these are just 2x4 rafters so I ended up routing out 3/4" on the rafter top and outrigger bottom then mating them together. I made the outriggers 4' long so I could end nail to the next rafter in. This is a large overhang so when I finish painting the siding, I will be installing braces under the outriggers for added support as the snow load in my area will be an issue if I don't. The ends would also eventually sag. For now, it's fine.
I was in an all-fired hurry to get the roof decking done and covered with the underlayment before it snowed so I never got a good picture of how I did the outriggers but this is what they look like inside the coop and under the gable overhang.
It was too cold to install the shingles so I just put up the eave drip edges and the underlayment to make it watertight and moved on to interior framing.
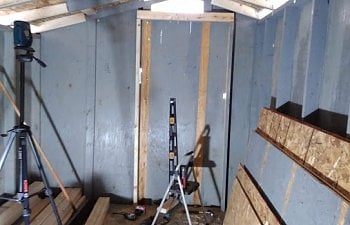
I began by reframing the west wall for the entry door. This not being a load bearing wall, I did not need much of a header. I reused as many of the existing wall studs as I could. Note the opening over the door. This will remain open and eventually be covered with 1/2" HC and become one of the gable end vents.
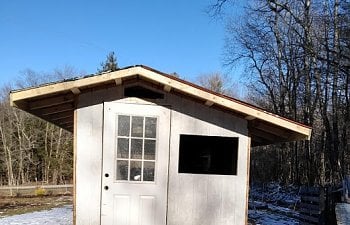
I originally planned to build a 30" door out of siding but on my way home from work one day, I saw someone had discarded an exterior door. Score! I grabbed the truck and DH and we went back down the hill for it. It's steel and needed the bottom interior framing replaced as the wood had rotted. I ripped and cut a scrap piece of pressure treated (PT) 2x4 and glued it into the bottom of the door with Loctite PL 3X construction adhesive (my favorite) and clamped it. The door will need a little sanding, priming and painting and it'll be good to go.
I won't have full trim around the window and door because this door is 36" but that's okay. It's just a coop and free is free!
I installed the rough opening (RO) on the east wall to receive one of these 60" x 16" salvage windows I picked up for $25 each.
(Ignore the gawdawful garage door they are leaning against.
It was either work on the coop or the rest of the property. I chose the coop. )
)
The second of these 60" x 16" windows will be installed on the rear (south) wall, centered-ish along the length of the 10' roost. Now this is a load bearing wall so I needed a decent header.
A quick image on basic framing technique for those interested. (I did not create this sketch, I did modify it though.)
In the interest of not having to cut more of the existing studs than absolutely necessary, I shifted the window position off center and used an existing wall stud for the right side king stud, because this is just a coop and I am lazy!
I had some miscellaneous lengths of 2x6 and 2x8 scrap in the garage from previous construction projects. I used a 2x6 for the header and used my favorite construction tool, my laser level, to line up the RO for the south wall window with the east wall window.
I then marked the studs I needed to cut where the laser crossed them, measured up the width of the header and made a cut mark on three sides of the stud. I used a sawzall to cut through about 90% of each stud then finished it with a Fein saw (oscillating saw).
Next step was to measure down the height of the RO and add on the thickness of the sill framing (1.5"), mark the studs and cut again. After prying out the studs pieces from the window RO, I cut the jack studs and nailed them to the king studs then cut and placed the header on top of the jack studs and under the upper cripple studs. I toe nailed through the upper cripple studs into the header and through the header into the jack and king studs to secure the header.
I drilled 1" holes in opposite corners of the sheathing that needed to be removed to open up the RO. I cut the sheathing out with the sawzall.
Rafter ties were installed on all the rafter assemblies to protect the roof from uplift forces.
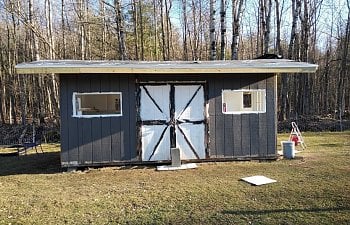
The north wall required the most work as I had to center the existing doors on the wall and make two ROs for the two windows that will flank the doors. Instead of making the cleanout doors from scratch, I salvaged the doors that were on the shed by cutting off the rotted bottoms. The cleanout doors had to be shorter than the original doors because the extended eaves prevented the old doors from opening. I will eventually re-trim these doors but for now, I had to keep the chickens out becaaaaause...
I had yet another unexpected inspection and received an OSHA violation citation for an unsafe worksite. So the Inspector sent in his OWN work crew and had the nerve to act as foreman and give directions!!
Well!
I evicted his entire crew AND the Inspector for failure to wear proper protective equipment on the worksite!
The Inspector flogged me.
This is the north side of the coop reframed (I still need to install some siding over the doors but at least I can keep the Inspector and his flunky crew out).
I framed out the partition wall between the coop and what I call the brooder room. I took no pictures of this.
I framed out the community nest box using 2x2's and 3" screws.
I re-used pieces of the old roof deck for the sheathing and door on the nest box. I clamped a level to the OSB and used my little Versacut saw to rip and cut the OSB.
I used 1 1/4 brads to pin the OSB pieces to the framing. (Nice jeans, huh?)
I slid the nest box into the framing in the partition wall and nailed it in place and then installed a landing roost in front of the box.
Next step was building the poop boards. I did not get good pictures of how I built the poop boards. This is a little sketch showing the cross-section of how I did it.
07/05/19 Update: I made another PB with roost and took some pictures and posted them to the Move In and Modifications Page.
The black framed box is the 2x4 framing. The solid blue boxes are pieces of a 1x8 board I had laying around that I ripped down to 1" high ledge boards. The yellow lines are the brad nails. I brad nailed the (blue) ledge boards flush with the bottoms of the 2x4 framing. I used salvaged pieces of 22" x 8' OSB (solid red) for the "poop deck" and brad nailed them onto the ledges I made. The poop boards where then nailed to the walls and angle braces were cut and installed to support the fronts of the boards. I can stand up on the framing. It is strong.
This is the finished product. (Note the ever present caffeine dispenser in many of these pictures).
I screwed the roost uprights into the PB frames, then routed out an overlap for the area where the roosts crossed and screwed the roosts to the uprights so they can easily be removed if needed for cleaning or for installing shorter or taller uprights to adjust the roost height over the PBs. The starting height is 10" over the PB.
At this point it was time for cleaning. The entire coop was swept, vacuumed and every original painted surface was scrubbed with a solution of TSP-phosphate free (doesn't that just make it TS then?), rinsed and allowed to dry.
I had an old 5-gallon bucket of Kilz Max primer in the basement from one of my past flips. It was purchased because it is great as an exterior stain blocking primer and also an odor sealant. I used about 4.5 gallons to prime all surfaces of the coop interior and under the exposed overhangs outside.
There was a casualty during exterior priming of the undersides of the overhangs. It couldn't happen to one of the white chickens. It had to happen to Astrid.
A coat of white satin exterior paint went on everything but the floor, PB surface and the bottom of the nest box. Those horizontal surfaces were painted with 2 coats of Porch and Floor paint. I got an "Oops" can at the Home Depot for $9. Yay!
Before I painted the PBs, I caulked between the edges of the board and the framing to keep sand, PDZ and (ahem) other material from getting down into the cracks.
As one can see, I ended up cutting the corner off the brooder in the interest of not ramming a hip into it every time I walked in the coop. The entrance door and the door into the chicken's area swing away from the brooder room. There is not enough space for doors to swing into the brooder room.
Exterior painting was done at this time while the weather was warm enough to cooperate.
I also decided I'd better get the shingles on the roof so I didn't have to do it when the chicks were in the brooder. I had a box of coil nails left over from yet another flip so I used them even though they were about 1/2" longer than I would have preferred and the points stick a little too far through the decking.
Once all the painting was done, I wired up the coop. I again had left over wire, electric boxes, staples and light fixtures from, you guessed it, previous flips. The wire is 12/2 run on a 15-amp circuit. Perfectly acceptable, just usually not done. I wasn't going to waste the wire. I still used 15-amp receptacles on the 12 gauge wires.
I installed a ceiling light in the brooder room and one in the coop.
A motion light at the entry door with a dusk to dawn feature was installed next. This light is wired up to control two coach lamps on the north side of the coop.
After locking up the birds for the night, I turn the lights on (all low lumens LED bulbs so I'm burning 9 watts) overnight. That way a quick peek out my deck door tells me all is well with the coop circuit and it serves as a reminder that I did indeed lock up the birds. A peek into the future...
The area that is stapled to the siding will be covered with 1x4 trim boards.
I then stapled HC over the gable end vents, all the window openings and the rest of the brooder enclosure.
I enclosed the area of the brooder closest to the coop door with scrap plywood so it would be better protected from drafts. I installed two 3.5" x 5" slide up doors in the plywood wall between the brooder and the coop for future integration use.
The rest of the partition wall and the door was covered in chicken wire.
After the partition wall was done I built and installed the main and brooder pop doors. Details of their construction and installation are on this page.
I used a 48" piano hinge to attach the OSB door and a small latch with carabiner to keep it closed.
I attached chains to the sides to hold it level when I open it to collect eggs.
(Pictures taken after the move in)
Oops! Sorry, Amelia! Didn't know you were in there.
At this point, I was pretty much out of time. I had been puttering with stripping the salvaged windows but still had a long way to go before they were ready to install so I ended up eventually cutting cardboard and old tarps to cover the openings to keep drafts from blowing into the coop on cold nights. The chicks were coming and I was anxious for the flock to be moved in. So I prepped the coop for occupancy on Easter Sunday.
I used three bags of pine shavings to bed down the floor.
I picked up a vinyl tablecloth for $3 and sewed curtains for the front of the nest box. I have about a 4" thick bed of chopped straw in the nest box.
Poop boards covered with about 1/2" of sand/PDZ mixture.
The feed trough hangs off the underside of the front edge of the shorter PB. I will be making a second 6' long trough to hang under the longer PB before the new chicks get integrated into the flock.
I made this waterer out of a TSC bucket I had and some horizontal chicken nipples I bought off Amazon. I already have a thermostatically controlled bird bath heater that I will put in the bucket for the winter. All the chickens drank from it on their first night in the coop.
I cut a hole in the side of an empty jar and screwed it to the wall under the ramp and filled it with crushed egg shells. I also have an OS feeder suspended next to the trough.
The upper barrel bolts on the clean-out doors. The bottoms of the doors are secured with barrel bolts as well.
Next I moved on to trimming out the coop.
For this I used 1x4 furring strips. Each piece was pre-cut and dry fitted then taken into the garage to be primed on all six sides with the Kilz max then painted on all six sides with the same satin white paint I used on the interior of the coop.
All trim was nailed on with 1 1/2" brad nails and the pneumatic brad nailer. I caulked where trim met trim and over the divots of the brads then painted the fronts of the trim a second coat.
I also changed out the old rusty hinges on the clean-out doors and installed some pull handles. I have yet to install the gable fascia boards or paint the eave fascia boards as they are PT deck boards and I want them good and dry before priming and painting to avoid the paint peeling off.
This has been a particularly difficult time for the Inspector, Fabio. He began to really object to all the commotion going on in his territory. He did not like me walking in the pen with all those noisy tools and long trim boards.
It is not his fault when I had difficulty controlling my knee jerk reactions to his floggings. He frequently went airborne, straight up and sometimes flung backwards a good 6 feet. Sorry bud. One day, Fabio was also flung off of me with a trim board that I blocked him with. Chickens cannot fly backwards. I will also admit that I was fascinated observing Fabio's ninja warrior moves. He is quite agile. Just not agile enough. I have since started scooping him up before things escalate to this level. He rarely gets past the giving me the stink eye phase.
Fabio and I are, at the writing of this article, working on relationship repair. He is starting to come back around. Ah. But we still have the run to build...
The first thing I had to do was remove all the trim, fascia and soffit boards.
I wanted to get the roof done first so I needed to install the rafter extensions I needed to get my 2 foot roof overhangs.
The quick method I used to determine the angle of the cuts was to clamp a piece of 2x4 onto a rafter tail then mark a plumb line on the end of the 2x4 using a bullet level. I then took the marked piece of 2x4 to the chop saw and moved the table until the laser line for the cut overlapped my mark. The front rafters were 13º and the rear rafters were 15º.
I didn't want to just trace the existing rafter tails as the shed was no longer perfectly level.
I shot ten 3" framing nails into each sistered rafter extension.
Front:
Rear:
I had an unexpected inspection just prior to the end of work that day. Thankfully, I passed!
After I installed the rafter extensions, I marked the rafters on the gable ends for the outriggers I needed to install to support the fly rafters for the 2' overhangs on the rakes. The outriggers were positioned over vertical support members in the gable walls.
Now these are just 2x4 rafters so I ended up routing out 3/4" on the rafter top and outrigger bottom then mating them together. I made the outriggers 4' long so I could end nail to the next rafter in. This is a large overhang so when I finish painting the siding, I will be installing braces under the outriggers for added support as the snow load in my area will be an issue if I don't. The ends would also eventually sag. For now, it's fine.
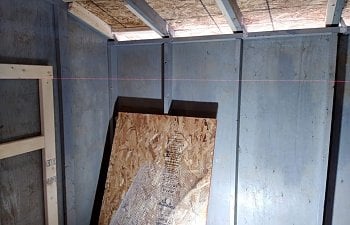
I was in an all-fired hurry to get the roof decking done and covered with the underlayment before it snowed so I never got a good picture of how I did the outriggers but this is what they look like inside the coop and under the gable overhang.
Interior underside view of outriggers
Exterior underside view of outookers
I originally planned to replace all the roof decking but most of it was in good shape after I removed it so I reused a few full sized pieces for the new roof deck and kept the rest to use for the poop boards and nest box. I left a 1" gap at the peak of each side of the roof deck for my ridge vent.
Exterior underside view of outookers
It was too cold to install the shingles so I just put up the eave drip edges and the underlayment to make it watertight and moved on to interior framing.
I began by reframing the west wall for the entry door. This not being a load bearing wall, I did not need much of a header. I reused as many of the existing wall studs as I could. Note the opening over the door. This will remain open and eventually be covered with 1/2" HC and become one of the gable end vents.
I originally planned to build a 30" door out of siding but on my way home from work one day, I saw someone had discarded an exterior door. Score! I grabbed the truck and DH and we went back down the hill for it. It's steel and needed the bottom interior framing replaced as the wood had rotted. I ripped and cut a scrap piece of pressure treated (PT) 2x4 and glued it into the bottom of the door with Loctite PL 3X construction adhesive (my favorite) and clamped it. The door will need a little sanding, priming and painting and it'll be good to go.
I won't have full trim around the window and door because this door is 36" but that's okay. It's just a coop and free is free!
I installed the rough opening (RO) on the east wall to receive one of these 60" x 16" salvage windows I picked up for $25 each.
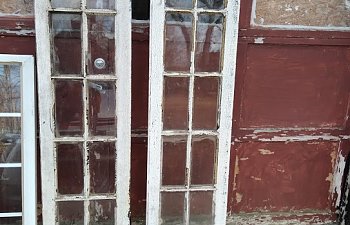
(Ignore the gawdawful garage door they are leaning against.
It was either work on the coop or the rest of the property. I chose the coop.
)The second of these 60" x 16" windows will be installed on the rear (south) wall, centered-ish along the length of the 10' roost. Now this is a load bearing wall so I needed a decent header.
A quick image on basic framing technique for those interested. (I did not create this sketch, I did modify it though.)
I had some miscellaneous lengths of 2x6 and 2x8 scrap in the garage from previous construction projects. I used a 2x6 for the header and used my favorite construction tool, my laser level, to line up the RO for the south wall window with the east wall window.
Next step was to measure down the height of the RO and add on the thickness of the sill framing (1.5"), mark the studs and cut again. After prying out the studs pieces from the window RO, I cut the jack studs and nailed them to the king studs then cut and placed the header on top of the jack studs and under the upper cripple studs. I toe nailed through the upper cripple studs into the header and through the header into the jack and king studs to secure the header.
I drilled 1" holes in opposite corners of the sheathing that needed to be removed to open up the RO. I cut the sheathing out with the sawzall.
Rafter ties were installed on all the rafter assemblies to protect the roof from uplift forces.
The north wall required the most work as I had to center the existing doors on the wall and make two ROs for the two windows that will flank the doors. Instead of making the cleanout doors from scratch, I salvaged the doors that were on the shed by cutting off the rotted bottoms. The cleanout doors had to be shorter than the original doors because the extended eaves prevented the old doors from opening. I will eventually re-trim these doors but for now, I had to keep the chickens out becaaaaause...
I had yet another unexpected inspection and received an OSHA violation citation for an unsafe worksite. So the Inspector sent in his OWN work crew and had the nerve to act as foreman and give directions!!
I evicted his entire crew AND the Inspector for failure to wear proper protective equipment on the worksite!
The Inspector flogged me.
This is the north side of the coop reframed (I still need to install some siding over the doors but at least I can keep the Inspector and his flunky crew out).
I framed out the partition wall between the coop and what I call the brooder room. I took no pictures of this.
I framed out the community nest box using 2x2's and 3" screws.
I re-used pieces of the old roof deck for the sheathing and door on the nest box. I clamped a level to the OSB and used my little Versacut saw to rip and cut the OSB.
I used 1 1/4 brads to pin the OSB pieces to the framing. (Nice jeans, huh?)
I slid the nest box into the framing in the partition wall and nailed it in place and then installed a landing roost in front of the box.
Next step was building the poop boards. I did not get good pictures of how I built the poop boards. This is a little sketch showing the cross-section of how I did it.
07/05/19 Update: I made another PB with roost and took some pictures and posted them to the Move In and Modifications Page.
The black framed box is the 2x4 framing. The solid blue boxes are pieces of a 1x8 board I had laying around that I ripped down to 1" high ledge boards. The yellow lines are the brad nails. I brad nailed the (blue) ledge boards flush with the bottoms of the 2x4 framing. I used salvaged pieces of 22" x 8' OSB (solid red) for the "poop deck" and brad nailed them onto the ledges I made. The poop boards where then nailed to the walls and angle braces were cut and installed to support the fronts of the boards. I can stand up on the framing. It is strong.
This is the finished product. (Note the ever present caffeine dispenser in many of these pictures).
I screwed the roost uprights into the PB frames, then routed out an overlap for the area where the roosts crossed and screwed the roosts to the uprights so they can easily be removed if needed for cleaning or for installing shorter or taller uprights to adjust the roost height over the PBs. The starting height is 10" over the PB.
At this point it was time for cleaning. The entire coop was swept, vacuumed and every original painted surface was scrubbed with a solution of TSP-phosphate free (doesn't that just make it TS then?), rinsed and allowed to dry.
I had an old 5-gallon bucket of Kilz Max primer in the basement from one of my past flips. It was purchased because it is great as an exterior stain blocking primer and also an odor sealant. I used about 4.5 gallons to prime all surfaces of the coop interior and under the exposed overhangs outside.
There was a casualty during exterior priming of the undersides of the overhangs. It couldn't happen to one of the white chickens. It had to happen to Astrid.
A coat of white satin exterior paint went on everything but the floor, PB surface and the bottom of the nest box. Those horizontal surfaces were painted with 2 coats of Porch and Floor paint. I got an "Oops" can at the Home Depot for $9. Yay!
Before I painted the PBs, I caulked between the edges of the board and the framing to keep sand, PDZ and (ahem) other material from getting down into the cracks.
As one can see, I ended up cutting the corner off the brooder in the interest of not ramming a hip into it every time I walked in the coop. The entrance door and the door into the chicken's area swing away from the brooder room. There is not enough space for doors to swing into the brooder room.
Exterior painting was done at this time while the weather was warm enough to cooperate.
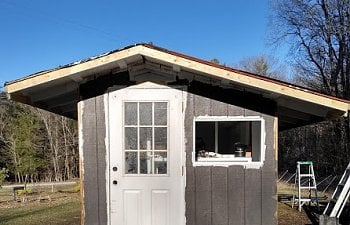
I also decided I'd better get the shingles on the roof so I didn't have to do it when the chicks were in the brooder. I had a box of coil nails left over from yet another flip so I used them even though they were about 1/2" longer than I would have preferred and the points stick a little too far through the decking.
The finished roof with ridge vent.
Once all the painting was done, I wired up the coop. I again had left over wire, electric boxes, staples and light fixtures from, you guessed it, previous flips. The wire is 12/2 run on a 15-amp circuit. Perfectly acceptable, just usually not done. I wasn't going to waste the wire. I still used 15-amp receptacles on the 12 gauge wires.
I installed a ceiling light in the brooder room and one in the coop.
A motion light at the entry door with a dusk to dawn feature was installed next. This light is wired up to control two coach lamps on the north side of the coop.
After locking up the birds for the night, I turn the lights on (all low lumens LED bulbs so I'm burning 9 watts) overnight. That way a quick peek out my deck door tells me all is well with the coop circuit and it serves as a reminder that I did indeed lock up the birds. A peek into the future...
I had left over 1/2" HC from my original coop construction that I cut up and used to secure the soffit openings.
The area that is stapled to the siding will be covered with 1x4 trim boards.
I then stapled HC over the gable end vents, all the window openings and the rest of the brooder enclosure.
I enclosed the area of the brooder closest to the coop door with scrap plywood so it would be better protected from drafts. I installed two 3.5" x 5" slide up doors in the plywood wall between the brooder and the coop for future integration use.
The rest of the partition wall and the door was covered in chicken wire.
After the partition wall was done I built and installed the main and brooder pop doors. Details of their construction and installation are on this page.
Next I finished assembly of the nest box.I used a 48" piano hinge to attach the OSB door and a small latch with carabiner to keep it closed.
I attached chains to the sides to hold it level when I open it to collect eggs.
Oops! Sorry, Amelia! Didn't know you were in there.
At this point, I was pretty much out of time. I had been puttering with stripping the salvaged windows but still had a long way to go before they were ready to install so I ended up eventually cutting cardboard and old tarps to cover the openings to keep drafts from blowing into the coop on cold nights. The chicks were coming and I was anxious for the flock to be moved in. So I prepped the coop for occupancy on Easter Sunday.
I picked up a vinyl tablecloth for $3 and sewed curtains for the front of the nest box. I have about a 4" thick bed of chopped straw in the nest box.
Poop boards covered with about 1/2" of sand/PDZ mixture.
The feed trough hangs off the underside of the front edge of the shorter PB. I will be making a second 6' long trough to hang under the longer PB before the new chicks get integrated into the flock.
I made this waterer out of a TSC bucket I had and some horizontal chicken nipples I bought off Amazon. I already have a thermostatically controlled bird bath heater that I will put in the bucket for the winter. All the chickens drank from it on their first night in the coop.
I cut a hole in the side of an empty jar and screwed it to the wall under the ramp and filled it with crushed egg shells. I also have an OS feeder suspended next to the trough.
The upper barrel bolts on the clean-out doors. The bottoms of the doors are secured with barrel bolts as well.
Next I moved on to trimming out the coop.
For this I used 1x4 furring strips. Each piece was pre-cut and dry fitted then taken into the garage to be primed on all six sides with the Kilz max then painted on all six sides with the same satin white paint I used on the interior of the coop.
All trim was nailed on with 1 1/2" brad nails and the pneumatic brad nailer. I caulked where trim met trim and over the divots of the brads then painted the fronts of the trim a second coat.
I also changed out the old rusty hinges on the clean-out doors and installed some pull handles. I have yet to install the gable fascia boards or paint the eave fascia boards as they are PT deck boards and I want them good and dry before priming and painting to avoid the paint peeling off.
It is not his fault when I had difficulty controlling my knee jerk reactions to his floggings. He frequently went airborne, straight up and sometimes flung backwards a good 6 feet. Sorry bud. One day, Fabio was also flung off of me with a trim board that I blocked him with. Chickens cannot fly backwards. I will also admit that I was fascinated observing Fabio's ninja warrior moves. He is quite agile. Just not agile enough. I have since started scooping him up before things escalate to this level. He rarely gets past the giving me the stink eye phase.
Fabio and I are, at the writing of this article, working on relationship repair. He is starting to come back around. Ah. But we still have the run to build...
") Very cool coop!
Very cool coop! Oooh, a serial story!
") Thank you so much for posting in such detail—it is very generous of you. I'm probably going to owe you brownies or a tea towel or something for stealing so many ideas and design elements!
Thank you so much for posting in such detail—it is very generous of you. I'm probably going to owe you brownies or a tea towel or something for stealing so many ideas and design elements! 

 but I see you are using wood chips. Why did you choose this material? Where did you get your chips from?