This is my dream coop and run that I built in my suburban backyard for my family to enjoy. It's in an awkward space and the run had to be a non-standard shape, but everything turned out great and I'm very happy with it! The coop matches our house, and the run has a very woodsy, natural feel, since it's under some trees and among bushes. I wanted everything to look nice, but to be very practical, too. It was my first time building anything of this scope (though I've built other things before, just for fun). It was a great learning experience. I have documented everything, and organized it here in a bunch of pages, separated by category. I have learned a lot on BYC, including tips on building coops, and have benefited a lot from reading other people's build threads and coop pages. I hope my experience can be useful for someone else, too!
Coop Build - The Plans
Here are my plans. The grid represents 1 foot by 1 foot. The coop is 5'x7', walk-in lean-to style slanting down from about 8' to 7' tall (tall enough to allow for thick bedding and enough head room for my tall husband to walk into). The human door and chicken door are elevated off the floor by quite a bit, to keep the bedding from falling out when the doors are open. I planned on large vents all around the whole perimeter under the roof. I also included a "poop door" in the plans - a floor-level opening where I'd push the bedding out for the big clean-out.


Here's the location - under some big trees for shade:

And the outline of what it should look like:

It's an odd shape because there's a young linden tree in the way, right next to where the coop would be. I planted that tree before I had decided on chickens... I didn't want to move it, so I decided to build around it. And the reason for the diagonal wall is that if I extended that side all the way to the left to make the run a standard shape, there wouldn't be enough room for me to maneuver to and from the coop with a wheelbarrow. It would be too close to the raised garden (left) and the shrubbery. The angled cut into the run would give me more space.
Note: You may notice how close everything is to the property lines there (1 foot), with the retaining wall on one side and chain link fence on the other side. This is an ongoing dispute with the town. One authority says that coops are not regulated, another says that the coop is an accessory structure and needs to be 8 feet from the line... Multiple authority figures have told me the run is fine wherever, but one official said it's not... The property on the other side of the chain link fence changed owners in the middle of construction and the new people are waging war on me right now. There's an appeals process happening at the moment. The town's rules are unclear and different officials are giving people conflicting information. I'm hoping they don't make me move anything... But let this be a warning to anybody building in a densely packed neighborhood and putting anything near your fences: double-triple-quadruple check with all your authorities beforehand, and maybe get their permission in writing in case they later say "well he shouldn't have told you that"
Here's the location - under some big trees for shade:
And the outline of what it should look like:
It's an odd shape because there's a young linden tree in the way, right next to where the coop would be. I planted that tree before I had decided on chickens... I didn't want to move it, so I decided to build around it. And the reason for the diagonal wall is that if I extended that side all the way to the left to make the run a standard shape, there wouldn't be enough room for me to maneuver to and from the coop with a wheelbarrow. It would be too close to the raised garden (left) and the shrubbery. The angled cut into the run would give me more space.
Note: You may notice how close everything is to the property lines there (1 foot), with the retaining wall on one side and chain link fence on the other side. This is an ongoing dispute with the town. One authority says that coops are not regulated, another says that the coop is an accessory structure and needs to be 8 feet from the line... Multiple authority figures have told me the run is fine wherever, but one official said it's not... The property on the other side of the chain link fence changed owners in the middle of construction and the new people are waging war on me right now. There's an appeals process happening at the moment. The town's rules are unclear and different officials are giving people conflicting information. I'm hoping they don't make me move anything... But let this be a warning to anybody building in a densely packed neighborhood and putting anything near your fences: double-triple-quadruple check with all your authorities beforehand, and maybe get their permission in writing in case they later say "well he shouldn't have told you that"
Coop Build - Foundation and Floor
The coop took me all summer and all fall to build, because I had to squeeze it in between having a full time job and two young children. I kept chipping away, and by the time it got too cold to work outside, it was done enough to overwinter (all but a couple small details). I finished the remaining details the following spring, just in time for the chicks to move in! So, busy working people (especially parents) - don't despair, it can be done. It will just take a loooooooong time, so plan far ahead.
First, I gave it a cinder block foundation. Cheap and easy, and good enough. Underneath the blocks there's a layer of sand, for easier leveling of the ground. I also had to pour concrete inside and between some of the blocks to secure them better.

Next to the coop is where I have my compost bin and compost pile (covered with a tarp) with two stages of compost going on. The idea is that the coop will have a "poop flap" at floor level facing the compost area, so that when the time comes for the big coop clean-out, I just open the flap and push all the bedding out of the coop and then rake it over to the compost pile.
The floor, which is basically a torsion box. I built the frame with half lap joints. A bit of extra work, but easy to make and very sturdy. All the frame joints of the whole coop are half laps, actually. This thing was built to last.
The half lap joints, up close and personal:


I used pressure treated 2x4's for all frames, and OSB for all flat surfaces (floor, walls, roof etc.) My coop is 5'x7' because of space constraints (tree, bushes, fences etc.) which is inconvenient because OSB and other sheets are sold in sizes of 4'x8'. To extend the 4' to 5', I had to join two pieces of OSB one foot from the frame, so not over a 2x4. To secure the floating joint, I used biscuits.
Here are some biscuits:

And here's how I used them. I cut the slots for the biscuits with a router.

Lots of wood glue:
I stained the OSB with Behr's Waterproofing Stain and Sealer (solid color stain). I read that stain performs better than paint, because it penetrates into the wood instead of sitting on top of it like paint does, thus offering better protection and durability. It doesn't flake off like paint does. And, to refresh it you can stain on top of it - unlike paint where you have to first scrape the old paint off.
Reverse side. I had a bunch of junk foam I had to get rid of, left over from packaging and other projects. I "hid" it in the floor. This way I get free insulation in the floor, and I don't contribute to the landfill!
Closed it up and stained it with the same stain, and that's it for the floor!
First, I gave it a cinder block foundation. Cheap and easy, and good enough. Underneath the blocks there's a layer of sand, for easier leveling of the ground. I also had to pour concrete inside and between some of the blocks to secure them better.
Next to the coop is where I have my compost bin and compost pile (covered with a tarp) with two stages of compost going on. The idea is that the coop will have a "poop flap" at floor level facing the compost area, so that when the time comes for the big coop clean-out, I just open the flap and push all the bedding out of the coop and then rake it over to the compost pile.
The floor, which is basically a torsion box. I built the frame with half lap joints. A bit of extra work, but easy to make and very sturdy. All the frame joints of the whole coop are half laps, actually. This thing was built to last.
The half lap joints, up close and personal:
I used pressure treated 2x4's for all frames, and OSB for all flat surfaces (floor, walls, roof etc.) My coop is 5'x7' because of space constraints (tree, bushes, fences etc.) which is inconvenient because OSB and other sheets are sold in sizes of 4'x8'. To extend the 4' to 5', I had to join two pieces of OSB one foot from the frame, so not over a 2x4. To secure the floating joint, I used biscuits.
Here are some biscuits:
And here's how I used them. I cut the slots for the biscuits with a router.
Lots of wood glue:
I stained the OSB with Behr's Waterproofing Stain and Sealer (solid color stain). I read that stain performs better than paint, because it penetrates into the wood instead of sitting on top of it like paint does, thus offering better protection and durability. It doesn't flake off like paint does. And, to refresh it you can stain on top of it - unlike paint where you have to first scrape the old paint off.
Reverse side. I had a bunch of junk foam I had to get rid of, left over from packaging and other projects. I "hid" it in the floor. This way I get free insulation in the floor, and I don't contribute to the landfill!
Closed it up and stained it with the same stain, and that's it for the floor!
Coop Build - Walls
All the walls were built like the floor - continuous pieces of 2x4's joined together with half lap joints. Here's the north wall:

Got some shed windows from Amazon:
Found an old door thrown out on somebody's curb. Decided to rescue it and use it for the coop. It needed a lot of work, but it was otherwise solid!
The south wall all framed out. It's stacked on top of the other frames because I didn't have enough working space.
Some wall pieces - also stained with solid color waterproofing stain. Blue to match our house")

With a busy life, a lot of the work got done at night after the kids went to bed... My head lamp was crucial.
Back to the human door. It had some horrible peeling old paint on one side. I tried dissolving it with a paint stripper. Massive fail. Then I tried a manual planer. Another massive fail. Hacked away at it with a chisel and a scraper...
What saved the day was the electric planer, hooked up to a shop vac:
I couldn't get in the cracks so there was a bit of old paint left over, so I decided to paint over it with paint, as the stain would've needed a cleaner surface. I ordered some paint to be mixed in the same color as the solid color stain I used on the interior of the coop, to match (this will be the interior side of the door). Turned out quite nice!
The exterior of the door is black, to match our house, which has a black front door.
I love that I happened to find a door with a window built into it. My original plan was to build a door that would have a window in it, to get more light into the coop. So I found exactly what I needed! One of the panels was broken when I found it, and another one broke as I was hacking away at the old paint (okay maybe I put my foot through it...). I bought two pieces of glass and a special glass cutting kit, followed all the instructions precisely, but the glass still shattered to $#!t, so... I gave up and replaced it with plexiglass instead. The plexiglass was SO much easier to cut!!!! Nice, easy, perfect clean cuts. And now I won't have to worry about it breaking. It does look different after a while, now that the coop has been up for some time... It doesn't shed water and dirt as easily as glass does. So, the two glass panels look nice and clear, while the plexiglass looks kinda cloudy, with dried up dusty raindrops and crap on it... The occasional wipe solves the problem, and I don't think the chickens care either way.
Here's what the door looks like on the coop:
Got some shed windows from Amazon:
Found an old door thrown out on somebody's curb. Decided to rescue it and use it for the coop. It needed a lot of work, but it was otherwise solid!
The south wall all framed out. It's stacked on top of the other frames because I didn't have enough working space.
Some wall pieces - also stained with solid color waterproofing stain. Blue to match our house
With a busy life, a lot of the work got done at night after the kids went to bed... My head lamp was crucial.
Back to the human door. It had some horrible peeling old paint on one side. I tried dissolving it with a paint stripper. Massive fail. Then I tried a manual planer. Another massive fail. Hacked away at it with a chisel and a scraper...
What saved the day was the electric planer, hooked up to a shop vac:
I couldn't get in the cracks so there was a bit of old paint left over, so I decided to paint over it with paint, as the stain would've needed a cleaner surface. I ordered some paint to be mixed in the same color as the solid color stain I used on the interior of the coop, to match (this will be the interior side of the door). Turned out quite nice!
The exterior of the door is black, to match our house, which has a black front door.
I love that I happened to find a door with a window built into it. My original plan was to build a door that would have a window in it, to get more light into the coop. So I found exactly what I needed! One of the panels was broken when I found it, and another one broke as I was hacking away at the old paint (okay maybe I put my foot through it...). I bought two pieces of glass and a special glass cutting kit, followed all the instructions precisely, but the glass still shattered to $#!t, so... I gave up and replaced it with plexiglass instead. The plexiglass was SO much easier to cut!!!! Nice, easy, perfect clean cuts. And now I won't have to worry about it breaking. It does look different after a while, now that the coop has been up for some time... It doesn't shed water and dirt as easily as glass does. So, the two glass panels look nice and clear, while the plexiglass looks kinda cloudy, with dried up dusty raindrops and crap on it... The occasional wipe solves the problem, and I don't think the chickens care either way.
Here's what the door looks like on the coop:
Coop Build - Assembly
I built the floor and the walls off-site on our mini back patio, because that was the only reasonably flat, solid work surface I had. The wall frames were getting quite heavy already, so I decided to hold off on putting the OSB on, until they were assembled on-site. This is the only part of construction that I needed manual help with, so I got my husband and a neighbor to help me move the heavy floor and wall frames to their final location.
There was rain in the forecast, so I put a tarp over it to protect it until the roof goes up:
OSB is up:

I gathered from the BYC experts that ventilation is very important for a healthy coop, so I left plenty. The top half a foot on all the walls is left open.
Here are the vents with the roof on (the roof gets its own page - check it out for the build photos):
There was rain in the forecast, so I put a tarp over it to protect it until the roof goes up:
OSB is up:
I gathered from the BYC experts that ventilation is very important for a healthy coop, so I left plenty. The top half a foot on all the walls is left open.
Here are the vents with the roof on (the roof gets its own page - check it out for the build photos):
Coop Build - Roof
At the time I was building the coop, the house you see in the below photo was in the process of changing owners and there was nobody yet in it. I had no idea what kind of neighbors I'd get, so I wanted to make the coop look pretty, just in case. I gave it a real nice roof with shingles and everything proper. Turns out, it made no difference and they were total a-holes, but oh well... I wanted it to be nice for us and our chickens, too.
I want to add a special thank you to the wonder that is YouTube. That's where I learned how to build roofs (among lots of other things).
Here are some rafters being cut:
And up in their places:
Roof deck:
I put fly rafters all along the rake edges, to support the overhang:
Fascia boards on the roof:
Tar paper:
Drip edge:
And the roof is done!
Coop Build - Details
Now that the basic structure itself has been built, it's time for the fun little details! Trim, latches and so on.
Window and pop door trim:
I had some leftover drip edge flashing, so I decided to cover the exposed edges of the OSB board at the bottom of the pop door. To protect it from the dirty little chicken feet (one is a night shot because that's when I did most of the work...).

That gave me an idea. I bought more white flashing, the extra wide kind, and decided to protect the human doorway in the same way. First I was only going to do it on the bottom, where the wood was already starting to get torn up from me stepping on it. But then I decided to cover all the edges of the doorway. Turned out pretty nice.
Looks even better with the trim on!
All the trim is done:

I bent the hardware cloth on the windows out over the edges of the wider trim, and then sandwiched it with the narrower pieces on the inside of the wide trim frames. Screwed everything in. It's very sturdy. Now I'm thinking I should've gotten 1/2" HC... This here is 1". I thought 1" would be cheaper than 1/2". Turns out it's not. This was a small test roll that only went on the windows and the vents. Everything else (on the run) is 1/2". This being high up - the windows and vents - I'm hoping it will be enough to stop the big critters, and any mice or snakes probably won't make it all the way up there. The windows still have their metal screens, too.
Here's the "poop flap". I would open it at clean out time, to push the bedding out onto the compost pile.
On the inside, I made a little ramp out of leftover triangular pieces, so the bottom of the wall frame wouldn't be in the way:
Pop door:

Hardware cloth and trim on the vents:
It's really starting to take shape!
Cemented the steps together so they wouldn't wobble:
The lock on the human door:
And the exterior of the coop is done! Check out the other pages of my coop article for the interior, and the glamor shots of the whole thing after everything was done
Window and pop door trim:
I had some leftover drip edge flashing, so I decided to cover the exposed edges of the OSB board at the bottom of the pop door. To protect it from the dirty little chicken feet (one is a night shot because that's when I did most of the work...).
That gave me an idea. I bought more white flashing, the extra wide kind, and decided to protect the human doorway in the same way. First I was only going to do it on the bottom, where the wood was already starting to get torn up from me stepping on it. But then I decided to cover all the edges of the doorway. Turned out pretty nice.
Looks even better with the trim on!
All the trim is done:
I bent the hardware cloth on the windows out over the edges of the wider trim, and then sandwiched it with the narrower pieces on the inside of the wide trim frames. Screwed everything in. It's very sturdy. Now I'm thinking I should've gotten 1/2" HC... This here is 1". I thought 1" would be cheaper than 1/2". Turns out it's not. This was a small test roll that only went on the windows and the vents. Everything else (on the run) is 1/2". This being high up - the windows and vents - I'm hoping it will be enough to stop the big critters, and any mice or snakes probably won't make it all the way up there. The windows still have their metal screens, too.
Here's the "poop flap". I would open it at clean out time, to push the bedding out onto the compost pile.
On the inside, I made a little ramp out of leftover triangular pieces, so the bottom of the wall frame wouldn't be in the way:
Pop door:
Hardware cloth and trim on the vents:
It's really starting to take shape!
Cemented the steps together so they wouldn't wobble:
The lock on the human door:
And the exterior of the coop is done! Check out the other pages of my coop article for the interior, and the glamor shots of the whole thing after everything was done
Coop Interior
I saw some nesting boxes with round openings on BYC and really liked the idea. With a goal of 5 hens, I wouldn't need more than 1-2 boxes. So I decided on 2. And I had some fun with the design
The lid has hinges and opens for easier access. I painted the inside black to make it look darker and cozier. I don't have "in use" pictures of the nesting box, in the finished coop, because my chicks aren't laying age yet and I took the nesting box out to give them more space. When they start nearing laying age, I'll put it back in.
I stained the interior with Behr Waterproofing Stain and Sealer like the exterior, but I picked a light, warm yellow color. I put oilcloth on the floor, to protect the wood, because it was cheap and easy to get (through Amazon). It feels quite heavy... I hope it lasts. The coop bedding is pine shavings and I'm keeping them very dry, plus the floor is stained with the waterproofing seal as well.
The poop flap and its ramp:
I ended up getting an auto door - The Happy Henhouse. That wasn't in the plans when I was designing the coop and the pop door framing, so I had to retro-fit it in there... It obscures the window a bit and doesn't look very elegant, but it works. And I can still open and close the window. I was doing this late at night with the head lamp on.. I was tired and frustrated... so I just banged those boards on to drill the motor onto, and didn't see how offset they were until the next morning. Now they will bother me forever, but I just can't bring myself to drag the tools out there to even them out
I installed the auto door's metal frame a little below the level of the bottom wood frame, to prevent little raccoon hands from slipping under the metal door to lift it up. Right now the door slides down behind the wooden frame in front of it.
After I added the additional wood to accommodate the auto door, I ended up with a weird gap between the boards right in the bottom of the doorway. I observed the chickens going in and out to see if it would be a problem. They were mostly okay, but they did occasionally get a toe stuck in the gap. I didn't want to risk it, so I cut a piece of leftover wide flashing (the kind I used for the doorway of the human door) and banged it across both boards, so now the chickens have one solid piece to walk on:
Also, side note - I put the hook half of a hook-and-eye latch on the outside of the pop door, so I can hook it onto the faux ivy mesh outside and keep it from closing. Second side note - the ramp is attached via two hinges, so I can lift it up if I ever need to rake or clean underneath it.
Hung some essentials on the walls:
The kids contributed:
Curtains, because why not:
A WYZE pan cam to spy on them day and night:
A remote temperature sensor so I can monitor things from my desk:

I have been very happy with all 3 of my chicken tech devices - the auto door, the cam, and the temperature sensor. I know they're a bit extra, but I think they are worthy investments. The auto door for letting me sleep in or go away for a day or two, the cam for letting me keep an eye out for trouble (one time it helped me see that a chicken had knocked the lid of the hanging feeder off and had gotten stuck inside the bucket... so I was able to rescue him quickly), and the thermometer for showing me just how awfully hot it gets in there in the summer, even with the giant vents and both windows open all the way! It has prompted me to plan an addition - I want to build a HC-ed screen door in the frame of the human door, so that in the summer I can keep the solid human door open and only have the screen door there, to let more air in and help the coop cool down faster at night. Right now it's summer and 95 degrees in there and my poor babies are panting at night.
A couple practical details - I added a thin strip of wood along the inside of the human door frame where the door was swinging in, to stop it, so it would have something to rest against (it's an outward-opening door), and I added a hook and eye latch so I can secure the door while I'm inside and make sure the chickens don't run out (since the door handles are just handles without any latch like a real door).
.
For roosts, I used thick tree branches and 6" screws to attach them to the roost supports:
I had help spreading the shavings
And here's the finished interior!

The residents approve:
To the left as you walk in, as you can see in one of the above photos, I put a small stump. That's the visitor chair. When I go in for a visit, I sit down on the stump and the chickens hop up to say hi or to take a nap on me
And here are the views from my chicken cam (it has two way sound and can record video, too) -

A note on roost space: there are currently 11 chicks in that coop, but I'm not ultimately keeping all of them. I'll cull the 6 males when the hormones hit and they get too loud and obnoxious. Which will leave me with 5 hens and enough roost space. Until then... they'll be tight on the top roost and when they start falling off, somebody's gonna need to settle for the lower roost until I thin out the flock.
The lid has hinges and opens for easier access. I painted the inside black to make it look darker and cozier. I don't have "in use" pictures of the nesting box, in the finished coop, because my chicks aren't laying age yet and I took the nesting box out to give them more space. When they start nearing laying age, I'll put it back in.
I stained the interior with Behr Waterproofing Stain and Sealer like the exterior, but I picked a light, warm yellow color. I put oilcloth on the floor, to protect the wood, because it was cheap and easy to get (through Amazon). It feels quite heavy... I hope it lasts. The coop bedding is pine shavings and I'm keeping them very dry, plus the floor is stained with the waterproofing seal as well.
The poop flap and its ramp:
I ended up getting an auto door - The Happy Henhouse. That wasn't in the plans when I was designing the coop and the pop door framing, so I had to retro-fit it in there... It obscures the window a bit and doesn't look very elegant, but it works. And I can still open and close the window. I was doing this late at night with the head lamp on.. I was tired and frustrated... so I just banged those boards on to drill the motor onto, and didn't see how offset they were until the next morning. Now they will bother me forever, but I just can't bring myself to drag the tools out there to even them out
I installed the auto door's metal frame a little below the level of the bottom wood frame, to prevent little raccoon hands from slipping under the metal door to lift it up. Right now the door slides down behind the wooden frame in front of it.
After I added the additional wood to accommodate the auto door, I ended up with a weird gap between the boards right in the bottom of the doorway. I observed the chickens going in and out to see if it would be a problem. They were mostly okay, but they did occasionally get a toe stuck in the gap. I didn't want to risk it, so I cut a piece of leftover wide flashing (the kind I used for the doorway of the human door) and banged it across both boards, so now the chickens have one solid piece to walk on:
Also, side note - I put the hook half of a hook-and-eye latch on the outside of the pop door, so I can hook it onto the faux ivy mesh outside and keep it from closing. Second side note - the ramp is attached via two hinges, so I can lift it up if I ever need to rake or clean underneath it.
Hung some essentials on the walls:
The kids contributed:
Curtains, because why not:
A WYZE pan cam to spy on them day and night:
A remote temperature sensor so I can monitor things from my desk:
I have been very happy with all 3 of my chicken tech devices - the auto door, the cam, and the temperature sensor. I know they're a bit extra, but I think they are worthy investments. The auto door for letting me sleep in or go away for a day or two, the cam for letting me keep an eye out for trouble (one time it helped me see that a chicken had knocked the lid of the hanging feeder off and had gotten stuck inside the bucket... so I was able to rescue him quickly), and the thermometer for showing me just how awfully hot it gets in there in the summer, even with the giant vents and both windows open all the way! It has prompted me to plan an addition - I want to build a HC-ed screen door in the frame of the human door, so that in the summer I can keep the solid human door open and only have the screen door there, to let more air in and help the coop cool down faster at night. Right now it's summer and 95 degrees in there and my poor babies are panting at night.
A couple practical details - I added a thin strip of wood along the inside of the human door frame where the door was swinging in, to stop it, so it would have something to rest against (it's an outward-opening door), and I added a hook and eye latch so I can secure the door while I'm inside and make sure the chickens don't run out (since the door handles are just handles without any latch like a real door).
For roosts, I used thick tree branches and 6" screws to attach them to the roost supports:
I had help spreading the shavings
And here's the finished interior!
The residents approve:
To the left as you walk in, as you can see in one of the above photos, I put a small stump. That's the visitor chair. When I go in for a visit, I sit down on the stump and the chickens hop up to say hi or to take a nap on me
And here are the views from my chicken cam (it has two way sound and can record video, too) -
A note on roost space: there are currently 11 chicks in that coop, but I'm not ultimately keeping all of them. I'll cull the 6 males when the hormones hit and they get too loud and obnoxious. Which will leave me with 5 hens and enough roost space. Until then... they'll be tight on the top roost and when they start falling off, somebody's gonna need to settle for the lower roost until I thin out the flock.
Run Build - Plans and Footings
The run had to be an irregular shape, to accommodate the tree that was in my way, as well as to work with the proximity of the raised garden and the shrubbery. I considered making it a regular rectangle/square with a "tunnel" connecting it to the coop, behind the young tree, but that would've reduced its total area. I wanted to make use of all the space I had, and give the chickens every last square foot. So I went ahead with the irregular shape. I like a good challenge anyway!
The run is 8' tall in the front and 6' tall in the back. It has a clear polycarbonate roof.
Here are the plans. The grid represents 1'x1' and everything is to scale.

Here's a version with the polycarbonate roofing laid on top (the dashed line is where I cut the panels. I used a piece of the leftover roofing material to patch up the rectangular hole).

I built a scale model to help me visualize it. The grid is 1"x1", representing 1'x1'. The posts would be 8' along the front of the run, and 6' along the back, with the short connector section next to the coop itself 6' on both front and back. To give the roof a bit of a slant for drainage, but to avoid getting longer pieces of wood and hitting the branches of the linden tree (6' was about as high as I could go without cutting branches), I used 6' for the front as well, but I layered two pieces of wood for the top plate on the front, and only one on the back. Now that little section of roof has enough of a slant to shed rain, and if snow doesn't want to slide down easily, I can always push it down with a rake. It's a very small section of roof and, because it's only 6' tall, it's easily reachable with a short ladder or step stool.
It doesn't have rafters or even all the vertical supports, but I mostly wanted to see what the shape would look like and how the big pieces would connect. This really helped me see that the two different roof angles - of the main section and of the small section next to the coop - were actually not too different, and with the polycarbonate roofing panels being flexible, I'd be able to just bend them a little and cover everything, without needing to use the diagonal section as a separate angled slope to connect between the two. It ended up working out fine.
The outline in context:
Work is starting! (the kids wanted to "help", so their things are all over the place)
I dug the holes for the support posts with a one-man auger. Very unfair name. It was a one-woman auger this time.
The holes are 24" deep. Technically they need to be deeper than the frost line, and our frost line is at 30+ inches, but the auger only goes so deep. And there was no way I could dig any deeper by hand. So it's gonna have to be enough. It was incredibly difficult to dig because our soil is very rocky, and because my run is at the base of a giant tree, with roots as thick as my thigh right where I needed to dig. In some places, I wasn't able to dig at all. So, some of the supports have the 2' in-ground footers, and the others where I wasn't able to dig, have these footer blocks instead:

Trusty BYC builder members advised me not to sink the posts themselves into the ground (like I see so many people do in Youtube tutorials), because the wood would rot. Rather, they advised me to use fence post anchors instead, and that's what I did. Very good advice.
The ground was very uneven, so in some places I had to pile up the concrete to lift the supports a bit (they were all the same height - 8' in the front and 6' in the back). To keep the concrete from spilling over, I used a thin plastic flower pot, the kind that plants are sold in. After the concrete hardened, I just peeled the plastic pot away.
For the pre-made concrete footer blocks, I did sink them into the ground some, for extra stability:
After the concrete had set, I put in the 4x4 posts.
To give the posts in the pre-made footer blocks better support, I drilled a long 6" bolt into the underside of each of them, sticking out about 4", like this:
The footer blocks have round holes about 2-3" in diameter in the middle of the square post hole, like this:
I filled the round hole with concrete, leaving a thin layer of it on the bottom of the square hole as well, and stuck the post in the square post hole, with the bolt going 4" down into the wet concrete. When the concrete cured, the post felt very stable (it was wobbly before).
That's it for the footers. Check out the next section for the fence part.
The run is 8' tall in the front and 6' tall in the back. It has a clear polycarbonate roof.
Here are the plans. The grid represents 1'x1' and everything is to scale.
Here's a version with the polycarbonate roofing laid on top (the dashed line is where I cut the panels. I used a piece of the leftover roofing material to patch up the rectangular hole).
I built a scale model to help me visualize it. The grid is 1"x1", representing 1'x1'. The posts would be 8' along the front of the run, and 6' along the back, with the short connector section next to the coop itself 6' on both front and back. To give the roof a bit of a slant for drainage, but to avoid getting longer pieces of wood and hitting the branches of the linden tree (6' was about as high as I could go without cutting branches), I used 6' for the front as well, but I layered two pieces of wood for the top plate on the front, and only one on the back. Now that little section of roof has enough of a slant to shed rain, and if snow doesn't want to slide down easily, I can always push it down with a rake. It's a very small section of roof and, because it's only 6' tall, it's easily reachable with a short ladder or step stool.
It doesn't have rafters or even all the vertical supports, but I mostly wanted to see what the shape would look like and how the big pieces would connect. This really helped me see that the two different roof angles - of the main section and of the small section next to the coop - were actually not too different, and with the polycarbonate roofing panels being flexible, I'd be able to just bend them a little and cover everything, without needing to use the diagonal section as a separate angled slope to connect between the two. It ended up working out fine.
The outline in context:
Work is starting! (the kids wanted to "help", so their things are all over the place)
I dug the holes for the support posts with a one-man auger. Very unfair name. It was a one-woman auger this time.
The holes are 24" deep. Technically they need to be deeper than the frost line, and our frost line is at 30+ inches, but the auger only goes so deep. And there was no way I could dig any deeper by hand. So it's gonna have to be enough. It was incredibly difficult to dig because our soil is very rocky, and because my run is at the base of a giant tree, with roots as thick as my thigh right where I needed to dig. In some places, I wasn't able to dig at all. So, some of the supports have the 2' in-ground footers, and the others where I wasn't able to dig, have these footer blocks instead:
Trusty BYC builder members advised me not to sink the posts themselves into the ground (like I see so many people do in Youtube tutorials), because the wood would rot. Rather, they advised me to use fence post anchors instead, and that's what I did. Very good advice.
The ground was very uneven, so in some places I had to pile up the concrete to lift the supports a bit (they were all the same height - 8' in the front and 6' in the back). To keep the concrete from spilling over, I used a thin plastic flower pot, the kind that plants are sold in. After the concrete hardened, I just peeled the plastic pot away.
For the pre-made concrete footer blocks, I did sink them into the ground some, for extra stability:
After the concrete had set, I put in the 4x4 posts.
To give the posts in the pre-made footer blocks better support, I drilled a long 6" bolt into the underside of each of them, sticking out about 4", like this:
The footer blocks have round holes about 2-3" in diameter in the middle of the square post hole, like this:
I filled the round hole with concrete, leaving a thin layer of it on the bottom of the square hole as well, and stuck the post in the square post hole, with the bolt going 4" down into the wet concrete. When the concrete cured, the post felt very stable (it was wobbly before).
That's it for the footers. Check out the next section for the fence part.
Run Build - Fence
A kind former chicken owner in my neighborhood was dismantling her setup and gave me her welded iron fencing panels for free. Looked like a great deal! The panels' holes are 2"x 2", so that worried me, but I decided to go for it anyway, as covering that much area with hardware cloth would've been too expensive. I covered about 18" along the bottom of the fence with 1/2" HC, bent it down and covered 18" along the ground as well, as an apron for digging predators. The coop has both an auto pop door and a manual pop door, so I'm hoping the chickens will be safe at night, and anything smaller than 2" won't risk it during the day... I'm in the city so, while we do have critters, it's not as bad as being out in the woods/country.
Here are the fence panels I inherited. I used their dimensions to plan out the spacing of the wooden posts and everything else in the run frame, so the run walls are in multiples of the dimensions of these panels. I ended up covering all the walls of the run with the fence panels and everything fit perfectly, even the angled diagonal wall, and only had to patch up with HC for the rectangular shapes under the roof.

I attached them to the wooden posts with galvanized pipe hanger tape - a genius invention I only discovered recently, and which I have since used for a whole bunch of other things!
As you can see in that photo, I drilled two 2x4's into the coop wall (they're drilled into the 2x4's of the wall frame for better security) to act as the run connection to the coop.
First couple of panels are up:
Making progress:
The diagonal wall. I'm very pleased with how the fence panels fit perfectly everywhere and I was able to cover the whole perimeter with them (they were an awkward size... 3.80 x 4.10 feet or something random like that).
Hardware cloth along the bottom of the wall and on the ground. I secured it to the fence panels with 14 ga. wire twists. I pinned the HC down with garden staples. I think I used something ridiculous like 200 staples for the apron, but better safe than sorry! They come in large packs anyway.
Under the door, too:
The chickens moved in before I was 100% finished with the run, and they enjoyed "helping" me through the fence They crowded around me to check out what I was doing, and to try to peck at the spinning drill bit. These chicks grew up in my house with young children and there is no sound in the world that can startle or scare them! I can mow the lawn inches from them on the other side of the fence and they won't budge.
I spray-painted the HC black to make it "disappear". It looks SO much better now!! Here's a before-and-after shot to demonstrate the difference:
Just like with the coop, I wanted the run to be a good-looking structure, so I stained the wooden frame a dark brown color (with my favorite Behr Waterproofing Stain and Sealer, only not a solid color this time, but a semi-transparent brown so you can still see the nice wood grain). And I painted all the metal strips and brackets black (with RustOleum paint meant for metal) to make everything look extra nice!
And, since I'm already going extra, I also spray-painted all the exposed concrete brown, so it would blend better with the wood and the ground and would be less ugly:
Check out all those nice browns! ?

I also want to point out another little detail. In the above photo, there's a wooden board under the door. The door opens inward, and the purpose of that board is to make it easier for the door to open when the run litter starts to add up, or when the chickens have kicked a pile against the door. The board slides down on tracks and can be lifted up and removed, so that I can go into the run with the wheelbarrow. I've had to do that a few times already and I'm so glad I have the board there, and that it's removable.
Here's the diagonal wall, all done. It's hard to see because of all the vegetation, but everything fits perfectly, all gaps are covered with HC, and I'm very happy with it! Not as easy as having a simple rectangle, but it wasn't particularly hard either, and I'm glad that I (and the chickens) have the extra space now.
And the door. The black HC improves visibility so much! And looks so much nicer!

The door lock:
I put a hook and eye latch on the inside of the door, so it can be secured when I'm inside. The door is heavy and swings in to close itself if you forget to close it, but I wanted the extra security. When the door is fully open, it touches the fence on the other side and you can hook the hook of the latch onto the fence panels, to keep the door open - convenient when I need to go in with the wheelbarrow and need it to stay open, without bringing a bungie cord or something else to tie it with.
A final touch on the fence is that I put faux ivy all along the back wall of the fence, to give the run a nice backdrop:
And the fence is done! Check out the next section for the roof build.
Here are the fence panels I inherited. I used their dimensions to plan out the spacing of the wooden posts and everything else in the run frame, so the run walls are in multiples of the dimensions of these panels. I ended up covering all the walls of the run with the fence panels and everything fit perfectly, even the angled diagonal wall, and only had to patch up with HC for the rectangular shapes under the roof.
I attached them to the wooden posts with galvanized pipe hanger tape - a genius invention I only discovered recently, and which I have since used for a whole bunch of other things!
As you can see in that photo, I drilled two 2x4's into the coop wall (they're drilled into the 2x4's of the wall frame for better security) to act as the run connection to the coop.
First couple of panels are up:
Making progress:
The diagonal wall. I'm very pleased with how the fence panels fit perfectly everywhere and I was able to cover the whole perimeter with them (they were an awkward size... 3.80 x 4.10 feet or something random like that).
Hardware cloth along the bottom of the wall and on the ground. I secured it to the fence panels with 14 ga. wire twists. I pinned the HC down with garden staples. I think I used something ridiculous like 200 staples for the apron, but better safe than sorry! They come in large packs anyway.
Under the door, too:
The chickens moved in before I was 100% finished with the run, and they enjoyed "helping" me through the fence
They crowded around me to check out what I was doing, and to try to peck at the spinning drill bit. These chicks grew up in my house with young children and there is no sound in the world that can startle or scare them! I can mow the lawn inches from them on the other side of the fence and they won't budge.
I spray-painted the HC black to make it "disappear". It looks SO much better now!! Here's a before-and-after shot to demonstrate the difference:
Just like with the coop, I wanted the run to be a good-looking structure, so I stained the wooden frame a dark brown color (with my favorite Behr Waterproofing Stain and Sealer, only not a solid color this time, but a semi-transparent brown so you can still see the nice wood grain). And I painted all the metal strips and brackets black (with RustOleum paint meant for metal) to make everything look extra nice!
And, since I'm already going extra, I also spray-painted all the exposed concrete brown, so it would blend better with the wood and the ground and would be less ugly:
Check out all those nice browns! ?
I also want to point out another little detail. In the above photo, there's a wooden board under the door. The door opens inward, and the purpose of that board is to make it easier for the door to open when the run litter starts to add up, or when the chickens have kicked a pile against the door. The board slides down on tracks and can be lifted up and removed, so that I can go into the run with the wheelbarrow. I've had to do that a few times already and I'm so glad I have the board there, and that it's removable.
Here's the diagonal wall, all done. It's hard to see because of all the vegetation, but everything fits perfectly, all gaps are covered with HC, and I'm very happy with it! Not as easy as having a simple rectangle, but it wasn't particularly hard either, and I'm glad that I (and the chickens) have the extra space now.
And the door. The black HC improves visibility so much! And looks so much nicer!
The door lock:
I put a hook and eye latch on the inside of the door, so it can be secured when I'm inside. The door is heavy and swings in to close itself if you forget to close it, but I wanted the extra security. When the door is fully open, it touches the fence on the other side and you can hook the hook of the latch onto the fence panels, to keep the door open - convenient when I need to go in with the wheelbarrow and need it to stay open, without bringing a bungie cord or something else to tie it with.
A final touch on the fence is that I put faux ivy all along the back wall of the fence, to give the run a nice backdrop:
And the fence is done! Check out the next section for the roof build.
Run Build - Roof
The run has a clear polycarbonate roof. The chicken area is under trees and very shady and pleasant in the summer, so I didn't need extra shade. On the contrary - it can get a bit gloomy back there, so I wanted them to have light in the summer. And, of course, light in the winter was a bit thing, too, as our winters are long.
I decided to use 2x4's for the rafters, instead of the usual recommendations for 2x6 or 2x8, because they are more manageable and I was building this on my own. The roof was going to have a nice pitch, and the slick polycarbonate should shed water and snow easily. Also because we rarely get snow anymore, and will keep getting less and less in the future.
Rafters going up:
I used post brackets to attach the vertical 4x4 posts to the horizontal 4x4 top plates, and hurricane ties to attach the rafters to the top plates. The ground was uneven and my last two sections of fencing panels came up just a little higher than the previous ones, so I cut across the top plate a bit to make up for the difference.
The awkward angle section where the diagonal wall connects to the coop side wall of the fence. I had to bungie the boards together because clamps were useless there. I used a 6" screw, because brackets were useless, too.
I used 1x3 furring strips as purlins, and I stained them with the same dark brown stain (later stained the rafters, too - everything):
Polycarbonate panels going up:
I clamped the end strips down to keep them from lifting up as the screw was going in:
And the roof is done! Everything got covered, and everything fits
Here’s the diagonal section:
And the short section by the coop:
I covered all the gaps all the way around with 1/2" hardware cloth (spray painted black), and painted all the brackets and hardware black, too. I'm very happy with how it turned out!
Check out the next page for some fun extras I added to the interior of the run.
Note: You may wonder if the runoff from the roof goes into the neighbor’s yard. It does not.The roof drips into the space between the run and the privacy fence I put up there, and flows back towards our lawn because their yard has been raised and is higher than ours. They did try to claim runoff issues (we’re at war over the chickens because the neighbor doesn’t like animals and is trying to get the town to make restrictions stricter), but the torrential rains of this week have clearly demonstrated the path water takes by dragging the mulch around the run down towards our lawn, away from the neighbors. I made a video showing the slope going from their yard towards ours and the trenches the water has dug, carrying material away from the run and into the center of our yard where the lowest point is, and I sent the video to the town.
Run Interior
I wanted to make the chickens' habitat fun and engaging, so I added a few "toys" for them (some of them I built, because I love building and need every excuse I can find!) The space came with its own built-in feature - a forsythia bush, which the chickens love! They spent their first few weeks in the run chilling under the overhanging branches and eating all the leaves they could reach. Here they are, while the bush still had chicken-level leaves:
They've destroyed those now, but the bush is big enough that it still provides them with plenty of cool shade and branches to climb through:
I gave them a few stumps to climb on as well. They double as visitor stools, for us to sit on when we go in to hang out with the chickens:
In the above picture you can also see the faux ivy wall at the back of the run. I really wanted the space to have a woodsy, natural look to it (inspired by the trees and shrubs it's nestled between and under). Hence why the dark wood stain and black-painted mesh and hardware, too. I wanted it to look good. So I found natural-looking planters to use as containers as well - a fake log as their outdoor drinker (I covered the inside with silicone to make it safe to drink from, in case the material it's made of leaches anything into the water), and a smaller fake log planter to serve as their grit container. That one fits a 4" flower pot, so I put a pot inside to keep them from pecking the fake log material (hard foam) as they're trying to get the grit. It's been several weeks and neither container itself has been pecked yet, so I'm feeling hopeful about them not trying to eat the containers themselves.

Now, for the things I built. I found a guy in my neighborhood who was trying to get rid of a fallen tree he'd cut up. So I took about three trunkfuls.
And I built the chicks a log jungle gym:

I used my new favorite galvanized pipe hanger tape to hold the logs together. With a lot of screws drilled through a lot of holes, I was able to get really tight joints, and the whole structure feels very secure. I also put large 6" L brackets on the bottom of the two vertical logs, on the front, to keep it from ever tipping forward, but the long diagonal log should stop it from doing that anyway. In the above photos, you can still see the metal pieces and it really bothers me... I have since painted them brown to hide them... But these are my nicer photos of the setup with chickens on it, so they'll have to do for now. I do also have these couple of pictures, where you can see how much better the metal strips look now:
The chickens love climbing on it and resting on it. My little kids love arranging the chickens on the branches, and the chickens actually oblige and stay where they've been placed. In the second photo of the setup, the chickens are in the configuration my 4-year-old gave them
I also use the jungle gym to tie fresh cut branches to for the chickens to eat some greens. I have a lot of overgrown shrubbery, so every couple of days I give them a fresh bunch of greens to eat, and they like climbing up to reach from different angles.
One of them even figured out how to use the tallest branch to get to the too-high-to-reach leaves on the forsythia:
Here's another photo just for fun I love how green everything looks (real and fake ") )
)
Another thing I built for them is a dust bath. I'd been inspired by one of my kids' favorite local playgrounds and its sand box, which has logs going all the way around it for the kids to climb on:
So I built a miniature version for my chickens. The logs are held together with a loop of (yes, again!) my favorite galvanized hanger tape, drilled into the logs along the inner circle on the sand side. The chickens love climbing on it and scratching through the sand, but, alas... I have never seen them dust bathe in it They are like little kids. You get them a nice toy, and they want to play with the wrapping paper instead. So my chickens dust bathe in the dirt, and only poop in the sand box...
I'm also going to hang a chicken swing at some point, but I haven't gotten to that yet.
And one last extra - I gave the run an outdoor camera so I could spy on the chickens wherever they go! It's hard to see in the picture, but I cut a piece of leftover roofing material and bent it in that space between the roof and the top plate, so that the camera and its cords are protected from any horizontal rain/snow blowing under there in a storm. We've had some heavy rainstorms this week, and the camera is still working!
It doesn't pan, but it covers enough that I can see almost the whole run - all but a couple inches along the far edges. I can zoom from its phone app. Here's my view during the day:
And at night:
And that is the interior of my run! The chickens seem very happy, and my family has been very happy spending time with them in there.
I've pulled my best shots of the whole setup, coop and run, together in the next section - the glamor shots!
They've destroyed those now, but the bush is big enough that it still provides them with plenty of cool shade and branches to climb through:
I gave them a few stumps to climb on as well. They double as visitor stools, for us to sit on when we go in to hang out with the chickens:
In the above picture you can also see the faux ivy wall at the back of the run. I really wanted the space to have a woodsy, natural look to it (inspired by the trees and shrubs it's nestled between and under). Hence why the dark wood stain and black-painted mesh and hardware, too. I wanted it to look good. So I found natural-looking planters to use as containers as well - a fake log as their outdoor drinker (I covered the inside with silicone to make it safe to drink from, in case the material it's made of leaches anything into the water), and a smaller fake log planter to serve as their grit container. That one fits a 4" flower pot, so I put a pot inside to keep them from pecking the fake log material (hard foam) as they're trying to get the grit. It's been several weeks and neither container itself has been pecked yet, so I'm feeling hopeful about them not trying to eat the containers themselves.
Now, for the things I built. I found a guy in my neighborhood who was trying to get rid of a fallen tree he'd cut up. So I took about three trunkfuls.
And I built the chicks a log jungle gym:
I used my new favorite galvanized pipe hanger tape to hold the logs together. With a lot of screws drilled through a lot of holes, I was able to get really tight joints, and the whole structure feels very secure. I also put large 6" L brackets on the bottom of the two vertical logs, on the front, to keep it from ever tipping forward, but the long diagonal log should stop it from doing that anyway. In the above photos, you can still see the metal pieces and it really bothers me... I have since painted them brown to hide them... But these are my nicer photos of the setup with chickens on it, so they'll have to do for now. I do also have these couple of pictures, where you can see how much better the metal strips look now:
The chickens love climbing on it and resting on it. My little kids love arranging the chickens on the branches, and the chickens actually oblige and stay where they've been placed. In the second photo of the setup, the chickens are in the configuration my 4-year-old gave them
I also use the jungle gym to tie fresh cut branches to for the chickens to eat some greens. I have a lot of overgrown shrubbery, so every couple of days I give them a fresh bunch of greens to eat, and they like climbing up to reach from different angles.
One of them even figured out how to use the tallest branch to get to the too-high-to-reach leaves on the forsythia:
Here's another photo just for fun
I love how green everything looks (real and fake )
Another thing I built for them is a dust bath. I'd been inspired by one of my kids' favorite local playgrounds and its sand box, which has logs going all the way around it for the kids to climb on:
So I built a miniature version for my chickens. The logs are held together with a loop of (yes, again!) my favorite galvanized hanger tape, drilled into the logs along the inner circle on the sand side. The chickens love climbing on it and scratching through the sand, but, alas... I have never seen them dust bathe in it
They are like little kids. You get them a nice toy, and they want to play with the wrapping paper instead. So my chickens dust bathe in the dirt, and only poop in the sand box...
I'm also going to hang a chicken swing at some point, but I haven't gotten to that yet.
And one last extra - I gave the run an outdoor camera so I could spy on the chickens wherever they go! It's hard to see in the picture, but I cut a piece of leftover roofing material and bent it in that space between the roof and the top plate, so that the camera and its cords are protected from any horizontal rain/snow blowing under there in a storm. We've had some heavy rainstorms this week, and the camera is still working!
It doesn't pan, but it covers enough that I can see almost the whole run - all but a couple inches along the far edges. I can zoom from its phone app. Here's my view during the day:
And at night:
And that is the interior of my run! The chickens seem very happy, and my family has been very happy spending time with them in there.
I've pulled my best shots of the whole setup, coop and run, together in the next section - the glamor shots!
Glamor Shots and Conclusion
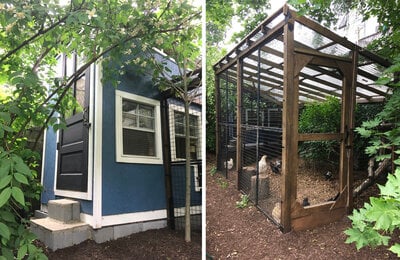
Here's my whole setup in all its glory! I'm very happy with how it turned out. I wanted to make it nice to look at, since it's in my suburban backyard and I'd have to look at it every day. The run has a woodsy feel to it which I love. The coop matches our house. Both coop and run have been built with practicality in mind, and I'm enjoying the useful little details. The chickens have been happy there so far, and my family has been happy to spend time with them in their home!
One thing I would've done differently, and which I'm planning on building soon, is EVEN more ventilation in the coop. It has a lot already, but summer here gets HOT and humid, and the chickens are panting at night even with both of the big windows open, and all the big vents. So I'm planning on building a HC screen door in addition to the human door, so that in the summer I can prop the human door open and only have the screen door in that space (maybe have it be wooden/opaque on the bottom so the chickens don't get spooked looking at the raccoons circling them). I might have done the window in the door differently, if I'd known - made that HC with plexiglass on top, so it can be opened in the summer and closed in the winter... Word of advice to anybody who has summers - plan for lots of things to open!
And now, here are the glamor shots!

And one before the run went up and the vegetation leafed out to hide half the coop... Here's the whole coop!
One thing I would've done differently, and which I'm planning on building soon, is EVEN more ventilation in the coop. It has a lot already, but summer here gets HOT and humid, and the chickens are panting at night even with both of the big windows open, and all the big vents. So I'm planning on building a HC screen door in addition to the human door, so that in the summer I can prop the human door open and only have the screen door in that space (maybe have it be wooden/opaque on the bottom so the chickens don't get spooked looking at the raccoons circling them). I might have done the window in the door differently, if I'd known - made that HC with plexiglass on top, so it can be opened in the summer and closed in the winter... Word of advice to anybody who has summers - plan for lots of things to open!
And now, here are the glamor shots!
And one before the run went up and the vegetation leafed out to hide half the coop... Here's the whole coop!