Recently my 30 pound hanging feeder broke. I had the metal kind from Tractor Supply and the metal rusted and the hooks that hold the bottom to the top and keep the feeder elevated from the base broke right off, rendering it useless. I of course didn't want to buy another one and spend $20 on a feeder that was only going to last a year and cause me a lot of aggravation in that time by coming apart, rusting, etc, so I decided to create my own.
I started by gathering supplies. Here is what you will need:
To make the feeder you will need a drill with a hole saw, a drill bit, and possibly a pair of pliers. For parts you will need:
5 gallon bucket - you may be able to pick this up free at a local restaurant if you ask for their old pickle buckets. Otherwise, they are $4 at Tractor Supply.
Rubber feed dish - $6 OR metal feed dish - $5 (these need to be big enough that they are wider than the bottom of your bucket)
Bolt and nut (optional) - $0.30
Bucket lid (optional) $1.50
To make the feeder:
Start with your bucket. I recycled one I was using as a nesting box before I replaced it. Use your drill bit or a screw to make a guide hole for the drill bit in your hole saw. Drill a hole. Be careful to estimate the size of your hole saw and how the hole will sit on your bucket before you do this. If you are off a little bit it won't matter because the extra hole will just come off with the plastic the hole saw removes anyway. You want to create your hole as close to the bottom of your bucket as possible so that no feed is stuck in the bottom when the feeder gets close to empty. I used a one inch hole saw, but other sizes will work too. Using the guide hole, line up your hole saw and create the first hole. If your hole saw gets stuck, just reverse the drill for a second and then go at it again. It will eventually go through and you will end up with this:
Make as many holes as you would like. I did four around the whole the bucket so that the feed would come out on all sides. Your finished product will look something like this:
If you'd like, you can stop here if you don't care that your feeder isn't attached to the base. If you don't care about that, you can use the metal feed dish. Otherwise you will need the rubber kind. If you do want the two parts of your feeder to be attached, carry on to the next step.
Take your rubber feed dish and using your drill bit make a hole in the bottom for your bolt. Try to use a drill bit that is similar in size to your bolt. Once the hole is made, put the bolt through it from the bottom of the dish. I was able to use my drill to get the bolt the rest of the way in and then I used pliers to tighten it up. When that is done it will look like this:
Next drill a matching hole in the center of the bottom of your bucket. I did mine a little off center since there was a little protruding plastic and it didn't affect it at all:
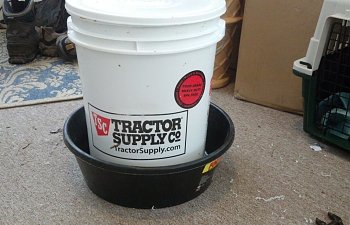
Now go ahead and slide your bucket onto the bolt in your feed dish and tighten the nut onto it. When done it will look like this:
And that's it! Your feeder is done. Now fill it up for your birds to enjoy. Pop the lid on to keep the birds and the elements out.
A note: the size rubber feed dish I used for this doesn't leave a lot of space between the bucket and the edge of the dish. I did this on purpose to keep my chickens from scratching the feed out. They have no trouble reaching in. However, ducks do have trouble getting in there and getting the feed out. To solve this either go with a bigger rubber feed dish or go with the metal pan option if you don't mind not being able to hang it. I have a separate one of these with the metal pan for my ducks and geese.