The Bantam Tractor.


So the reason for this coop/chicken tractor is that I wanted a small easy to move coop for Japanese bantams. I believe it would be good for any bantam's needs especially those with feathered feet or very low to the ground and hard to keep clean.
The design!


I wanted it to be light enough to move but tall enough that I can get in to for maintenance and upkeep. I settled on a 4'x4' footprint and 5' tall. I debated on putting the nest box on the inside but decided to maximize the foraging space inside the coop and placed it to the outside. I thought this would be good for a small breeding group of bantams if moved every couple of days. Also may be used as a grow out for young chicks.
______________________________________
Materials:
At least 16' salt treated of 2x4" for the base.
For the rest of the build you can use regular non treated lumber as long as you are going to seal or paint the wood. If not use all salt treated lumber for all on the construction.
One sheet plywood or outside siding material (I used a sheet of 3/8" T1-11 with primer.)
Wire cloth. (I used 1/4" because that's what I had but I would recommend 1/2" for better durability and predator proofing.)
screws: I used 1 5/8" and 3" drywall screws for the structure, 1 1/4" metal roofing screws, and 1" stainless screws with washers for the wire.
Wheels and bolts for the wheels. I used two old lawnmower wheels I had laying around and 4, 2"x3/8" carriage bolts to secure them to the structure.
2 pieces of tin 8' long and something to use as a ridge cap. I used a pice of metal and just bent it myself to use but you could buy ridge cap.
henges and fasters. I used 4 door henges I had and 3 smaller cabinet hinges for the best box. For the doors I also used 3 barrel latches and a lock clasp for the nest box.
Optional: flag of your choice for decoration!
_____________________________________
The build.
Always start with a good foundation!
I used a reclaimed 16' 2x4" salt treated board.
Note: all wood in this build is reclaimed wood. The only new components are the tin, paint, hardware cloth, and hardware.

I made the foundation this way for structural integrity. I put a 48" board in the bad, two 46.5" sides attached to that and a 45" board in-between on the front. The reason for that is so that the side supports bridge the seams where they come together.

In the back the two 17" legs and in the front the two angle toped 23.5" pieces.
Note: (the Angle for that cut is 34° and it is 23.5" long to the tip.)
After that I built the rafters because my chop saw was set on the angle I needed (34°). The rafters are 48" but could be a little longer if you want more overhang. I figured for around 3".

Also a good place to note that I drilled and countersunk most all these holes so that I did now crack my lumber.

Also countersinking the tops of the doors will prevent issues with screw heads sticking up above the wood.
Next I tested the rafters on the end to make sure my angels was cut right.
Note here. (I had to take the back one back off because I forgot to put in the upper side pieces that went under the cross piece )
)


Attached the side pieces that the tin will attach to. Starting to look like something now!
Next I attached the back panel and made the front doors.

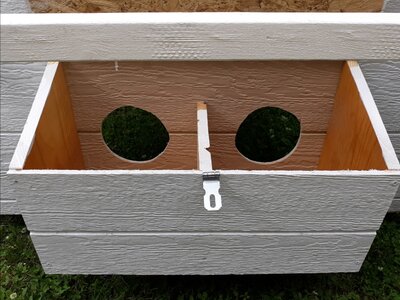
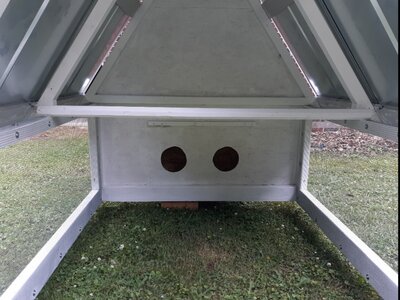
Here you see where I cut out holes for entering the nest boxes.
Note: I placed this piece in the front to trace my cut angles and then notched out for the handles. It was a decent fit but honestly was a bit off.
The doors turned out nice but I did have to trim a little extra off from the original design to leave enough gap for the doors to work.
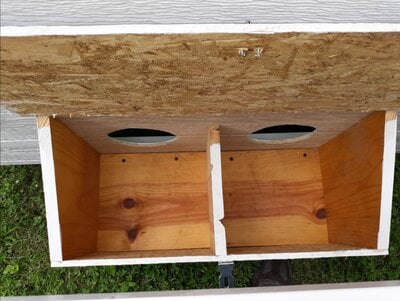
Now time to build that nest box.
I decided to place it near the ground for two reasons. One was so that it would fit under the handle and two is so that they do not try using the best box as a roost.
A couple of notes here.
#1: my handles where too short! The lid of the nest box would hit the handle when you tried to open it. What I had to was add a 1/2 spacer to have just enough room to open the lid. I'd recommend adding an additional inch to the length of these.
#2: the handle felt a little weak so I added additional support on the top. It may not need this and it looks a little bulky but I felt more comfortable adding them.
I had to put this on backwards and bend the latch because if done normally pointing down again it would hit the handle.
Again add an additional inch to prevent this.
Paint and metal.
I just painted everything white but in hindsight I probably should have left the roosting poll unpainted. It can be easily changed out if needed in the future though.


Here you can see the metal is on and I had started the wire. I recommend drawing a line to keep the screws lined up. Just looks better if they are.
Also I had to cut about 2" off my hardware cloth here so the design could easily be made 2" taller without causing additional cost or problems. In hindsight I probably would if I was doing it again.
Due two the larger gaps here I added additional wire to keep predators out. There is a small gap between the tin and the frame but it is much smaller than these.
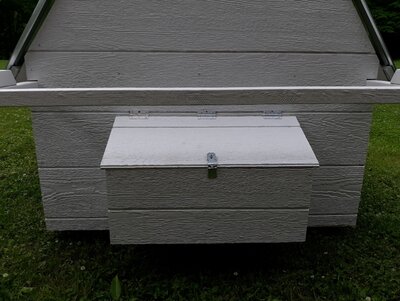
Door hardware.
I added a barrel latch at the bottom and top of one door so it can be locked down. That way when you don't need to open the whole front you don't have too.
Then one in the middle on the other door secure it closed.
Wheels.

These can be done the way I have them here for moving and then when you are ready to set it in place you can flip it around the other direction.
Note: I used these because they are what I had handy but the set down a little low and will require more work switching them around. If I was doing it again I would use another wheel that does not have to sit so low. I may change this in the future.
Final pics!!!
Done!!!


I hope you enjoyed this build!
So the reason for this coop/chicken tractor is that I wanted a small easy to move coop for Japanese bantams. I believe it would be good for any bantam's needs especially those with feathered feet or very low to the ground and hard to keep clean.
The design!
I wanted it to be light enough to move but tall enough that I can get in to for maintenance and upkeep. I settled on a 4'x4' footprint and 5' tall. I debated on putting the nest box on the inside but decided to maximize the foraging space inside the coop and placed it to the outside. I thought this would be good for a small breeding group of bantams if moved every couple of days. Also may be used as a grow out for young chicks.
______________________________________
Materials:
At least 16' salt treated of 2x4" for the base.
For the rest of the build you can use regular non treated lumber as long as you are going to seal or paint the wood. If not use all salt treated lumber for all on the construction.
One sheet plywood or outside siding material (I used a sheet of 3/8" T1-11 with primer.)
Wire cloth. (I used 1/4" because that's what I had but I would recommend 1/2" for better durability and predator proofing.)
screws: I used 1 5/8" and 3" drywall screws for the structure, 1 1/4" metal roofing screws, and 1" stainless screws with washers for the wire.
Wheels and bolts for the wheels. I used two old lawnmower wheels I had laying around and 4, 2"x3/8" carriage bolts to secure them to the structure.
2 pieces of tin 8' long and something to use as a ridge cap. I used a pice of metal and just bent it myself to use but you could buy ridge cap.
henges and fasters. I used 4 door henges I had and 3 smaller cabinet hinges for the best box. For the doors I also used 3 barrel latches and a lock clasp for the nest box.
Optional: flag of your choice for decoration!
_____________________________________
The build.
Always start with a good foundation!
I used a reclaimed 16' 2x4" salt treated board.
Note: all wood in this build is reclaimed wood. The only new components are the tin, paint, hardware cloth, and hardware.
I made the foundation this way for structural integrity. I put a 48" board in the bad, two 46.5" sides attached to that and a 45" board in-between on the front. The reason for that is so that the side supports bridge the seams where they come together.
In the back the two 17" legs and in the front the two angle toped 23.5" pieces.
Note: (the Angle for that cut is 34° and it is 23.5" long to the tip.)
After that I built the rafters because my chop saw was set on the angle I needed (34°). The rafters are 48" but could be a little longer if you want more overhang. I figured for around 3".
Also a good place to note that I drilled and countersunk most all these holes so that I did now crack my lumber.
Also countersinking the tops of the doors will prevent issues with screw heads sticking up above the wood.
Next I tested the rafters on the end to make sure my angels was cut right.
Note here. (I had to take the back one back off because I forgot to put in the upper side pieces that went under the cross piece
)
Attached the side pieces that the tin will attach to. Starting to look like something now!
Next I attached the back panel and made the front doors.
Here you see where I cut out holes for entering the nest boxes.
Note: I placed this piece in the front to trace my cut angles and then notched out for the handles. It was a decent fit but honestly was a bit off.
The doors turned out nice but I did have to trim a little extra off from the original design to leave enough gap for the doors to work.
Now time to build that nest box.
I decided to place it near the ground for two reasons. One was so that it would fit under the handle and two is so that they do not try using the best box as a roost.
A couple of notes here.
#1: my handles where too short! The lid of the nest box would hit the handle when you tried to open it. What I had to was add a 1/2 spacer to have just enough room to open the lid. I'd recommend adding an additional inch to the length of these.
#2: the handle felt a little weak so I added additional support on the top. It may not need this and it looks a little bulky but I felt more comfortable adding them.
I had to put this on backwards and bend the latch because if done normally pointing down again it would hit the handle.
Again add an additional inch to prevent this.
Paint and metal.
I just painted everything white but in hindsight I probably should have left the roosting poll unpainted. It can be easily changed out if needed in the future though.
Here you can see the metal is on and I had started the wire. I recommend drawing a line to keep the screws lined up. Just looks better if they are.
Also I had to cut about 2" off my hardware cloth here so the design could easily be made 2" taller without causing additional cost or problems. In hindsight I probably would if I was doing it again.
Due two the larger gaps here I added additional wire to keep predators out. There is a small gap between the tin and the frame but it is much smaller than these.
Door hardware.
I added a barrel latch at the bottom and top of one door so it can be locked down. That way when you don't need to open the whole front you don't have too.
Then one in the middle on the other door secure it closed.
Wheels.
These can be done the way I have them here for moving and then when you are ready to set it in place you can flip it around the other direction.
Note: I used these because they are what I had handy but the set down a little low and will require more work switching them around. If I was doing it again I would use another wheel that does not have to sit so low. I may change this in the future.
Final pics!!!
Done!!!
I hope you enjoyed this build!