Even though my old nesting boxes that my parents built were still in acceptable shape, I needed new ones. I had recently bought several Brahmas (the second largest chicken breed in the world!) and I needed something quite a bit larger and lower to the ground.

Silver-laced Wyandottes in the old, cramped nesting boxes
I'm not one to buy the best and spend a lot of money, especially on something that will be used by animals, so I went online to find the cheapest nest box idea I could that was the right size. A few minutes of searching and scrolling later and I had found it - a repurposed dresser! I knew I could find an old dresser for free and, sure enough, a few weeks later I came across a free 14-inch-deep dresser in a nearby town. It was stinky, dirty, and falling apart - perfect!

The dilapidated dresser
Step one was to remove the old brace (I replaced it later) and deal with the drawer slides. Since I wanted to keep two drawers, I kept the slides at the bottom, raised a couple to make more room underneath, then removed the rest.
Removing the drawer slides
Next, I reinforced the bottoms of the drawers. I chose two drawers that still had the bottom pieces intact. They were much too thin to support a chicken, so I added two pieces of 1x3 to the underside of each drawer. I also replaced the existing brace with a much stronger 2x4 and added scrap pieces of wood to a couple corners for additional stability.
Reinforcing the drawers and carcass
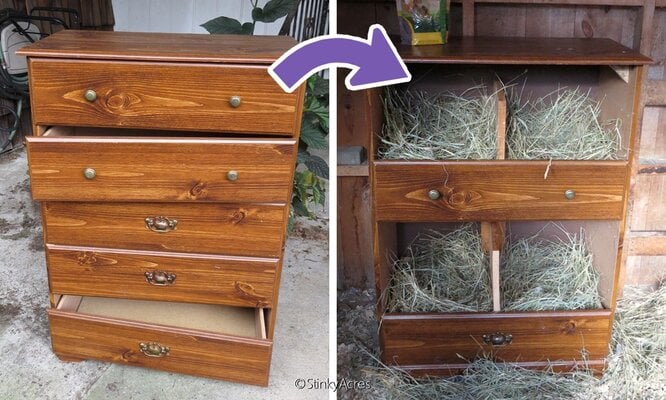
Using scrap wood I added privacy screens between each drawer to create four cozy nest boxes. For easy cleaning I placed cat litter pans I found at the dollar store inside each one. The original litter pans were too large, but a bit of cutting and hot glue solved the problem. However, I recommend finding pans that fit in the first place!
Cat litter pan nest liners modified to fit
Fill it with some nesting material and the dresser nest is done!
Nifty nesting boxes that cost nearly nothing!
Materials used:
Update #1: The dresser nest held up great through its first winter. I did end up securing the top drawer in place with screws to prevent it from falling out. Other than that it didn't need any improvements and worked flawlessly. And the hens have used all four boxes!
Brahma hen approved!
Silver-laced Wyandottes in the old, cramped nesting boxes
I'm not one to buy the best and spend a lot of money, especially on something that will be used by animals, so I went online to find the cheapest nest box idea I could that was the right size. A few minutes of searching and scrolling later and I had found it - a repurposed dresser! I knew I could find an old dresser for free and, sure enough, a few weeks later I came across a free 14-inch-deep dresser in a nearby town. It was stinky, dirty, and falling apart - perfect!


The dilapidated dresser
Step one was to remove the old brace (I replaced it later) and deal with the drawer slides. Since I wanted to keep two drawers, I kept the slides at the bottom, raised a couple to make more room underneath, then removed the rest.


Removing the drawer slides
Next, I reinforced the bottoms of the drawers. I chose two drawers that still had the bottom pieces intact. They were much too thin to support a chicken, so I added two pieces of 1x3 to the underside of each drawer. I also replaced the existing brace with a much stronger 2x4 and added scrap pieces of wood to a couple corners for additional stability.


Reinforcing the drawers and carcass
Using scrap wood I added privacy screens between each drawer to create four cozy nest boxes. For easy cleaning I placed cat litter pans I found at the dollar store inside each one. The original litter pans were too large, but a bit of cutting and hot glue solved the problem. However, I recommend finding pans that fit in the first place!


Cat litter pan nest liners modified to fit
Fill it with some nesting material and the dresser nest is done!
Nifty nesting boxes that cost nearly nothing!
Materials used:
- Dresser
- Cat litter pans
- 1x3 furring strips
- 2x4 stud
- Scrap lumber
- 2" screws
- 1 1/4" screws
- Miter saw
- Power drill/driver
- Impact driver
- Hammer
- Measuring tape
- Spirit level
- Pencil
- High temp hot glue gun
- Hand saw
- Scissors
Update #1: The dresser nest held up great through its first winter. I did end up securing the top drawer in place with screws to prevent it from falling out. Other than that it didn't need any improvements and worked flawlessly. And the hens have used all four boxes!
Brahma hen approved!