(This article is still in progress)
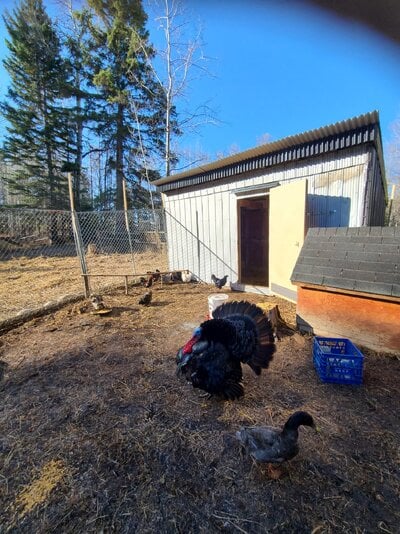
It all began with adopting a Silkie Rooster, hatching 11 chicks and raising 7 ducks..... now we have a Large Coop, 2 turkeys, ducks and 16 chickens (all broody ).
).
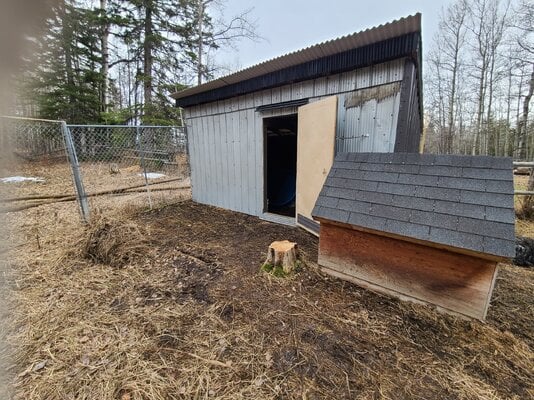
This coop was a abandoned horse shelter within an old horse pen. Eventually it was turned into a dog run / kennel and the horse rails were stapled with sheep fencing. Chain link boxed in a smaller pen with-in the original one, looking like this:


This horse shelter was chewed on, had two broken roof rafters, rotten strapping, a leaky roof, a gap under the NorthWest wall, and not to mention only 3 inclosed walls. Here's some pictures of it:
(Description of drawings above; Two rafters snapped in half & patched with plywood & screws; see; 1st photo A+B closeup. Strapping snapped and rotted; see; 1st photo C+D closeup)
⚘


 🕊
🕊


 ⚘
⚘
Materials used: (scroll if on mobile)


 ️
️
Tools used: (scroll if on mobile)
 🕊
🕊
 ️
️
On the next page, you will begin the journey.
It all began with adopting a Silkie Rooster, hatching 11 chicks and raising 7 ducks..... now we have a Large Coop, 2 turkeys, ducks and 16 chickens (all broody
).This coop was a abandoned horse shelter within an old horse pen. Eventually it was turned into a dog run / kennel and the horse rails were stapled with sheep fencing. Chain link boxed in a smaller pen with-in the original one, looking like this:
This horse shelter was chewed on, had two broken roof rafters, rotten strapping, a leaky roof, a gap under the NorthWest wall, and not to mention only 3 inclosed walls. Here's some pictures of it:
⚘
🕊⚘Materials used: (scroll if on mobile)
| Roof: | 4th Wall: | Run: | Door: | Other: |
|---|---|---|---|---|
| 2x4 (2) | Pallets | Chicken Wire | 3½ in. Plywood | 2x6 (backer) |
| Blk Painted Tin | Tarpaper (roof membrane) | 4ft. Wooden Stakes | Frame (Pallet pieces) | Roosts (Logs) |
| Strapping (Plywood) | 2x6 | Staples | Hinges | Chicken- Wire |
| Roof screws | 2x4 | Chainlink | Tarpaper | Screws |
| Tin | Zip-ties & Staples | Blk Tin x1 | 2x6 scraps | |
| Plywood & Pallet pieces (strapping) | Homemade posts (logs) | Whale latch | Rubber bungee cord | |
| Silicone | Chimney Strapping (Strapping tape) | Chain & Caribeaner | Motivation | |
| Drip edge (tin) | Laths | Staples | Rocks | |
| Lock Wire | Silica (fancy Silicone) | Rails | ||
| Landscaping Stakes (for holding down apron) |
️Tools used: (scroll if on mobile)
| Measuring | Cutting | Pounding | Attaching | Elec. Other | Other | Other #2 |
|---|---|---|---|---|---|---|
| Speed square | Skillsaw | Hammers | Cordless Drill | Extension cords | Safety Glasses | Smart Ladder |
| 4ft level | Chainsaw | Nailpuller | Cordless Impact | Impact & Drill Batteries | Work Gloves | Rake |
| Measuring tape | Jigsaw | Sledgehammer | #2 Robertson bit | Battery chargers | Pencil / Marker | Stool/Step |
| Utility knife | Speed bits (roofing) | Stereo (opt.) | Pencil sharpener | Ratchet Strap | ||
| Handsaw | Clamps | Zipcutter blades | Wheel Barrow | |||
| Zipcutter | Hammer tacker/ Stapler | Utility knife blades | ||||
| Wire cutters | WorkX table | |||||
| Table saw | Bucket |
🕊️On the next page, you will begin the journey.
Closing & Framing in the 4th Wall pt. 1
Once a collapsed and leaking roof, now fixed with new rafters, tin and strapping; this is a strong and useful structure again. Now, time to do some cleaning up.
(Can you see the color difference between the new wood & old?)


We removed the rotten logs that were somewhat filling the gaps under the NorthWest and SE walls, and then moved the giant cubic doghouse. We also removed the chewed boards on the sidewalls. Now, it looks so much better.
Now, for what we've all been waiting for; the building!

 🕊
🕊
The first pallet was secured with ease. We then installed our first 2x6 and screwed it into the pallet.
Next, we installed the 2nd pallet. It was much harder than the first, because we wanted them to be somewhat the same height, and it needed to fit between the 2x6 and center 6x6. We made it fit by cutting off a few inches on the end with the chainsaw. It's all coming together!
As you may see in the photo above, there is now a 2x4 screwed to the 6x6 middle beam (right side), it is there to frame the door.
We added another 2x6 and 2x4 both parallel to the one on the 6x6, about 3½ ft to the right. Then secured a scrap 2x4 atop the previous 2x4s. Now we have a door frame.
2x4 cut offs were then placed above the door frame, creating a small frame to attach strapping to in the near future.
Like clockwork we installed the 3rd pallet, but instead on the right (Northwest).
As you can see above, there is a gap between the 2x4 and the 3rd pallet. We installed a cut-off of another pallet and filled the gap.
Do you see the dog ?
?
After, we just closed the small gap between the 3rd pallet & the NorthWest wall with a scrap 2x4.
Here's the wide view of the progress so far. This was a whole days work, so the next page will be "Closing in the wall prt. 2".
Here's what it looked like that morning for comparison:
Continue the journey on pg. 3.
Have any questions? Please ask them in the comments.
 🌬🏔
🌬🏔
(Can you see the color difference between the new wood & old?)
We removed the rotten logs that were somewhat filling the gaps under the NorthWest and SE walls, and then moved the giant cubic doghouse. We also removed the chewed boards on the sidewalls. Now, it looks so much better.
Now, for what we've all been waiting for; the building!
🕊The first pallet was secured with ease. We then installed our first 2x6 and screwed it into the pallet.
Next, we installed the 2nd pallet. It was much harder than the first, because we wanted them to be somewhat the same height, and it needed to fit between the 2x6 and center 6x6. We made it fit by cutting off a few inches on the end with the chainsaw. It's all coming together!
As you may see in the photo above, there is now a 2x4 screwed to the 6x6 middle beam (right side), it is there to frame the door.
We added another 2x6 and 2x4 both parallel to the one on the 6x6, about 3½ ft to the right. Then secured a scrap 2x4 atop the previous 2x4s. Now we have a door frame.
2x4 cut offs were then placed above the door frame, creating a small frame to attach strapping to in the near future.
Like clockwork we installed the 3rd pallet, but instead on the right (Northwest).
As you can see above, there is a gap between the 2x4 and the 3rd pallet. We installed a cut-off of another pallet and filled the gap.
Do you see the dog
?After, we just closed the small gap between the 3rd pallet & the NorthWest wall with a scrap 2x4.
Here's the wide view of the progress so far. This was a whole days work, so the next page will be "Closing in the wall prt. 2".
Here's what it looked like that morning for comparison:
Continue the journey on pg. 3.
Have any questions? Please ask them in the comments.
🌬🏔Closing & Framing in the 4th Wall pt. 2
On the last page, we finished inclosing the bottom portion of the 4th wall with pallets. On this page we will be inclosing the top portion.
Let's get started.
To install a pallet on top of the first, we needed to slightly cut the 3 planks (on the pallet) that would butt up against the gusset mending boards.
Here we are cutting a bit off of the planks, to accommodate the gusset mending board.
It fit like a wooden glove.
The gap between the gusset mending board & the pallet planks can give you a hint of why we cut there.
Placing the next pallet was a breeze, no cutting needed.
It really looks like a wall now.
On the other side of the doorway we placed the 3rd top pallet, snug to the door this time.
Like the first, we needed to cut a few planks to accommodate the incroching gusset mending board.
The cut-off came next, and then the pallet work is done.
Here's what it looked like from the inside:
Now, the wall & door structure is complete!!
🌬 🕊️
🕊️
On the next page, we will be wind-proofing the 4th wall with 'roof membrane' / roofing tar paper.
Let's get started.
To install a pallet on top of the first, we needed to slightly cut the 3 planks (on the pallet) that would butt up against the gusset mending boards.
Here we are cutting a bit off of the planks, to accommodate the gusset mending board.
It fit like a wooden glove.
The gap between the gusset mending board & the pallet planks can give you a hint of why we cut there.
Placing the next pallet was a breeze, no cutting needed.
It really looks like a wall now.
On the other side of the doorway we placed the 3rd top pallet, snug to the door this time.
Like the first, we needed to cut a few planks to accommodate the incroching gusset mending board.
The cut-off came next, and then the pallet work is done.
Here's what it looked like from the inside:
Now, the wall & door structure is complete!!
🌬🕊️On the next page, we will be wind-proofing the 4th wall with 'roof membrane' / roofing tar paper.
Wind-proofing the 4th Wall with Tar Paper
Since we have successfully built the 4th wall structure/framing, rebuilt the roofing system & cleaned up the coop, it is now time to not only celebrate  , but to wind-proof the 4th wall with tar paper or 'roofing membrane'.
 🌬
🌬
Let's do this!
In order to get the Tarpaper flush, we removed the gussets with the skillsaw.
Tarpaper is fairly easy to work with and is somewhat light.
It has a sticky back that will adhere it to the pallets when it gets very hot, but for now we stapled it.
The process goes very quickly, the only prep needed is cutting them and removing the plastic coating on the back.
(We cut through it using a Utility Knife)
Here's pictures of the rest of the tarpaper installing:
Much darker in there.")
️
We cut and folded the 3rd tarpaper sheet edge onto the doorframe.
This will also help with rain protection, since tarpaper is a great semi water-repeller.
The wide view: (4th sheet added)
We then added the final sheet and it folded over onto NorthWest wall by a few inches.
🏔
On the page, I will show how to take apart pallets without breaking them apart (or as much), to make strapping for under the tin.
, but to wind-proof the 4th wall with tar paper or 'roofing membrane'.🌬Let's do this!
In order to get the Tarpaper flush, we removed the gussets with the skillsaw.
Tarpaper is fairly easy to work with and is somewhat light.
It has a sticky back that will adhere it to the pallets when it gets very hot, but for now we stapled it.
The process goes very quickly, the only prep needed is cutting them and removing the plastic coating on the back.
(We cut through it using a Utility Knife)
Here's pictures of the rest of the tarpaper installing:
Much darker in there.
️We cut and folded the 3rd tarpaper sheet edge onto the doorframe.
This will also help with rain protection, since tarpaper is a great semi water-repeller.
The wide view: (4th sheet added)
We then added the final sheet and it folded over onto NorthWest wall by a few inches.
🏔On the page, I will show how to take apart pallets without breaking them apart (or as much), to make strapping for under the tin.
Reusing Pallets for Strapping & Installing Strapping on the 4th Wall
Strapping was needed, so we started to take apart some viable leftover pallets.
 ️
️
Here's how I removed pallet planks with a nail puller & a hammer:
1: First angle your nail puller into the wood (sharp angle) right above the embedded nail head.
2: Hit near the head of the nailpuller with the hammer, until the nail puller has the nail head between its teeth.
3: Pull the nail, using the nailpuller as leverage. Then push the handle up/down as needed until you have something like this:
Or this:
Whether the teeth are facing up or down doesn't matter. If the teeth are facing up like in picture 2, then hit the hammer on the end of the nailpuller handle (while holding it).
(Long handled nailpullers are best).
If you aren't getting anywhere with the position in photo 1, then switch to the other, or go back in forth.
4:After you have removed most of the nails (or pryed apart the connection) give the plank a pound on the inside, until it looks like this:
(Note: there is many more ways to free a pallet plank, this is just a simple example & a lot of the technique comes from experience).
All nails are different, some easy, some stubborn and some aren't made to be pulled out. Good luck !
!
After removing many nails, we cut some strapping from 3 ¾inch plywood. Now it's time to install it all.
We drilled directly into the pallet planks, measuring where they were.
Strapping is traditionally used on rooves. It creates a gap between the tin and the wall (or roof) so moisture can escape, thus preventing rot.
After strapping the whole wall, we installed more around the outline of the door to secure the tin edge to.
The strapping was very successful.


On the next page we will be putting tin on the almost complete 4th wall.
🏔
️Here's how I removed pallet planks with a nail puller & a hammer:
1: First angle your nail puller into the wood (sharp angle) right above the embedded nail head.
2: Hit near the head of the nailpuller with the
hammer, until the nail puller has the nail head between its teeth.
3: Pull the nail, using the nailpuller as leverage. Then push the handle up/down as needed until you have something like this:
Or this:
Whether the teeth are facing up or down doesn't matter. If the teeth are facing up like in picture 2, then hit the hammer on the end of the nailpuller handle (while holding it).
If you aren't getting anywhere with the position in photo 1, then switch to the other, or go back in forth.
4:After you have removed most of the nails (or pryed apart the connection) give the plank a pound on the inside, until it looks like this:
(Note: there is many more ways to free a pallet plank, this is just a simple example & a lot of the technique comes from experience).
All nails are different, some easy, some stubborn and some aren't made to be pulled out. Good luck
!After removing many nails, we cut some strapping from 3 ¾inch plywood. Now it's time to install it all.
We drilled directly into the pallet planks, measuring where they were.
Strapping is traditionally used on rooves. It creates a gap between the tin and the wall (or roof) so moisture can escape, thus preventing rot.
After strapping the whole wall, we installed more around the outline of the door to secure the tin edge to.
The strapping was very successful.
On the next page we will be putting tin on the almost complete 4th wall.
🏔Putting Tin on the 4th Wall
On the last page we finished installing the strapping and framing the doorway, now we are installing tin on the 4th wall.
The tin we used was previously on the roof and most of it was unscathed.
🏔️
Time for tin!
Like we did on the roof, we installed the tin from left to right (SE-NW); for the purpose of the seam facing SE instead of NorthWest; thus preventing the north wind and rain from blowing in.
When installing the first piece we placed it as vertically 'level' as possible, since the first sheet decides the course of all that come after. The picture below is of the first two sheets of tin.
Since this procedure goes relatively quick, it was a bit challenging to capture every individual piece of tin going up. So the pictures show our progress in a spaced way.
We continued with tinning left of the door, and then cut a small piece for above the door.
Now on the right of the doorway, we continued plating the wall with tin sheets.
The sheet just right of the door had a approximately 5inch overhang, that was obstructing the doorway. We then cut off the excess with the Zipcutter.
Here's an action shot:
After that we bent the remaining edge onto the framing 2x4. This way no one will get cut or scraped when brushing past.
The last 2 sheets were the most bent (from being hit by a tree top), but are still leak-free. We evened out the indentations as best we could with roofing screws and then bent the excess tin around the corner and against the NW wall, with the help of a hammer.
As seen above, the last 'piece' is really two short pieces put together; with the top one ontop of the other the water cannot get in.
🕊
In order to get the tin flush on the corner, we had to cut a small part off in order to accommodate for the wood protruding from the frame.
The NorthWest wall looks so good! If you look closely (at the left corner ), you may see that we folded the last sheet of tarpaper around the corner as well.
What a very successful, satisfying and rewarding day of work, for those eternally loved birds.
P.S: If you're wondering why the screws/screwholes on the reused tin dont make a organized pattern, that's because of the previous installer.
On the next page we will be adding the Drip edges and making it look pretty.
🕊
The tin we used was previously on the roof and most of it was unscathed.
🏔️Time for tin!
Like we did on the roof, we installed the tin from left to right (SE-NW); for the purpose of the seam facing SE instead of NorthWest; thus preventing the north wind and rain from blowing in.
When installing the first piece we placed it as vertically 'level' as possible, since the first sheet decides the course of all that come after. The picture below is of the first two sheets of tin.
Since this procedure goes relatively quick, it was a bit challenging to capture every individual piece of tin going up. So the pictures show our progress in a spaced way.
We continued with tinning left of the door, and then cut a small piece for above the door.
Now on the right of the doorway, we continued plating the wall with tin sheets.
The sheet just right of the door had a approximately 5inch overhang, that was obstructing the doorway. We then cut off the excess with the Zipcutter.
Here's an action shot:
After that we bent the remaining edge onto the framing 2x4. This way no one will get cut or scraped when brushing past.
The last 2 sheets were the most bent (from being hit by a tree top), but are still leak-free. We evened out the indentations as best we could with roofing screws and then bent the excess tin around the corner and against the NW wall, with the help of a hammer.
🕊In order to get the tin flush on the corner, we had to cut a small part off in order to accommodate for the wood protruding from the frame.
The NorthWest wall looks so good! If you look closely (at the left corner ), you may see that we folded the last sheet of tarpaper around the corner as well.
What a very successful, satisfying and rewarding day of work, for those eternally loved birds.
P.S: If you're wondering why the screws/screwholes on the reused tin dont make a organized pattern, that's because of the previous installer.
On the next page we will be adding the Drip edges and making it look pretty.
🕊Adding a Drip edge and Tinning the NW Wall
We have come quite a ways. It's marvelous how two people can make such an impact in such a short amount of time. Tenacity is key- and patience .
 ️
️
Now, lets contiune.
Firstly, we installed the 'Drip edge' on the header board just above the original tin sheets. The Drip edge panels are 1-2 inches away from the wall and hang over the tin sheets; helping to direct water away from the otherwise vulnerable spot.
[Drip edge is a term commonly used for 'flashing' or something to aid in waterproofing. Our 'Drip edge' dose fit the criterion of waterproofing, but it isn't the traditional object used as 'Drip edge'. Use this as you will.]
We ran the whole width of the 4th wall with the silver drip edge, and, like before bent the excess around the Northern corner.
This is what it looks like so far:
Then we covered the exposed horizontal board (just under the roofing tin) with some new black tin; the same tin as said roofing tin.
Like the first, we ran the black Drip edge the whole length of the house and bent it around the corner.
The black Drip edge will extend that boards life by quite a large margin, and it looks great.
We continued with the black tin on the NW wall, but this time running the ruts horizontally.
By plating the once exposed board on the NW wall with tin, we have waterproofed the rafter and accented the roof.
I think it looks great.
This added a cleaner appearance to the NW wall, and it makes it that much more waterproof.
 🏔
🏔
On the next page we will be tinning the NW wall.
.️Now, lets contiune.
Firstly, we installed the 'Drip edge' on the header board just above the original tin sheets. The Drip edge panels are 1-2 inches away from the wall and hang over the tin sheets; helping to direct water away from the otherwise vulnerable spot.
[Drip edge is a term commonly used for 'flashing' or something to aid in waterproofing. Our 'Drip edge' dose fit the criterion of waterproofing, but it isn't the traditional object used as 'Drip edge'. Use this as you will.]
We ran the whole width of the 4th wall with the silver drip edge, and, like before bent the excess around the Northern corner.
This is what it looks like so far:
Then we covered the exposed horizontal board (just under the roofing tin) with some new black tin; the same tin as said roofing tin.
Like the first, we ran the black Drip edge the whole length of the house and bent it around the corner.
The black Drip edge will extend that boards life by quite a large margin, and it looks great.
We continued with the black tin on the NW wall, but this time running the ruts horizontally.
By plating the once exposed board on the NW wall with tin, we have waterproofed the rafter and accented the roof.
I think it looks great.
This added a cleaner appearance to the NW wall, and it makes it that much more waterproof.
🏔On the next page we will be tinning the NW wall.
Installing Strapping & Tin on the NW wall
When you order tin (we didn't on this project) you're given a 'cover sheet' to protect the tin you ordered from being scratched.
There were only two remaining charcoal tin sheets (one being the coversheet), so we didn't have enough for the 4th wall, but on the NW wall we did.
🏔
Let's contiune.
In the spirit of beauty and functionality, we decided covering the NW wall would be both brilliant and keep the building in good shape, longer.
It was fairly simple, all we needed was about 12 (or more) pallet boards for strapping and then to install the two charcoal tin sheets.
When we began taking the pallets apart it occurred to us that the nails in the boards were spiraled; meaning they weren't going to be backing out of those boards anytime soon. Seeing this we decided to cut the nails with the Zipcutter instead of trying to pound them out using a hammer.
Clamps held the pallet boards while cutting the nails, making it a smooth process.
Here's an example of a flush cut from the Zipcutter.
The picture above is of a cut nail that fell in the snow after cutting. If you look closely you may see the spiraling I mentioned.
With more than 12 boards cut we were set for strapping the NW wall and the next project.
We worked so swiftly I only captured us finishing installing the tin. There were approximately three horizontal rows of strapping and one slanted row parallel to the rafter.
Before we installed the tin we cut both panels at a angle to accommodate the rafters angle.
The two charcoal sheets were very easy to install and we were soon done.
Here's a view of the tin installed:
After, we bent the charcoal tin around the Northern corner to prevent any water coming in.
I think it looks really good.
I'm glad we put the charcoal tin on the NW wall; firstly, it looks aestheticly pleasing, it blocks the Northern wind and rain and it adds to the longevity of the structure.
Here's a final view of the work we've done so far:
 🏔
🏔
Join me on the next page to see us make and install the door using pallets.
There were only two remaining charcoal tin sheets (one being the coversheet), so we didn't have enough for the 4th wall, but on the NW wall we did.
🏔Let's contiune.
In the spirit of beauty and functionality, we decided covering the NW wall would be both brilliant and keep the building in good shape, longer.
It was fairly simple, all we needed was about 12 (or more) pallet boards for strapping and then to install the two charcoal tin sheets.
When we began taking the pallets apart it occurred to us that the nails in the boards were spiraled; meaning they weren't going to be backing out of those boards anytime soon. Seeing this we decided to cut the nails with the Zipcutter instead of trying to pound them out using a hammer.
Clamps held the pallet boards while cutting the nails, making it a smooth process.
Here's an example of a flush cut from the Zipcutter.
With more than 12 boards cut we were set for strapping the NW wall and the next project.
We worked so swiftly I only captured us finishing installing the tin. There were approximately three horizontal rows of strapping and one slanted row parallel to the rafter.
Before we installed the tin we cut both panels at a angle to accommodate the rafters angle.
The two charcoal sheets were very easy to install and we were soon done.
Here's a view of the tin installed:
After, we bent the charcoal tin around the Northern corner to prevent any water coming in.
I think it looks really good.
I'm glad we put the charcoal tin on the NW wall; firstly, it looks aestheticly pleasing, it blocks the Northern wind and rain and it adds to the longevity of the structure.
Here's a final view of the work we've done so far:
🏔Join me on the next page to see us make and install the door using pallets.
Making & Installing a Door Built with Recycled Pallets
Previously we took apart pallets and used the boards as strapping on the NW wall. When we were doing that we also took apart enough to make a door and a few other things you'll see in the future.
This was the first time either of us has built a door, but it is 100% predator proof and has a nice seal.


First things first we installed a 2x4 on top of the horizontal 6x6 framing the bottom of the doorway.
Then we cut a small piece of some of the leftover silver tin and placed it over the two exposed wooden boards.
Now, lets build the door.
We took a sheet of 3½ inch plywood to use as the body of the door. We didn't have to cut it since it was the perfect height and width.
Next, we framed the plywood with pallet boards to add strength and structure. Smaller screws work well for this since they won't be holding much weight. Three boards ran vertically in the center to create bones for the tar paper and tin to lay on.
You can tell the dogs were helping.
Next, we dressed the pallet boards with tar paper, one sheet of Tarpaper did the trick. Then we trimmed the excess with a Utility Knife.
I personally don't recommend doing this next step if you're using this article as inspiration; adding strapping on top of the tarpaper.
It had a lot of pros, but the deal breaker was that it was in the way of the hinges opening the distance we wanted.
We flipped the door over and installed two reused hinges.
We carried the heavy door over to the doorway and placed it onto 3 staked pallet boards. This held it at the height we needed while one of us installed the hinges. The place of installation was too low to the ground to open because of the compacted snow, so we raised it and that fixed the problem.
Epiphanies came and we flipped the hinges around to allow more movement for the hinges.
The next epiphany was that the strapping was in the way of the door opening completely, so we removed it.
Now the easy part; installibg the tin. Only one cut was needed and then it was installed.
We then added some finishing details to the exterior using some leftover tin.
First we added a strip of black tin on the plywood that we installed in the wall to attach the hinges to.
Cut a small piece of black tin and put it over the entry to act as a Drip edge canopy.
And finally a reused kickplate made of the previous roofing tin.
As you might see above, we outlined the overlap on the door with a pencil.
Here's what it looked like from the inside with the door shut.
To satisfy us all, here's a view of the back of the coop.
 🏔
🏔
On the next page we will be adding a Whale latch, talking about ventilation and more!
This was the first time either of us has built a door, but it is 100% predator proof and has a nice seal.
First things first we installed a 2x4 on top of the horizontal 6x6 framing the bottom of the doorway.
Then we cut a small piece of some of the leftover silver tin and placed it over the two exposed wooden boards.
Now, lets build the door.
We took a sheet of 3½ inch plywood to use as the body of the door. We didn't have to cut it since it was the perfect height and width.
Next, we framed the plywood with pallet boards to add strength and structure. Smaller screws work well for this since they won't be holding much weight. Three boards ran vertically in the center to create bones for the tar paper and tin to lay on.
You can tell the dogs were helping.
Next, we dressed the pallet boards with tar paper, one sheet of Tarpaper did the trick. Then we trimmed the excess with a Utility Knife.
I personally don't recommend doing this next step if you're using this article as inspiration; adding strapping on top of the tarpaper.
It had a lot of pros, but the deal breaker was that it was in the way of the hinges opening the distance we wanted.
We flipped the door over and installed two reused hinges.
We carried the heavy door over to the doorway and placed it onto 3 staked pallet boards. This held it at the height we needed while one of us installed the hinges. The place of installation was too low to the ground to open because of the compacted snow, so we raised it and that fixed the problem.
Epiphanies came and we flipped the hinges around to allow more movement for the hinges.
The next epiphany was that the strapping was in the way of the door opening completely, so we removed it.
Now the easy part; installibg the tin. Only one cut was needed and then it was installed.
We then added some finishing details to the exterior using some leftover tin.
First we added a strip of black tin on the plywood that we installed in the wall to attach the hinges to.
Cut a small piece of black tin and put it over the entry to act as a Drip edge canopy.
And finally a reused kickplate made of the previous roofing tin.
As you might see above, we outlined the overlap on the door with a pencil.
Here's what it looked like from the inside with the door shut.
To satisfy us all, here's a view of the back of the coop.
🏔On the next page we will be adding a Whale latch, talking about ventilation and more!
To be continued...
To be continued...