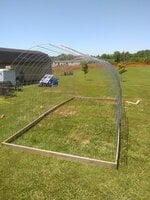
This is our new build. It's our 16 ft 9 1/2 in L x 7 ft W x 6 ft 2 in T Stationary Chicken Hoopy Coop STAGE #1. Bottom frame out of reclaimed pallet wood boards that are heat treated, not chemically treated, pieced in order to make the length to fit 4 - 16 ft x 50 in cattle panels (cost 19.99 each). More pictures of the following stages will be posted as we get them done. This will be a coop big enough to keep up to 13 to 14 Black Jersey Giant Chickens comfortably. Black Jersey Giants are the biggest Chicken breed there is from what I understand. They need 3 sq. ft. of floor space per chicken per. Right now we have 10 so they should be very happy in their new coop. We don't plan on having more until the two year mark when we will hatch out replacements and the old hens will be culled at 2 1/2 years as their egg production should drop by 1/2 by then. We will be able to have a broody hen hatch out baby chicks next summer if anyone is interested to buying pullets or roosters to raise for eggs or meat birds. They won't be ready to eat as fast as Cornish Cross pullets but that should be big enough for a tender 4 or 5 lb fryer at 6 monthes at least, I thinking. We'll see. I ended up with 7 hens and 3 roosters out of the straight run of 10 that I got from Rural King. So we'll see at what age two of the roosters have to be before they're big enough to harvest. The hens will be safe for at least 2 1/2 years, more if I have a good broody hen. We can't wait to see how they like their nice big coop! I hope I can tame them down a bit when I get them in there as they are very jittery right now. They were suppose to be a docile breed, but I'm not seeing it yet! LOL They do come running when I whistle as they've learned they're getting a treat when I whistle. But only the smallest hen will sometimes let me pet her briefly. I've named her braveheart, as she is the bravest and most curious out of the bunch. Kind of fell in love with her. Hope she turns out to be a good broody hen!
Our Hoopy Coop Build STAGE 2-Well we have framed in the front and rear door facings and bracings. We've braced up the interior so our coop doesn't look pregnant! LOL We've done all of this since 10 AM this morning, it's now 5:24 PM and I've had all of that hot hot sun that I can take for one day! Prew!! Next stage will be the top center 16 ft 9 1/2 in long pieced beam and two 16 ft 9 1/2 in long pieced side rails to stabilize our hoopy house so it doesn't wiggle like jello! LOL . Then the full front door and 3/4 rear door. Then covering the outside from the bottom up 4 ft with 1/2 in hardware cloth all the way around, the rest of the top with chicken wire, and then the back, and the top and side with heavy duty reflective tarp except for the bottom two ft on the sides. Only the front door will be covered with tarp so as to let in plenty of air flow but still give shade from the morning sun if desired in the center of the coop. If they want to sun they can get sun on the sides of the coop, Their roosts and nest boxes will be at 36 inches so they will be protected from and rain that might come in from the east, west, or south as most of our rain come in from those directions not north. I will put tarp over most of the open air places for the winter so as to prevent drafts while still leaving some gaps at lower levels for ventilation. If and when I have a hen go broody for these Black Jersey Giants which will get to about 10 lbs per hen, then I'll put a plastic tote put on it's side, of the appropriate size screwed into the back in the bottom board with the lid cut to just enough of it at the bottom to hold in the straw or pine shavings for nesting material. There will be a board at each corner at an angle that will hold a 5 gal. covered bucket of water each with two nipple watering cups and a 5 gal bucket with 3 pvc pipe access holes into for the feed. I hoping that by the time these giants are full grown to let them have free range access to the orchard you can see in the far rear of this picture and just close them up at night. They are going to be so big that I don't think air predators are going to bother them. And I'm thinking that if I leave a 12 lb rooster to run with my hens that there are going to be many dogs, cats, coyotes, coons, or opossums that are going to want to tangle with that size rooster with spurs! The great big bobcat that was spotted in my front yard at 7 pm three weeks ago, well I'm hoping it's moved on! We're going to have all totaled about $250 in this coop and as I've said in earlier posts with should be big enough for up to 13 of these giant chickens, not that I intend to have that many, or approx. 26 medium sized chickens. We'll post pics of the finished hoopy coop with all the bells and whistles and pics of each of our growing baby Black Jersey Giants when we get 'er dun! LOL Maybe you experienced chicken handlers and see if you agree with me as to who is a cockerel and who is a hen. I think I've got 3 cockerels and 7 hens
.
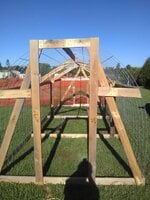
Our Hoopy Coop STAGE ? 3 l think LOL Sorry the heat is getting to me! LOL We think we've figured out all the bracing and we're done with the dry fitting, so now we take it apart in however I many pieces we need to in order to move it to it's final resting place. Then the next stage is the 1/2 inch metal hardware cloth and chicken wire. Prew I'm getting too old for this. LOL
This is what it looks like after all the bracings were secured. I was afraid that it was going to be to flimsy but once the bracings were secured, it was extremely sturdy. The following pics will show some close ups to the details of the bracings and securing the cattle panels. This is what we're calling stage 4. The next stage, Stage 5 will be putting the 1/2 inch hardware cloth on the entire front and back, and both sides from the ground up to 4 feet. Stage 6 will be putting the tarp roof on and securing it. Stage 7 will be building the doors and mounting them. Stage 8 will be introducing my big baby chickens to their new home! We'll add those pics when we get there!
This is what it looks like after all the bracings were secured. I was afraid that it was going to be to flimsy but once the bracings were secured, it was extremely sturdy. The following pics will show some close ups to the details of the bracings and securing the cattle panels. This is what we're calling stage 4. The next stage, Stage 5 will be putting the 1/2 inch hardware cloth on the entire front and back, and both sides from the ground up to 4 feet. Stage 6 will be putting the tarp roof on and securing it. Stage 7 will be building the doors and mounting them. Stage 8 will be introducing my big baby chickens to their new home! We'll add those pics when we get there!
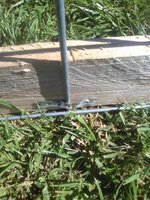
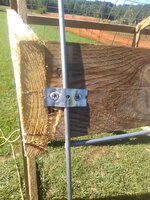
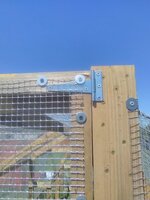
We used metal plumbers strapping to secure the cattle panels to the wood frame along the bottom. We also used it to secure the cattle panels to the wood framing at the very front and back of each side.
This is a close up of the bottom joints of the 4 bracings for the roof.
This is a close up of the top joints of the 4 bracing for roof. Notice that we staggered them on the roof center joist in order to be able to put the screws threw the center joist into the bracing.
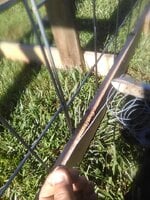
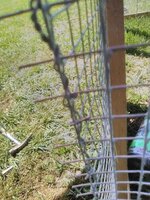
To connect the four cattle panels together, we used baling wire at each intersection of the cattle panels cross wires. We wove the wire in an X pattern around the cross members.
Before weaving them in an X pattern we twisted them securely together until the two panels were tightly together.
We then realized that the roof bracing joints were leaving a point of wood protruding past the cattle panel into the area that we are planning to put a tarp roof, therefore we used a jigsaw to trim the protrusion away.
Our Hoopy Coop Stage 4 - In this stage we will secure 4 foot 1/2 inch hardware cloth on each end and down both side of the coop. We did that by using wood screws and washers and securing the hardware cloth to the bottom boards and the bracing boards we had at the 4 foot high level. We used bailing wire to whip stitch any place that we had to join pieces of the hardware cloth together. By doing this we were able to get go corner angles and used a lot less of it then if we had tried to wrap it. The hardware cloth does not bend smoothly easily. We then covered the top of the coop with chicken wire, we chose to put 5 rows across the top from side to side. We then secured it under the hardware cloth by unscrewing it from the 4 ft. high bracing boards, slipping it underneath, and then retightening the screws. I know it seems like redoing what was already done, perhaps we should have started with the chicken wire top, but chicken wire hard to work with "I think it should be called rattlesnake wire, cause it bites!" as it is prickly and flimsy. Having the hardware cloth right there to secure the edges I think was a help. We then use bailing wire to whip stitch the chicken wire sections together and around the cattle panel wires that were at the seams. We then cover the front and back of the coop with the hardware cloth, accept for the front door, which we will make in stage 5.
Trim one side's wire to fit to the others perfectly, but you can leave the second side's wire to long until you finish whip stitching the corner together.
I trimmed the excess wire after I whipped stitched up the corners.
Well I thought that I would show you here how I bend the wire sprig around the ajoining wire and back again so as to lessen the sharpness of the corners. It's not necessary but I thought it was worth the trouble.
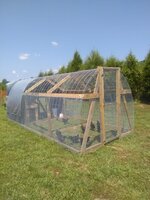
Here is the view of the right side. We'll have the 1/2 inch hardware cloth from the bottom to 4 ft up on both sides. The front and back will be completely hardware cloth.
I let the side hardware cloth overlap the end hardware cloth, which was trimmed to fit the contour of the side,or vise versa.
We used bailing wire to connect the side 1/2 inch hardware cloth with front hardware cloth. Whip stitch them together with the bailing wire.
Now in this our final stage, we will build the front door, cover it with hardware cloth, hang it with hinges, put on a top and bottom door latch, and a spring to keep it closed when you go in. Then we will cover the top and back with heavy duty reflective tarp secured down with bailing wire through the grommets and/or the screws and washers that are holding down the hardware cloth whenever the tarp is at the area the screws are. Finally we will build a 3/4 high back door that will eventually lead to a run for the chickens in our orchard, but that we will save for a later day. For right now we intend to secure the small coop we have had them in as a brooder to the back door opening with a come-a-long tie-down strap until they get used to their new digs! We want them to fill safe and secure. Then we will "RELEASE THE CRACKEN" LOL and see how the chicks like their new digs!
Here I'm showing how we screwed the sides of the door into the door jam in order to get it the correct size. Then we added the top and bottom, screwed it all together, put on the hinges and latches,then we took out those screws holding it closed. Wahlah! Finished door built to fit.
Fitting the door to size.
Here you can see the hinges and how we attached the hardware cloth to the door.
Here's the front door.
The front of the Hoopy Coop is finished! Yeah!
Now we can "Release The Cracken!" LOL They seem to like their new digs!

All in all there isn't much we would change, except we will be putting tarp over the entire roof not just 1/3 or it. Our 10 - 7 1/2 wk old Black Jersey Giants, apparently don't know how to come in out of a thunderstorm! We've got a nice dry area for them in the back, but they decided instead that it was a good idea to pile up on top of each other, shivering in the front corner by the door, until I had to go out there IN THE RAIN pick them up and put them in the back of the coop! Brother! I hope they'll dry out and not get too cold. Also we intend to put riversand on the ground when they kill the grass that's there now. We also be adding nest boxes to the back on one side when they get old enough to lay. Hope we have inspired you to try your hand at a build, if we can do it, you can do it. Good Luck
Our Hoopy Coop Build STAGE 2-Well we have framed in the front and rear door facings and bracings. We've braced up the interior so our coop doesn't look pregnant! LOL We've done all of this since 10 AM this morning, it's now 5:24 PM and I've had all of that hot hot sun that I can take for one day! Prew!! Next stage will be the top center 16 ft 9 1/2 in long pieced beam and two 16 ft 9 1/2 in long pieced side rails to stabilize our hoopy house so it doesn't wiggle like jello! LOL . Then the full front door and 3/4 rear door. Then covering the outside from the bottom up 4 ft with 1/2 in hardware cloth all the way around, the rest of the top with chicken wire, and then the back, and the top and side with heavy duty reflective tarp except for the bottom two ft on the sides. Only the front door will be covered with tarp so as to let in plenty of air flow but still give shade from the morning sun if desired in the center of the coop. If they want to sun they can get sun on the sides of the coop, Their roosts and nest boxes will be at 36 inches so they will be protected from and rain that might come in from the east, west, or south as most of our rain come in from those directions not north. I will put tarp over most of the open air places for the winter so as to prevent drafts while still leaving some gaps at lower levels for ventilation. If and when I have a hen go broody for these Black Jersey Giants which will get to about 10 lbs per hen, then I'll put a plastic tote put on it's side, of the appropriate size screwed into the back in the bottom board with the lid cut to just enough of it at the bottom to hold in the straw or pine shavings for nesting material. There will be a board at each corner at an angle that will hold a 5 gal. covered bucket of water each with two nipple watering cups and a 5 gal bucket with 3 pvc pipe access holes into for the feed. I hoping that by the time these giants are full grown to let them have free range access to the orchard you can see in the far rear of this picture and just close them up at night. They are going to be so big that I don't think air predators are going to bother them. And I'm thinking that if I leave a 12 lb rooster to run with my hens that there are going to be many dogs, cats, coyotes, coons, or opossums that are going to want to tangle with that size rooster with spurs! The great big bobcat that was spotted in my front yard at 7 pm three weeks ago, well I'm hoping it's moved on! We're going to have all totaled about $250 in this coop and as I've said in earlier posts with should be big enough for up to 13 of these giant chickens, not that I intend to have that many, or approx. 26 medium sized chickens. We'll post pics of the finished hoopy coop with all the bells and whistles and pics of each of our growing baby Black Jersey Giants when we get 'er dun! LOL Maybe you experienced chicken handlers and see if you agree with me as to who is a cockerel and who is a hen. I think I've got 3 cockerels and 7 hens
.


Our Hoopy Coop STAGE ? 3 l think LOL Sorry the heat is getting to me! LOL We think we've figured out all the bracing and we're done with the dry fitting, so now we take it apart in however I many pieces we need to in order to move it to it's final resting place. Then the next stage is the 1/2 inch metal hardware cloth and chicken wire. Prew I'm getting too old for this. LOL
This is what it looks like after all the bracings were secured. I was afraid that it was going to be to flimsy but once the bracings were secured, it was extremely sturdy. The following pics will show some close ups to the details of the bracings and securing the cattle panels. This is what we're calling stage 4. The next stage, Stage 5 will be putting the 1/2 inch hardware cloth on the entire front and back, and both sides from the ground up to 4 feet. Stage 6 will be putting the tarp roof on and securing it. Stage 7 will be building the doors and mounting them. Stage 8 will be introducing my big baby chickens to their new home! We'll add those pics when we get there!

This is what it looks like after all the bracings were secured. I was afraid that it was going to be to flimsy but once the bracings were secured, it was extremely sturdy. The following pics will show some close ups to the details of the bracings and securing the cattle panels. This is what we're calling stage 4. The next stage, Stage 5 will be putting the 1/2 inch hardware cloth on the entire front and back, and both sides from the ground up to 4 feet. Stage 6 will be putting the tarp roof on and securing it. Stage 7 will be building the doors and mounting them. Stage 8 will be introducing my big baby chickens to their new home! We'll add those pics when we get there!

We used metal plumbers strapping to secure the cattle panels to the wood frame along the bottom. We also used it to secure the cattle panels to the wood framing at the very front and back of each side.


This is a close up of the bottom joints of the 4 bracings for the roof.

This is a close up of the top joints of the 4 bracing for roof. Notice that we staggered them on the roof center joist in order to be able to put the screws threw the center joist into the bracing.

To connect the four cattle panels together, we used baling wire at each intersection of the cattle panels cross wires. We wove the wire in an X pattern around the cross members.

Before weaving them in an X pattern we twisted them securely together until the two panels were tightly together.


We then realized that the roof bracing joints were leaving a point of wood protruding past the cattle panel into the area that we are planning to put a tarp roof, therefore we used a jigsaw to trim the protrusion away.

Our Hoopy Coop Stage 4 - In this stage we will secure 4 foot 1/2 inch hardware cloth on each end and down both side of the coop. We did that by using wood screws and washers and securing the hardware cloth to the bottom boards and the bracing boards we had at the 4 foot high level. We used bailing wire to whip stitch any place that we had to join pieces of the hardware cloth together. By doing this we were able to get go corner angles and used a lot less of it then if we had tried to wrap it. The hardware cloth does not bend smoothly easily. We then covered the top of the coop with chicken wire, we chose to put 5 rows across the top from side to side. We then secured it under the hardware cloth by unscrewing it from the 4 ft. high bracing boards, slipping it underneath, and then retightening the screws. I know it seems like redoing what was already done, perhaps we should have started with the chicken wire top, but chicken wire hard to work with "I think it should be called rattlesnake wire, cause it bites!" as it is prickly and flimsy. Having the hardware cloth right there to secure the edges I think was a help. We then use bailing wire to whip stitch the chicken wire sections together and around the cattle panel wires that were at the seams. We then cover the front and back of the coop with the hardware cloth, accept for the front door, which we will make in stage 5.
Trim one side's wire to fit to the others perfectly, but you can leave the second side's wire to long until you finish whip stitching the corner together.

I trimmed the excess wire after I whipped stitched up the corners.

Well I thought that I would show you here how I bend the wire sprig around the ajoining wire and back again so as to lessen the sharpness of the corners. It's not necessary but I thought it was worth the trouble.

Here is the view of the right side. We'll have the 1/2 inch hardware cloth from the bottom to 4 ft up on both sides. The front and back will be completely hardware cloth.

I let the side hardware cloth overlap the end hardware cloth, which was trimmed to fit the contour of the side,or vise versa.

We used bailing wire to connect the side 1/2 inch hardware cloth with front hardware cloth. Whip stitch them together with the bailing wire.

Now in this our final stage, we will build the front door, cover it with hardware cloth, hang it with hinges, put on a top and bottom door latch, and a spring to keep it closed when you go in. Then we will cover the top and back with heavy duty reflective tarp secured down with bailing wire through the grommets and/or the screws and washers that are holding down the hardware cloth whenever the tarp is at the area the screws are. Finally we will build a 3/4 high back door that will eventually lead to a run for the chickens in our orchard, but that we will save for a later day. For right now we intend to secure the small coop we have had them in as a brooder to the back door opening with a come-a-long tie-down strap until they get used to their new digs! We want them to fill safe and secure. Then we will "RELEASE THE CRACKEN" LOL and see how the chicks like their new digs!
Here I'm showing how we screwed the sides of the door into the door jam in order to get it the correct size. Then we added the top and bottom, screwed it all together, put on the hinges and latches,then we took out those screws holding it closed. Wahlah! Finished door built to fit.

Fitting the door to size.

Here you can see the hinges and how we attached the hardware cloth to the door.

Here's the front door.

The front of the Hoopy Coop is finished! Yeah!

Now we can "Release The Cracken!" LOL They seem to like their new digs!
All in all there isn't much we would change, except we will be putting tarp over the entire roof not just 1/3 or it. Our 10 - 7 1/2 wk old Black Jersey Giants, apparently don't know how to come in out of a thunderstorm! We've got a nice dry area for them in the back, but they decided instead that it was a good idea to pile up on top of each other, shivering in the front corner by the door, until I had to go out there IN THE RAIN pick them up and put them in the back of the coop! Brother! I hope they'll dry out and not get too cold. Also we intend to put riversand on the ground when they kill the grass that's there now. We also be adding nest boxes to the back on one side when they get old enough to lay. Hope we have inspired you to try your hand at a build, if we can do it, you can do it. Good Luck