Poultry Palace Extraordinaire
After months of deliberation my boyfriend finally decided to allow me to obtain chicks for our urban backyard. I considered several things when planning out the design of the coop:
- I had no experience with power tools whatsoever - the design would have to be simple
- We live in a small city and the coop being aesthetically pleasing to neighbors was important
- We also needed to find a way to clean the coop easily and limit odor
- We have a fairly small yard so the coop couldn't take up a great deal of space
I decided that the following features were necessary in the coop:
- One nesting box to accommodate 2 chickens. The nesting box would stick out of the back of the coop and have a lid that lifted up for easy egg collection
- The coop would be small - about 2' wide, 2.5' long, and 2.5' tall
- A vent on the back wall of the coop to allow for ventilation
- A roost for the girls to perch on at night
- A window on the front of the coop to add to the aesthetic quality of the coop
- The coop would be lifted off the ground so that the space under it could be surrounded by hardware cloth or chicken wire to allow the chickens a place to free range safely
- To accommodate the deep litter method I decided on two doors for the front of the coop. Each door could be opened separately and locked. This ensured that when I opened the top door I could leave the bottom one closed to keep the litter in, but I could open both doors to fully clean the coop.
- Since I didn't want litter falling out I chose to put a side door in instead of putting a door under the coop (this also saved floor space in the already small coop) and lifted the door off of the base of the coop about 10 inches so litter wouldn't fall out when it was opened.
First I built a simple frame out of 2x2's and 1x3's and screwed a piece of OSB to the bottom of the coop:

The nesting box is a 1' cube and I installed that next. First I cut some siding we got from Home Depot to the size of the back wall and then cut a hole in the siding to accommodate the nesting box. The sides of the walls were cut as precisely as I could make them with a circular saw and the pieces for the walls were set into the coop, meeting the 2x2's on the sides and being drilled into the 1x3's on the top and bottom only. This meant that the sides only abutted the 2x2's and were not attached in any way. Precise cuts were important and I later caulked these edges to ensure that they wouldn't leak in rainy Oregon winters.
1x2's were drilled into the wall and adjacent 2x2's above and below where the nesting box would be placed. 1x2's were used to make a frame for the box and siding was attached to the frame to complete the box. It was drilled into the 1x2 frame above and below to keep it in place:
I added in the other 3 walls by cutting them to size and screwing them into the 1x3 frame as done with the back panel. I cut a side door out of the left side wall. I also cut the two front doors and framed them with 1x3 trim. Below is the bottom door only, sitting in place:
Next I cut the eaves for the coop. I cut 1x2's at 45 degree angles and drilled pilot holes and screwed the pieces together at perfect 90 degree angles, checking with a square to make sure they were right. I ran 1x2's across the width of the coop and drilled the eaves into them. I also cut out siding to fit into the front and back of the coop behind the eaves, and took a rectangle out of the back piece to accommodate a vent:
Next I used 4x4's and 1x3's to frame a base to lift the coop off of the ground. The coop was connected to the base by drilling through the bottom OSB into the 4x4's.
I added trim to all of the doors, cut a piece of plexiglass to the size of the window desired, and glued trim on with gorilla glue. After all of the construction was done, it was time to caulk all of the cracks in the coop from bugs or water. We live in Oregon so while the cold isn't a major concern, it rains a lot and I needed the coop to be dry. I also painted the coop with a wood sealant to keep out moisture. I painted the inside of the coop with high gloss paint so that I could wipe it down easily during cleaning.
After it was totally sealed I painted it and attached all the doors, windows, and roof.
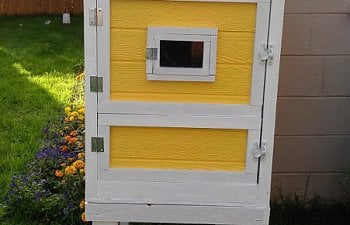
The Finished Coop
Front of the coop:
I used a hook and eye to keep the nesting box lid closed - it has a springloaded locking mechanism to make sure racoons can't get in:
Left side with side door:
Happy chicks in the coop:
Overall the coop probably cost me about $125. I purchased a sheet of OSB, 2 sheets of siding, and an assortment of 4x4's, 1x3's, 1x2's, 1x1's and 2x2's. I also needed hinges and window locks, a vent, and a sheet of plexiglass.
At some point I intend to make a frame to enclose the side door and connect to the base of the coop using chicken wire to enclose a space to let them have a place to free range, but I'll probably do it closer to the spring when it's warmer.

The nesting box is a 1' cube and I installed that next. First I cut some siding we got from Home Depot to the size of the back wall and then cut a hole in the siding to accommodate the nesting box. The sides of the walls were cut as precisely as I could make them with a circular saw and the pieces for the walls were set into the coop, meeting the 2x2's on the sides and being drilled into the 1x3's on the top and bottom only. This meant that the sides only abutted the 2x2's and were not attached in any way. Precise cuts were important and I later caulked these edges to ensure that they wouldn't leak in rainy Oregon winters.
1x2's were drilled into the wall and adjacent 2x2's above and below where the nesting box would be placed. 1x2's were used to make a frame for the box and siding was attached to the frame to complete the box. It was drilled into the 1x2 frame above and below to keep it in place:


I added in the other 3 walls by cutting them to size and screwing them into the 1x3 frame as done with the back panel. I cut a side door out of the left side wall. I also cut the two front doors and framed them with 1x3 trim. Below is the bottom door only, sitting in place:

Next I cut the eaves for the coop. I cut 1x2's at 45 degree angles and drilled pilot holes and screwed the pieces together at perfect 90 degree angles, checking with a square to make sure they were right. I ran 1x2's across the width of the coop and drilled the eaves into them. I also cut out siding to fit into the front and back of the coop behind the eaves, and took a rectangle out of the back piece to accommodate a vent:


Next I used 4x4's and 1x3's to frame a base to lift the coop off of the ground. The coop was connected to the base by drilling through the bottom OSB into the 4x4's.


I added trim to all of the doors, cut a piece of plexiglass to the size of the window desired, and glued trim on with gorilla glue. After all of the construction was done, it was time to caulk all of the cracks in the coop from bugs or water. We live in Oregon so while the cold isn't a major concern, it rains a lot and I needed the coop to be dry. I also painted the coop with a wood sealant to keep out moisture. I painted the inside of the coop with high gloss paint so that I could wipe it down easily during cleaning.


After it was totally sealed I painted it and attached all the doors, windows, and roof.
The Finished Coop
Front of the coop:

I used a hook and eye to keep the nesting box lid closed - it has a springloaded locking mechanism to make sure racoons can't get in:

Left side with side door:

Happy chicks in the coop:

Overall the coop probably cost me about $125. I purchased a sheet of OSB, 2 sheets of siding, and an assortment of 4x4's, 1x3's, 1x2's, 1x1's and 2x2's. I also needed hinges and window locks, a vent, and a sheet of plexiglass.
At some point I intend to make a frame to enclose the side door and connect to the base of the coop using chicken wire to enclose a space to let them have a place to free range, but I'll probably do it closer to the spring when it's warmer.
")