This coop was inspired by a combination of hot weather coop designs that I have seen throughout the years. I decided that it was most important to keep the chickens cool in the summer rather than warm in the very mild winters that we have, which of course means TONS of ventilation! I then decided that the best design to accommodate this need was a three sided, open concept coop. I also decided that of course I wouldn't be able to only buy a few chickens, which meant my plans needed to be able to accommodate a large number of birds. The finished coop is seen below!

Design plan made on Word to show the vision of the finished product:

Materials required for this build included:
Time to get started! First it was necessary to tear down the old chicken coop that was thrown together a few years ago. It did not weather nicely, nor protect the birds from predators or weather. We decided that it would be best to completely start over and the process is listed below! We started by clearing and leveling the area with the dirt that we had on hand.

We chose to construct in an "L" shape in hopes of the trees providing shade to the coop during the hot Texas summers. Next the posts went up. The holes were dug two feet down and set with concrete.
After all of the posts were up, we started attaching the wire with the use of an air pressurized staple gun. The staples were applied deliberately, as well as 1" fender washers put on later for added support and protection. The wire was very difficult to put on in long pieces, so we then decided that it would be easiest to cut pieces the size that it would take to reach from each post. The 2x4 boards that you see at the top of the next picture were used as supports so the 4x4 posts were not moved while setting in the concrete.
The next layer of hardware cloth was overlapped a few inches with the bottom layer, and secured with a 2x4 board that runs the entire length around the chicken coop, as shown in the next picture.
Once all of the wire was attached around the entirety of the coop, the roof line was framed out with 2x4's and 1x4's. The roof has a one foot slant, that sheds water away from the coop. A few pictures of the detail work listed below.
Next, it was time for the tin roofing to be added. This was done with 1" hex roofing screws that had attached washers. These screws are designed to ensure that no leaks in the roof occur.
The windbreak/open design coop area was put up next. I decided to use plywood as the siding for the coop. It was put up from roof to floor on three sides, leaving the fourth side completely open for airflow. For easy construction, the hardware cloth was installed completely around the coop for an additional predator barrier. This also allowed the fit to not have to be an exact match on the plywood, hence the little cracks seen in the picture below not being of any worry.
The end is near! Once the plywood and roof was up, all that was left to do was to install the predator apron and put the finishing staples and washers along the seams of the hardware cloth. The picture below is a reference for size and/or space layout.
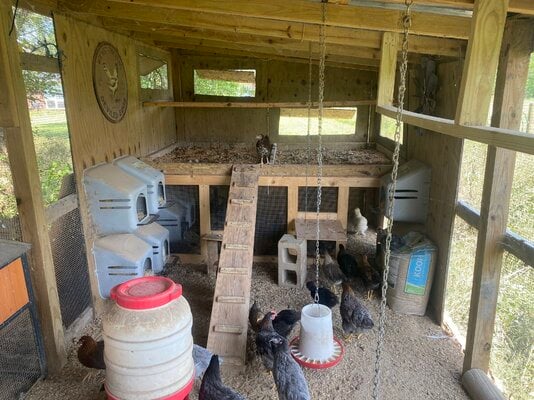
The roosts were installed at different heights to accommodate the number and different breeds of chickens that I have. The lowest roost is about two ft off the floor, while the tallest is about five ft off the floor. The roosts are spaced one foot away from each other to prevent dirty chickens during the night!
The predator apron was installed by stapling a lip of the cloth to the bottom baseboards of the coop. The edges of the apron were stapled down with 6" landscaping pins every few inches. Don't forget to overlap the edges!
A very important lesson that I learned from my last chicken coop was that I needed a way to lock myself in the coop without letting the chickens out. An eye hook was perfect for this!
The next step was to install the nesting boxes. I bought these from my local TSC for approximately $23 each, so they are a good choice for anyone interested! I decided that for 24 hens I would need eight boxes, so I installed four on each side. The picture below shows the boxes and how they were oriented. I was not able to find all eight at once, so they were installed individually when they were restocked. My pullets are ten weeks old at the moment, so the boxes will remain blocked for a few weeks.
The chickens enjoy the different levels of roosting bars during the day, however at night they usually cram onto the top level!
Below is an additional roosting bar that we added for daytime play, as well as nice weather nights when the chickens may want to roost in the breeze.
Another roosting bar that we added for daytime play, as well as more vertical use of the space.
Another element that my chickens really enjoyed when they were younger is an old stool. The foot rests were perfect size for them to perch on!
And that is the conclusion of the build!
A few things that I wished I would have done differently includes using clear poly carbonate roofing panels for extra sunlight. Shade was a very important aspect due to my climate, but extra sunlight is something that I wished I would have incorporated. Also, this has been said millions of times by chicken keepers across the globe, but always build bigger than anticipated! My coop is perfect for the amount of chickens I have, approximately ten sq ft per bird, however I am already wishing it was bigger! Chicken math is real! It is very difficult to run to the feed store for a bag of feed and refrain from bringing home chicks!
Building tips include remembering to hammer down the sharp edges of hardware cloth, nails, and staples, they hurt! Also, a chalk line helps when making sure that the 4x4 posts are straight before pouring concrete, which is a very important aspect. Another tip is to make sure you can accommodate the number of birds you want with roosting space. I have approximately 1-2 ft of roosting space per bird in the three sided coop area. One last tip includes to incorporate plenty of hiding places and daytime things to keep the chickens occupied when you are unable to free range such as I am!
Hope you enjoyed!
.JPG")
05/18/2022
MUCH needed update..... this coop did indeed NOT have enough ventilation.... go figure. We ended up cutting a good chunk out of each of the three sides of the plywood, covering the hole in hardware cloth, and using the cut piece of plywood as a shutter/protector from rain. Whew! Also, I cannot contain my chicken math madness so many more roosting bars have been added to accommodate a larger number of birds. I also have a large chicken yard that they range during the day. Lastly, there is now an integration brooder underneath the poop board with both chick and chicken size doors.
Design plan made on Word to show the vision of the finished product:
Materials required for this build included:
Time to get started! First it was necessary to tear down the old chicken coop that was thrown together a few years ago. It did not weather nicely, nor protect the birds from predators or weather. We decided that it would be best to completely start over and the process is listed below! We started by clearing and leveling the area with the dirt that we had on hand.
We chose to construct in an "L" shape in hopes of the trees providing shade to the coop during the hot Texas summers. Next the posts went up. The holes were dug two feet down and set with concrete.
After all of the posts were up, we started attaching the wire with the use of an air pressurized staple gun. The staples were applied deliberately, as well as 1" fender washers put on later for added support and protection. The wire was very difficult to put on in long pieces, so we then decided that it would be easiest to cut pieces the size that it would take to reach from each post. The 2x4 boards that you see at the top of the next picture were used as supports so the 4x4 posts were not moved while setting in the concrete.
The next layer of hardware cloth was overlapped a few inches with the bottom layer, and secured with a 2x4 board that runs the entire length around the chicken coop, as shown in the next picture.
Once all of the wire was attached around the entirety of the coop, the roof line was framed out with 2x4's and 1x4's. The roof has a one foot slant, that sheds water away from the coop. A few pictures of the detail work listed below.
Next, it was time for the tin roofing to be added. This was done with 1" hex roofing screws that had attached washers. These screws are designed to ensure that no leaks in the roof occur.
The windbreak/open design coop area was put up next. I decided to use plywood as the siding for the coop. It was put up from roof to floor on three sides, leaving the fourth side completely open for airflow. For easy construction, the hardware cloth was installed completely around the coop for an additional predator barrier. This also allowed the fit to not have to be an exact match on the plywood, hence the little cracks seen in the picture below not being of any worry.
The end is near! Once the plywood and roof was up, all that was left to do was to install the predator apron and put the finishing staples and washers along the seams of the hardware cloth. The picture below is a reference for size and/or space layout.
The roosts were installed at different heights to accommodate the number and different breeds of chickens that I have. The lowest roost is about two ft off the floor, while the tallest is about five ft off the floor. The roosts are spaced one foot away from each other to prevent dirty chickens during the night!
The predator apron was installed by stapling a lip of the cloth to the bottom baseboards of the coop. The edges of the apron were stapled down with 6" landscaping pins every few inches. Don't forget to overlap the edges!
A very important lesson that I learned from my last chicken coop was that I needed a way to lock myself in the coop without letting the chickens out. An eye hook was perfect for this!
The next step was to install the nesting boxes. I bought these from my local TSC for approximately $23 each, so they are a good choice for anyone interested! I decided that for 24 hens I would need eight boxes, so I installed four on each side. The picture below shows the boxes and how they were oriented. I was not able to find all eight at once, so they were installed individually when they were restocked. My pullets are ten weeks old at the moment, so the boxes will remain blocked for a few weeks.
The chickens enjoy the different levels of roosting bars during the day, however at night they usually cram onto the top level!
Below is an additional roosting bar that we added for daytime play, as well as nice weather nights when the chickens may want to roost in the breeze.
Another roosting bar that we added for daytime play, as well as more vertical use of the space.
Another element that my chickens really enjoyed when they were younger is an old stool. The foot rests were perfect size for them to perch on!
And that is the conclusion of the build!
A few things that I wished I would have done differently includes using clear poly carbonate roofing panels for extra sunlight. Shade was a very important aspect due to my climate, but extra sunlight is something that I wished I would have incorporated. Also, this has been said millions of times by chicken keepers across the globe, but always build bigger than anticipated! My coop is perfect for the amount of chickens I have, approximately ten sq ft per bird, however I am already wishing it was bigger! Chicken math is real! It is very difficult to run to the feed store for a bag of feed and refrain from bringing home chicks!
Building tips include remembering to hammer down the sharp edges of hardware cloth, nails, and staples, they hurt! Also, a chalk line helps when making sure that the 4x4 posts are straight before pouring concrete, which is a very important aspect. Another tip is to make sure you can accommodate the number of birds you want with roosting space. I have approximately 1-2 ft of roosting space per bird in the three sided coop area. One last tip includes to incorporate plenty of hiding places and daytime things to keep the chickens occupied when you are unable to free range such as I am!
Hope you enjoyed!
05/18/2022
MUCH needed update..... this coop did indeed NOT have enough ventilation.... go figure. We ended up cutting a good chunk out of each of the three sides of the plywood, covering the hole in hardware cloth, and using the cut piece of plywood as a shutter/protector from rain. Whew! Also, I cannot contain my chicken math madness so many more roosting bars have been added to accommodate a larger number of birds. I also have a large chicken yard that they range during the day. Lastly, there is now an integration brooder underneath the poop board with both chick and chicken size doors.