So I have been caponizing my extra roos for the past year and half or so. Over this time, I have learned many tips and tricks to successfully caponize and to have the highest success rate and least trauma to the bird. I just did 4 this morning. I want to make it clear, I have no prior medical experience and have simply learned by watching a lot of YouTube videos, reading amazing posts on BYC, and hands on trial and error.
The reason I caponize is that we are a small homestead. We started raising chickens with the idea of harvesting eggs and MEAT. I acquired 12 strait run Rhode Island Red chicks from tractor supply, and to my amazing luck 7 of them were Roos . Well they hit about 20 weeks and the Roos harassed the hens so bad, we knew it was time to harvest. My husband had to dispatch them and we followed some online guides to butchering and prepping. I cooked up a Roo two nights later expecting something similar to grocery store, smooth, tender and delicious. It was not. It was stringy and tough. I was gagging so bad, I couldn't finish. My husband didn't think it was too bad, but he would eat a car tire if it was smothered in gravy
  .
.
I was so disappointed. We moved from the city with intentions to be self-sufficient, and if I cant eat the Chicken.. what a complete waste of my time and efforts. So I hopped online and started reading about meat bird options. I came across an ad for cornish cross and noted someone had posted a comment on whether they had to be caponized. Caponized? WTFFF is that? So I googled and googled some more. I watched videos, read testimony's, was basically complete obsessed with this idea that I could still raise the birds I want, and still get tender amazing meat. I told my husband I wanted to try it, and he was down. So I ordered the Nasco Caponizing Kit from ebay. OMGOSH Was I excited when it came. It had this old school looking black and white guide on how to do the process, all the tools and even tie down line. Now I just needed the chicks. I hatched a small batch and waited patiently for them to hit the 5 week old mark. I had two that I was pretty sure were boys and would be my test subjects.
With shaky hands, I began. I followed the NASCO guide to the tee. First thing I had was a huge issue with the crappy plastic scalpel. It was difficult to hold and the blade kept slipping out. Next the rib splitters were absolute junk, they kept slipping and I had to keep running to the garage to have my husband adjust the clamp arms. Finally, the "scoop" was far too big to get into the body cavity. That poor first bird was on the table for over an hour. Finally, I got beans out using a bunch of random tweezers and other things from my medicine cabinet. It was a rough first experience. But it was done. I had one successful Capon and one Slip. You can read about those results here: https://www.backyardchickens.com/articles/capon-vs-rooster-a-side-by-side-comparison.76374/
I knew I wanted to keep trying, but I had to get some better tools. Based on the first experience, I knew what I wanted. I ordered a real surgical rib splitter and dissection kit. I proceed to try different techniques and tool combinations until I found what works best for me. The following are my preferred tools, where they came from, and how they are used (Left to Right):

1 - Scalpel - Dissection kit - Used for initial cut. 1 blade usually last for 4-5 birds.
2- Sharp Scissors - Dissection kit - Used for trimming feathers, skin, and leg tags
3- Curved tweezers - Dissection kit - used to grasp under testy and gently pull
4 - Blunted Poker - Dissection kit - Used to move around intestines to locate testies, and position testies for extraction.
5- Pointed Poker - NASCO Kit - I only use the pointed end to tear air sac
6 - Spiked Grasping Tweezers - Dissection kit - used to grasp any piece of the testie that may have been left behind
7 - Rib Splitters - Amazon - used to hold open the body cavity
Here is my total layout (yes, I perform this on my stove, so I can sanitize everything with bleach before and after):
2ft board with screws on each end and clean towel laid across. Boiling pot of water to sanitize tools between chickens. Cotton balls to wipe excess blood and apply alcohol to surgery area and the ties downs from the NASCO Kit.
I also apply a colored band to each chicken after surgery and record their information in my tracker

Prepare NUTRIDRENCH Mix to give to chickens after surgery
Rubbing alcohol in a small pan. And a light fabric cloth to cover their faces (I use an old pillow case)
Prepare Hospital cage with fresh clean towel, nutridrench water, and food soaked in nutridrench
I always Caponize Saturday mornings. So to prepare the chicks for surgery I do the following 2 days prior:
Thursday Night, I remove food. Move them to a pen with a wire floor so they cant eat their poop and provide them with water laced with electrolytes or nutridrench
Friday Night, I remove the water right before bed (around 8 pm)
Saturday Morning, around 8am, I start surgery.
THE NEXT PICTURES ARE OF ACTUAL SURGERY >> READER BEWARE
Keep Scrolling...
Keep Scrolling .......
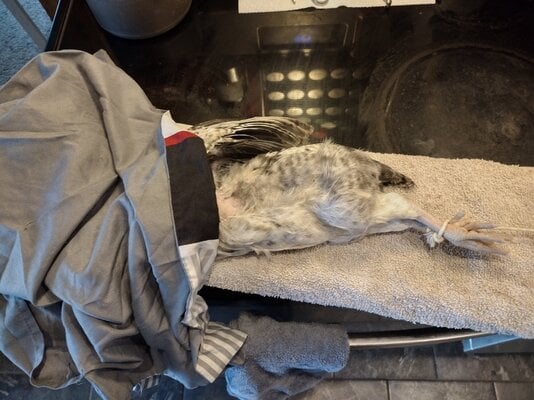
The day of surgery has arrived. Step 1 is to secure the bird, very tight! Be careful not to pull limbs from sockets, but you want them stretched to the max.
Next I cover his face with a light cloth and wipe his side down with alcohol and a cotton ball. Next pluck any feathers that might be close to the cut zone (between second and last RIB). I am careful here to only pluck the necessary feathers, don't go over board and do his whole side.
Next used the scalpel to create about 3/4 - 1 inch long incision between the second and last rib. Use the splitters to open the body cavity and the pointed poker to tear the air sac. Use the blunted poker to locate the testy and position it as high as possible.
(you can see the testy is the yellow bean shaped organ)
Carefully use the curved tweezer to clasp under the testy, attempt to get under the entire thing and not clamp in the middle of the "bean". Once you are under them, gently start pulling, the membranes will stretch and the "bean" will start to move to the surface. DO NOT LET IT GO, it will spring back into the body cavity.
Once you have it high enough you can twist to break the membrane or use the sharp scissors to cut the membrane.
If you missed any part of the bean, use the spiked tweezers to reach in and extract the pieces.
One you have it all, remove the rib splitters, flip the bird over, and repeat the process.
When both sides are done, gentle untie your capon and put him in the hospital cage with all the food and nutridrench water he wants. He might take a little time before he starts eating, but once he notices the food, all he will care about is eating.
I keep my chicks in the hospital cage for the remainder of the day and periodically check on them. Typically they are ready to go back outside to the brooder by evening (once the wound is scabbed over and they have their energy back).
I have been doing this so often now (every 3 weeks for the past 4 months or so), I now do it to all chicks. This allows me to confirm gender long before waiting for crowing or eggs. Here is what a female looks like inside:
(No testies and a small yellowish looking triangular sac (this is the ovaries or uterus??)) If I find it is a female, I am very careful to not probe around anymore than needed, you don't want to damage her egg making organs.
And that's it. The whole process doesn't take long and if you are careful, gentle, and calm, the bird will not be traumatized and back to normal in a few days.
With all that being said, I want to still warn you, if you choose to try this, you always risk loosing the bird. Their main artery runs right next to the testies and if you knick it, you will loose the bird in a matter of minutes from blood loss. They can also go into shock a few days after surgery, so added nutrients and electrolytes are important for the first few days after surgery. And no matter how careful you are, you can always get an infection or ruptured air sac. You also risk having a "Slip" if you miss even a little bit of the testie. With time and practice, I think my methods have greatly improved and success rates are higher than ever and I still recommend anyone interested in a self sustaining life with a handful of extra roos, try it out.
I will continue to Caponize as long as I can. I get to enjoy these beautiful birds for much longer, there is less drama, and they get to enjoy a fulfilling life free ranging with the flock.
I'll close this article with an image on my favorite Capon "Big Al". I was able to keep him for 14 months, he protected many ladies, and lived the good life. Upon butcher, he had the most incredible amount of fat and delicious flavor of any chicken I have EVER had, totally worth it, since he would have been butchered at only 3 months and have basically provided a meal for my dogs.
Good Luck! And God Bless you and your animals!
The reason I caponize is that we are a small homestead. We started raising chickens with the idea of harvesting eggs and MEAT. I acquired 12 strait run Rhode Island Red chicks from tractor supply, and to my amazing luck 7 of them were Roos
. Well they hit about 20 weeks and the Roos harassed the hens so bad, we knew it was time to harvest. My husband had to dispatch them and we followed some online guides to butchering and prepping. I cooked up a Roo two nights later expecting something similar to grocery store, smooth, tender and delicious. It was not. It was stringy and tough. I was gagging so bad, I couldn't finish. My husband didn't think it was too bad, but he would eat a car tire if it was smothered in gravy .I was so disappointed. We moved from the city with intentions to be self-sufficient, and if I cant eat the Chicken.. what a complete waste of my time and efforts. So I hopped online and started reading about meat bird options. I came across an ad for cornish cross and noted someone had posted a comment on whether they had to be caponized. Caponized? WTFFF is that? So I googled and googled some more. I watched videos, read testimony's, was basically complete obsessed with this idea that I could still raise the birds I want, and still get tender amazing meat. I told my husband I wanted to try it, and he was down. So I ordered the Nasco Caponizing Kit from ebay. OMGOSH Was I excited when it came. It had this old school looking black and white guide on how to do the process, all the tools and even tie down line. Now I just needed the chicks. I hatched a small batch and waited patiently for them to hit the 5 week old mark. I had two that I was pretty sure were boys and would be my test subjects.
With shaky hands, I began. I followed the NASCO guide to the tee. First thing I had was a huge issue with the crappy plastic scalpel. It was difficult to hold and the blade kept slipping out. Next the rib splitters were absolute junk, they kept slipping and I had to keep running to the garage to have my husband adjust the clamp arms. Finally, the "scoop" was far too big to get into the body cavity. That poor first bird was on the table for over an hour. Finally, I got beans out using a bunch of random tweezers and other things from my medicine cabinet. It was a rough first experience. But it was done. I had one successful Capon and one Slip. You can read about those results here: https://www.backyardchickens.com/articles/capon-vs-rooster-a-side-by-side-comparison.76374/
I knew I wanted to keep trying, but I had to get some better tools. Based on the first experience, I knew what I wanted. I ordered a real surgical rib splitter and dissection kit. I proceed to try different techniques and tool combinations until I found what works best for me. The following are my preferred tools, where they came from, and how they are used (Left to Right):

1 - Scalpel - Dissection kit - Used for initial cut. 1 blade usually last for 4-5 birds.
2- Sharp Scissors - Dissection kit - Used for trimming feathers, skin, and leg tags
3- Curved tweezers - Dissection kit - used to grasp under testy and gently pull
4 - Blunted Poker - Dissection kit - Used to move around intestines to locate testies, and position testies for extraction.
5- Pointed Poker - NASCO Kit - I only use the pointed end to tear air sac
6 - Spiked Grasping Tweezers - Dissection kit - used to grasp any piece of the testie that may have been left behind
7 - Rib Splitters - Amazon - used to hold open the body cavity
Here is my total layout (yes, I perform this on my stove, so I can sanitize everything with bleach before and after):

2ft board with screws on each end and clean towel laid across. Boiling pot of water to sanitize tools between chickens. Cotton balls to wipe excess blood and apply alcohol to surgery area and the ties downs from the NASCO Kit.

I also apply a colored band to each chicken after surgery and record their information in my tracker

Prepare NUTRIDRENCH Mix to give to chickens after surgery

Rubbing alcohol in a small pan. And a light fabric cloth to cover their faces (I use an old pillow case)

Prepare Hospital cage with fresh clean towel, nutridrench water, and food soaked in nutridrench
I always Caponize Saturday mornings. So to prepare the chicks for surgery I do the following 2 days prior:
Thursday Night, I remove food. Move them to a pen with a wire floor so they cant eat their poop and provide them with water laced with electrolytes or nutridrench
Friday Night, I remove the water right before bed (around 8 pm)
Saturday Morning, around 8am, I start surgery.
THE NEXT PICTURES ARE OF ACTUAL SURGERY >> READER BEWARE
Keep Scrolling...
Keep Scrolling .......
The day of surgery has arrived. Step 1 is to secure the bird, very tight! Be careful not to pull limbs from sockets, but you want them stretched to the max.


Next I cover his face with a light cloth and wipe his side down with alcohol and a cotton ball. Next pluck any feathers that might be close to the cut zone (between second and last RIB). I am careful here to only pluck the necessary feathers, don't go over board and do his whole side.

Next used the scalpel to create about 3/4 - 1 inch long incision between the second and last rib. Use the splitters to open the body cavity and the pointed poker to tear the air sac. Use the blunted poker to locate the testy and position it as high as possible.

(you can see the testy is the yellow bean shaped organ)
Carefully use the curved tweezer to clasp under the testy, attempt to get under the entire thing and not clamp in the middle of the "bean". Once you are under them, gently start pulling, the membranes will stretch and the "bean" will start to move to the surface. DO NOT LET IT GO, it will spring back into the body cavity.
Once you have it high enough you can twist to break the membrane or use the sharp scissors to cut the membrane.

If you missed any part of the bean, use the spiked tweezers to reach in and extract the pieces.
One you have it all, remove the rib splitters, flip the bird over, and repeat the process.

When both sides are done, gentle untie your capon and put him in the hospital cage with all the food and nutridrench water he wants. He might take a little time before he starts eating, but once he notices the food, all he will care about is eating.

I keep my chicks in the hospital cage for the remainder of the day and periodically check on them. Typically they are ready to go back outside to the brooder by evening (once the wound is scabbed over and they have their energy back).
I have been doing this so often now (every 3 weeks for the past 4 months or so), I now do it to all chicks. This allows me to confirm gender long before waiting for crowing or eggs. Here is what a female looks like inside:

(No testies and a small yellowish looking triangular sac (this is the ovaries or uterus??)) If I find it is a female, I am very careful to not probe around anymore than needed, you don't want to damage her egg making organs.
And that's it. The whole process doesn't take long and if you are careful, gentle, and calm, the bird will not be traumatized and back to normal in a few days.
With all that being said, I want to still warn you, if you choose to try this, you always risk loosing the bird. Their main artery runs right next to the testies and if you knick it, you will loose the bird in a matter of minutes from blood loss. They can also go into shock a few days after surgery, so added nutrients and electrolytes are important for the first few days after surgery. And no matter how careful you are, you can always get an infection or ruptured air sac. You also risk having a "Slip" if you miss even a little bit of the testie. With time and practice, I think my methods have greatly improved and success rates are higher than ever and I still recommend anyone interested in a self sustaining life with a handful of extra roos, try it out.
I will continue to Caponize as long as I can. I get to enjoy these beautiful birds for much longer, there is less drama, and they get to enjoy a fulfilling life free ranging with the flock.
I'll close this article with an image on my favorite Capon "Big Al". I was able to keep him for 14 months, he protected many ladies, and lived the good life. Upon butcher, he had the most incredible amount of fat and delicious flavor of any chicken I have EVER had, totally worth it, since he would have been butchered at only 3 months and have basically provided a meal for my dogs.
.jpg")

Good Luck! And God Bless you and your animals!


 good luck, and don't give up! It's a rewarding experience to bring back a lost art.
 Seeing as how they were my 'pets' I ended up giving the carcasses away - I wouldn't want to eat Pangoo after all!
")

