You don't need a tractor and big farm equipment to make hay, it's extremely easy to do on your own. All you need is access to grass and somewhere to dry and store it. If you have poultry I'm going to assume you have a backyard of sorts, but you can even dry hay inside your own house you are so inclined. You ask why on earth would I want to make hay? Grass is in many places a free resource, and often times a spent one. While it's not an essential part of poultry keeping it has is uses.
What you need:
Something to use it for
Grass
A way to cut it
A way to dry it
Storage
Uses for poultry
Lets look at this step first so this article don't seem like a giant waste of time.
Nest boxes
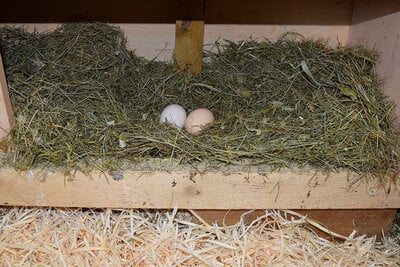
Most people associate hay usage in poultry with nest boxes, and for good reason. It's soft, pliable, easy to move around and makes the perfect nesting spot. Birds love to sit in it. And it smells good too!

Bedding
Hay isn't good for single bedding in coops with wooden or concrete floors as it doesn't absorb water well. It can, however, be a resource for those doing deep litter. In compost it's considered a brown material, meaning it composts well together with chicken poop. Seeing as it's a living material it can contain different seeds and maybe even bugs. Both things that will thrive and grow in a contained compost like deep litter coop, to your chickens' delight. Though you want to be careful using the future earth in your weed-free garden...
Feed
No poultry should live off of grass alone, not even grass eaters like domesticated geese. Hay is an addition and a treat where free ranging on fresh grass isn't an option. If your winters are as long as mine the bird will go a long time without the opportunity to free range. Storing home-grown fresh greens to last the entire winter can be tough, so hay is an easy solution to provide cheap green treats all year round.

Long stemmed grass can cause trouble when ingested. (Staged picture)
Dangers in feeding cut grass to birds
As we all know birds don't have teeth to chew their food into little pieces, but have a crop with rocks to do the job. The usual way for poultry to eat greens is to rip pieces off plants fastened to the ground. With loose hay this isn't an option, and long stemmed grass can fill up the crop and cause a blockage called impacted crop. This is a dangerous illness that can lead to death. Short hay is therefore best for poultry. Here's another reason to make it yourself, as hay sold in pet stores and on farms are meant for grass-eating mammals and are long stemmed. When making it yourself you can custom make the size to safely feed your bird. Remember: birds being fed anything other than poultry feed should ALWAYS have access to good quality grit!
Grass
What is grass and what is hay?
Like a lady in a musical once said; Let's start at the very beginning, a very good place to start. What is grass? "Grass" is a huge family of leaved plant that reproduce with seeds. Cereal and bamboo are grass. Bamboo would make terrible hay though. Some cereals are used for hay. Here we must not confuse hay with straw. Straw is the stems of matured cereals after the seeds have been removed. Straw is made after the plant has retracted much of its nutrients and is ready to shed the seeds and die. Therefore, straw is a low-quality feed and used for bedding. Hay on the other hand is made while the plant is growing and have high nutritional value, so hay is first and foremost used as food.

Rye grass
Botanical variety
What people picture when thinking of grass is rye grass. Fast growing, hardy grasses that serves well both for grazing and lawns. If allowed to grow they can reach a meter tall with long stems. The chickens like their grass young and juicy, when it's reached a certain age it becomes less interesting to them. Chickens prefer leafy greens, herbs and weeds, dandelion being an all-time hit. Other chicken favorites include clover, garden sorrel and dooryard dock. If the hay is meant for eating, including various weeds makes it more satiable. Some of these, like dandelion and clover, can be harvested when they're flowering to make an extra interesting batch of hay. Dried clover flowers are yummy treats in winter time! One thing to keep in mind is that broad leaved herbs take longer to dry.
Toxic plants
Before utilizing any area for animals, be it for grazing or hay making, go over the area and look for anything harmful. Some plants, like stinging nettles and meadow buttercup, lose their danger when they're dried. Some will keep their toxicity though and would be hard to pick out from the rest of the hay as the chickens eat it, putting them in danger of being poisoned. Look up plants in the area where you live and if you find a plant you've never seen before, google it to be sure.

Meadow buttercups have an irritant and are left standing in a free range area. The process of drying make them safe to eat.
Field maintenance
Good hay comes from good grass, and good grass comes from good soil. Sour soil will prevent the uptake of nutrients, and spreading lime on the field and lawn will prevent this. Too much nitrogen in the soil will similarly reduce the quality of the grass. Moss replaces grass and even though it makes for soft walking, it should be removed if you want the area for grass harvest. If the area holds too much moisture, the right sort of grass can also not grow.
Cutting
The first step is to find a source of grass to cut. This could be your lawn, the chickens' free range area or an un-utilized field. If you want to use an area that's not on your properly, you need to ask for permission. Even if the area is seemingly unused and wasted in your eyes, you MUST ask the land owner!
Lawn Mower
You need the version that collects the grass whole and don't cut it into tiny pieces. Your lawn must also have reached a certain length as too short grass will make dust, not hay. Unfortunately, you can't both have a perfectly manicured lawn and an area for hay making. It's vitally important that you don't leave lawn mower grass in a heap for too long. If so, the grass will start to gas and go bad. Grass cut with a lawn mower must be spread in a thin layer right away so it can start the drying process without getting hot.

Tip: If your free ranging area is heavily used, cut it a couple of dry days after a rainfall. That way the grass is nice and clean.
Scythe
You can go old fashioned and use a scythe. Make sure you get one that's actually meant to be used, and not a Halloween prop for the grim reaper... They come in different versions, since I'm short I prefer a small sized one. You don't need to be strong to use a scythe if you have the right technique. You swing it to one side and cut the grass in front of you from one side to the other in one swipe. The blade must hit the grass at the right angle so that you shear it clean off through the whole swing. The blade must also be sharp, you're cutting the grass, not beating it.

Big and small sized scythe.
String trimmers and brush cutters
A trimmer is a tool used to cut grass, weed and brush. It has a handle, a long shaft and a string or blade at the end. They can be big and small, electric or gasoline. The brush cutter is the most powerful, and also the most dangerous version. Make sure you use proper protective gear as the blade will cut right into your leg, or you can get pieces of grass in your eyes. If you've never used one before, get an experienced person to show you how.

Tip: If you just purchased a homestead or small farm, invest in one of these. It's amazing how fast brush and trees grow!
Drying
There are many ways of drying hay, so find a way that suits you. Here are some suggestions:
Hayrack
An old traditional way of making hay is with a hayrack. It's structure with poles set with some length between them, and then wire, rope or poles are put between them in various heights. The grass is then laid on top of each vertical line until the hayrack is completely filled. The grass sits in the sun until the top layer is dried, and then it's turned so that the inner layer is now on the outside. A traditional hayrack can be 20 meters long. You really don't need that much hay for a few chickens, two or three poles are more than enough. You'll need enough grass so that the grass don't blow away or fall down, but not so much that the inner layer will turn aerobic.
Pros: Utilizing a traditional method in a modern age. The grass doesn't touch the ground. Easy to dry big amounts.
Cons: Having the grass outside without cover, exposed to weather. If done incorrectly, the inner layer will turn moldy. Hard to do with short grass.

Please enjoy the quick sketches I made so I didn't have to use pic's found on google and risk copyright infringements.
Mesh board
If you make a small amount of hay over a longer period, a mesh board in a steel or wooden frame is a good solution. If you're a DIY'er it's a nice project, and it can stand just about anywhere including inside a house. The mesh has to be small, chicken wire and hardwire cloth have too big holes for short grass but could be suitable for longer stems. The stability of the mesh must also be taken into account. If it's flimsy and easily bent, a smaller frame or support underneath is required so the whole thing doesn't fall apart.
Pros: The grass is laid in a thin layer. Can be placed anywhere. Air from below makes for quick drying.
Cons: It can make a mess underneath if the mesh is too big and the grass too small. Needs some skill to build. Permanent structure that needs to be stored.

Drying on ground
The absolutely easiest way to make hay is to dry it on the ground. You can leave it where you cut it, or move it to a more suitable location. The grass is then laid out in a thin layer and turned by hand or with a rake. The ground is important. As the grass dries, the smaller part will fall to the bottom and be difficult to collect. If you put it on, say, gravel it will be impossible to remove the smallest parts. This can be avoided by having something underneath. Different types of cloth can be used. The ones with tiny holes are the best, as the moisture won't collect onto the cloth at the bottom. Having it on a cloth makes for easy moving as well. You can put it out when it's sunny, and drag it back under roof if it starts to rain.
Pros: The grass can be laid in a thin layer. Requires little to no preparation. It can be dried under roof. Moveable.
Cons: Contact with moisture and soil can cause the bottom layer to be less good. The smallest parts are hard to collect. Needs a big surface.

Drying on a tarp for easy moving. Since the moisture will gather on the plastic, the grass needs to be turned every few hours.
Loss of nutrients due to rain
The first rule of hay is: don't let it get wet after it's cut. How many farmers haven't cursed the rain after the hay has been cut for drying? Wetting half-dried grass doesn't necessarily destroy it. If it's completely dried again, it won't get moldy and stay perfectly edible. What the wetting does is make the hay less nutritional. All hay has a yellow-green color, but if the hay is deep yellow with no green shade it's either been wet during drying or old. If the hay is meant for bedding, it's not that big of a deal. If it's food, it will only serve to fill up the crop without giving the bird anything valuable.
Storage
Hay needs to be stored completely dry. Farmers can store hay outside in hay bales tightly wrapped in many layers of plastic. That's not an option for home made hay, it needs to be stored inside. Hay made by machines is also squeezed tightly together. This is hard to copy by hand, so the same amount of home made hay will take up more space than «tractor-packed» hay bales. Make sure you have room for the hay you make. Remember that even though hay stays fresh a long time, it has an expiration date. Don't feed hay more than a year old, preferably within 6 months.
Homemade hay bales
You can make your own hay bales with a box and ropes. You'll need a box with sturdy sides that won't budge. Lay rope inside the box, and start pressing as much hay as you can into it. When the box is filled, you wrap the ropes around like a Christmas present.

You have to pack the box as full and tightly as you can, otherwise the bale will fall apart.
Storing in bags or nets
Both plastic and fiber bags can be used for storing. The bags must have small holes for ventilation, especially if you use plastic. If you live in an area with fluctuating and cold temperatures, condensation inside the bags could become a problem. Here ventilation is especially important, and keeping the hay away from surfaces where condense can build up.

Storing in plastic bags with holes. Tip: keep animals like dogs and cats away, both during drying and storage. They can think the soft hay is a nice toilet, and you really don't want that!
Mold
Never ever give animals moldy hay! If any part of your batch stored together turns moldy, throw the whole thing out. It will have a strange smell (hay should smell sweet), be moist to the touch, have a brown or black color and at worst have visible mold. Hay can turn moldy due to two reasons; the hay wasn't dry enough when collected for storing, or the hay has been stored wrong either by not being allowed to breathe or exposed to condense or water.
Other plants you can dry
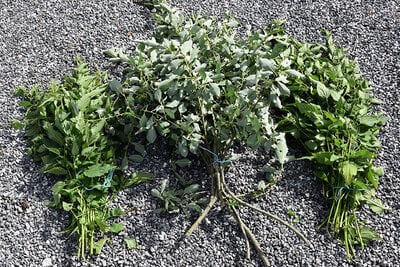
The process of drying food for storage is as old as agriculture itself. Drying, salting and curing meat and fish is a technique still used today, though it's no longer a necessity for survival. You can dry a whole number of plants for your poultry. How about growing kale and dry them for winter keeping? Sugar peas leave stems with leaves after the peas are harvested that can be dried. Stinging nettles are high in many micro-nutrients and drying them in bundles will make you gain access to them (you can even make soup or tea for yourself if you want to). If you have an overgrown forest nearby that needs cutting, you can even collect the thinnest branches and dry them with leaves on! If you put the whole bundle of branches in the coop, it will serve as a natural hiding place as well.

Stinging nettles and leaved branches ready for hanging to dry. As with plants, make sure the trees are safe to consume.
What you need:
Something to use it for
Grass
A way to cut it
A way to dry it
Storage
Uses for poultry
Lets look at this step first so this article don't seem like a giant waste of time.
Nest boxes
Most people associate hay usage in poultry with nest boxes, and for good reason. It's soft, pliable, easy to move around and makes the perfect nesting spot. Birds love to sit in it. And it smells good too!
Bedding
Hay isn't good for single bedding in coops with wooden or concrete floors as it doesn't absorb water well. It can, however, be a resource for those doing deep litter. In compost it's considered a brown material, meaning it composts well together with chicken poop. Seeing as it's a living material it can contain different seeds and maybe even bugs. Both things that will thrive and grow in a contained compost like deep litter coop, to your chickens' delight. Though you want to be careful using the future earth in your weed-free garden...
Feed
No poultry should live off of grass alone, not even grass eaters like domesticated geese. Hay is an addition and a treat where free ranging on fresh grass isn't an option. If your winters are as long as mine the bird will go a long time without the opportunity to free range. Storing home-grown fresh greens to last the entire winter can be tough, so hay is an easy solution to provide cheap green treats all year round.
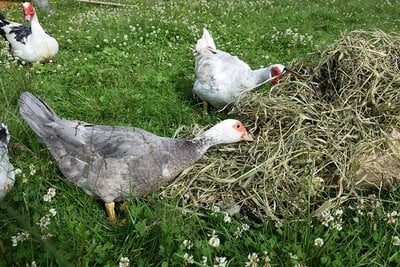
Long stemmed grass can cause trouble when ingested. (Staged picture)
Dangers in feeding cut grass to birds
As we all know birds don't have teeth to chew their food into little pieces, but have a crop with rocks to do the job. The usual way for poultry to eat greens is to rip pieces off plants fastened to the ground. With loose hay this isn't an option, and long stemmed grass can fill up the crop and cause a blockage called impacted crop. This is a dangerous illness that can lead to death. Short hay is therefore best for poultry. Here's another reason to make it yourself, as hay sold in pet stores and on farms are meant for grass-eating mammals and are long stemmed. When making it yourself you can custom make the size to safely feed your bird. Remember: birds being fed anything other than poultry feed should ALWAYS have access to good quality grit!
Grass
What is grass and what is hay?
Like a lady in a musical once said; Let's start at the very beginning, a very good place to start. What is grass? "Grass" is a huge family of leaved plant that reproduce with seeds. Cereal and bamboo are grass. Bamboo would make terrible hay though. Some cereals are used for hay. Here we must not confuse hay with straw. Straw is the stems of matured cereals after the seeds have been removed. Straw is made after the plant has retracted much of its nutrients and is ready to shed the seeds and die. Therefore, straw is a low-quality feed and used for bedding. Hay on the other hand is made while the plant is growing and have high nutritional value, so hay is first and foremost used as food.
Rye grass
Botanical variety
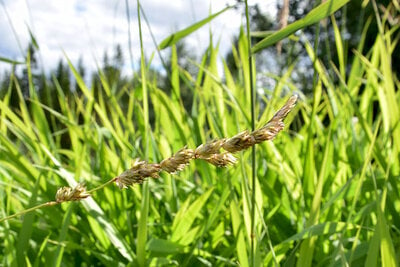
What people picture when thinking of grass is rye grass. Fast growing, hardy grasses that serves well both for grazing and lawns. If allowed to grow they can reach a meter tall with long stems. The chickens like their grass young and juicy, when it's reached a certain age it becomes less interesting to them. Chickens prefer leafy greens, herbs and weeds, dandelion being an all-time hit. Other chicken favorites include clover, garden sorrel and dooryard dock. If the hay is meant for eating, including various weeds makes it more satiable. Some of these, like dandelion and clover, can be harvested when they're flowering to make an extra interesting batch of hay. Dried clover flowers are yummy treats in winter time! One thing to keep in mind is that broad leaved herbs take longer to dry.
Toxic plants
Before utilizing any area for animals, be it for grazing or hay making, go over the area and look for anything harmful. Some plants, like stinging nettles and meadow buttercup, lose their danger when they're dried. Some will keep their toxicity though and would be hard to pick out from the rest of the hay as the chickens eat it, putting them in danger of being poisoned. Look up plants in the area where you live and if you find a plant you've never seen before, google it to be sure.
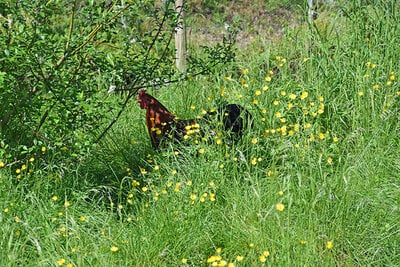
Meadow buttercups have an irritant and are left standing in a free range area. The process of drying make them safe to eat.
Field maintenance
Good hay comes from good grass, and good grass comes from good soil. Sour soil will prevent the uptake of nutrients, and spreading lime on the field and lawn will prevent this. Too much nitrogen in the soil will similarly reduce the quality of the grass. Moss replaces grass and even though it makes for soft walking, it should be removed if you want the area for grass harvest. If the area holds too much moisture, the right sort of grass can also not grow.
Cutting
The first step is to find a source of grass to cut. This could be your lawn, the chickens' free range area or an un-utilized field. If you want to use an area that's not on your properly, you need to ask for permission. Even if the area is seemingly unused and wasted in your eyes, you MUST ask the land owner!
Lawn Mower
You need the version that collects the grass whole and don't cut it into tiny pieces. Your lawn must also have reached a certain length as too short grass will make dust, not hay. Unfortunately, you can't both have a perfectly manicured lawn and an area for hay making. It's vitally important that you don't leave lawn mower grass in a heap for too long. If so, the grass will start to gas and go bad. Grass cut with a lawn mower must be spread in a thin layer right away so it can start the drying process without getting hot.
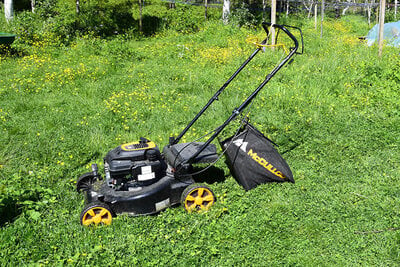
Tip: If your free ranging area is heavily used, cut it a couple of dry days after a rainfall. That way the grass is nice and clean.
Scythe
You can go old fashioned and use a scythe. Make sure you get one that's actually meant to be used, and not a Halloween prop for the grim reaper... They come in different versions, since I'm short I prefer a small sized one. You don't need to be strong to use a scythe if you have the right technique. You swing it to one side and cut the grass in front of you from one side to the other in one swipe. The blade must hit the grass at the right angle so that you shear it clean off through the whole swing. The blade must also be sharp, you're cutting the grass, not beating it.
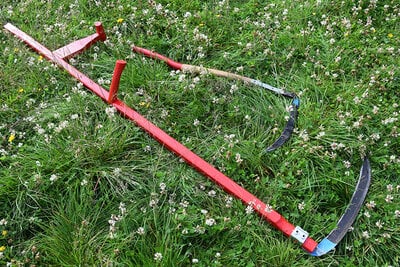
Big and small sized scythe.
String trimmers and brush cutters
A trimmer is a tool used to cut grass, weed and brush. It has a handle, a long shaft and a string or blade at the end. They can be big and small, electric or gasoline. The brush cutter is the most powerful, and also the most dangerous version. Make sure you use proper protective gear as the blade will cut right into your leg, or you can get pieces of grass in your eyes. If you've never used one before, get an experienced person to show you how.
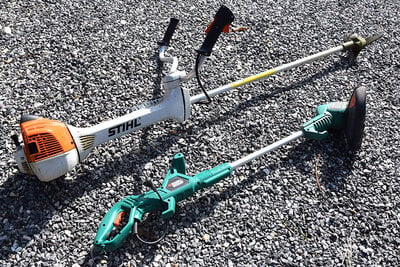
Tip: If you just purchased a homestead or small farm, invest in one of these. It's amazing how fast brush and trees grow!
Drying
There are many ways of drying hay, so find a way that suits you. Here are some suggestions:
Hayrack
An old traditional way of making hay is with a hayrack. It's structure with poles set with some length between them, and then wire, rope or poles are put between them in various heights. The grass is then laid on top of each vertical line until the hayrack is completely filled. The grass sits in the sun until the top layer is dried, and then it's turned so that the inner layer is now on the outside. A traditional hayrack can be 20 meters long. You really don't need that much hay for a few chickens, two or three poles are more than enough. You'll need enough grass so that the grass don't blow away or fall down, but not so much that the inner layer will turn aerobic.
Pros: Utilizing a traditional method in a modern age. The grass doesn't touch the ground. Easy to dry big amounts.
Cons: Having the grass outside without cover, exposed to weather. If done incorrectly, the inner layer will turn moldy. Hard to do with short grass.
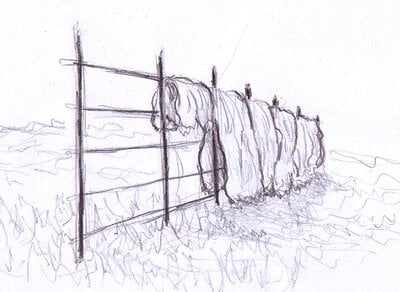
Please enjoy the quick sketches I made so I didn't have to use pic's found on google and risk copyright infringements.
Mesh board
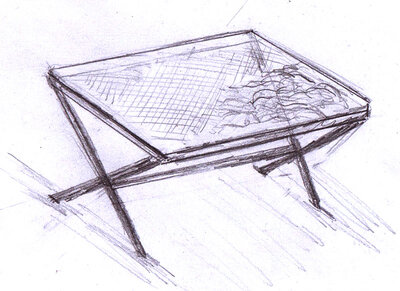
If you make a small amount of hay over a longer period, a mesh board in a steel or wooden frame is a good solution. If you're a DIY'er it's a nice project, and it can stand just about anywhere including inside a house. The mesh has to be small, chicken wire and hardwire cloth have too big holes for short grass but could be suitable for longer stems. The stability of the mesh must also be taken into account. If it's flimsy and easily bent, a smaller frame or support underneath is required so the whole thing doesn't fall apart.
Pros: The grass is laid in a thin layer. Can be placed anywhere. Air from below makes for quick drying.
Cons: It can make a mess underneath if the mesh is too big and the grass too small. Needs some skill to build. Permanent structure that needs to be stored.
Drying on ground
The absolutely easiest way to make hay is to dry it on the ground. You can leave it where you cut it, or move it to a more suitable location. The grass is then laid out in a thin layer and turned by hand or with a rake. The ground is important. As the grass dries, the smaller part will fall to the bottom and be difficult to collect. If you put it on, say, gravel it will be impossible to remove the smallest parts. This can be avoided by having something underneath. Different types of cloth can be used. The ones with tiny holes are the best, as the moisture won't collect onto the cloth at the bottom. Having it on a cloth makes for easy moving as well. You can put it out when it's sunny, and drag it back under roof if it starts to rain.
Pros: The grass can be laid in a thin layer. Requires little to no preparation. It can be dried under roof. Moveable.
Cons: Contact with moisture and soil can cause the bottom layer to be less good. The smallest parts are hard to collect. Needs a big surface.
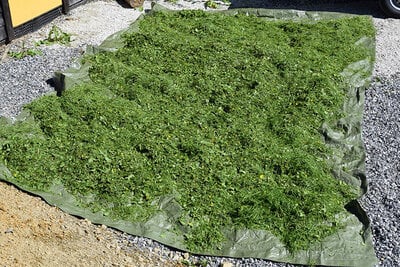
Drying on a tarp for easy moving. Since the moisture will gather on the plastic, the grass needs to be turned every few hours.
Loss of nutrients due to rain
The first rule of hay is: don't let it get wet after it's cut. How many farmers haven't cursed the rain after the hay has been cut for drying? Wetting half-dried grass doesn't necessarily destroy it. If it's completely dried again, it won't get moldy and stay perfectly edible. What the wetting does is make the hay less nutritional. All hay has a yellow-green color, but if the hay is deep yellow with no green shade it's either been wet during drying or old. If the hay is meant for bedding, it's not that big of a deal. If it's food, it will only serve to fill up the crop without giving the bird anything valuable.
Storage
Hay needs to be stored completely dry. Farmers can store hay outside in hay bales tightly wrapped in many layers of plastic. That's not an option for home made hay, it needs to be stored inside. Hay made by machines is also squeezed tightly together. This is hard to copy by hand, so the same amount of home made hay will take up more space than «tractor-packed» hay bales. Make sure you have room for the hay you make. Remember that even though hay stays fresh a long time, it has an expiration date. Don't feed hay more than a year old, preferably within 6 months.
Homemade hay bales
You can make your own hay bales with a box and ropes. You'll need a box with sturdy sides that won't budge. Lay rope inside the box, and start pressing as much hay as you can into it. When the box is filled, you wrap the ropes around like a Christmas present.
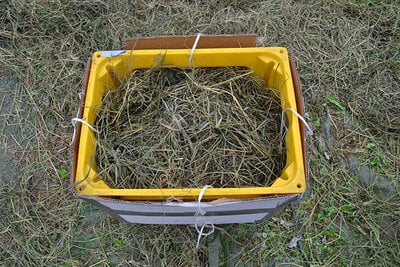
You have to pack the box as full and tightly as you can, otherwise the bale will fall apart.
Storing in bags or nets
Both plastic and fiber bags can be used for storing. The bags must have small holes for ventilation, especially if you use plastic. If you live in an area with fluctuating and cold temperatures, condensation inside the bags could become a problem. Here ventilation is especially important, and keeping the hay away from surfaces where condense can build up.
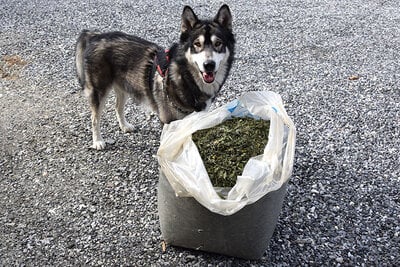
Storing in plastic bags with holes. Tip: keep animals like dogs and cats away, both during drying and storage. They can think the soft hay is a nice toilet, and you really don't want that!
Mold
Never ever give animals moldy hay! If any part of your batch stored together turns moldy, throw the whole thing out. It will have a strange smell (hay should smell sweet), be moist to the touch, have a brown or black color and at worst have visible mold. Hay can turn moldy due to two reasons; the hay wasn't dry enough when collected for storing, or the hay has been stored wrong either by not being allowed to breathe or exposed to condense or water.
Other plants you can dry
The process of drying food for storage is as old as agriculture itself. Drying, salting and curing meat and fish is a technique still used today, though it's no longer a necessity for survival. You can dry a whole number of plants for your poultry. How about growing kale and dry them for winter keeping? Sugar peas leave stems with leaves after the peas are harvested that can be dried. Stinging nettles are high in many micro-nutrients and drying them in bundles will make you gain access to them (you can even make soup or tea for yourself if you want to). If you have an overgrown forest nearby that needs cutting, you can even collect the thinnest branches and dry them with leaves on! If you put the whole bundle of branches in the coop, it will serve as a natural hiding place as well.
Stinging nettles and leaved branches ready for hanging to dry. As with plants, make sure the trees are safe to consume.
