By: Noelle Moser (Kuntry Klucker)
Building a Grape Arbor has been on my to-do list for the past 10+ years. Grapes are an enjoyable crop to grow on your land as they grow very fast, are pest resistant, and are easy to grow. They do require regular maintenance, pruning being the chief requirement.
As a child, I remember visiting my grandparent's farm during the summer and eating ripe grapes from their vines. It is a memory I cherish; I look forward to eating from my grape vines.

Building a Grape Arbor is a DIY project that you can tackle yourself. It takes some hard work, several helpers, effort, and time. But, if you are diligent, you can build a Grape Arbor in a week.
Why did I want to build a Grape Arbor?
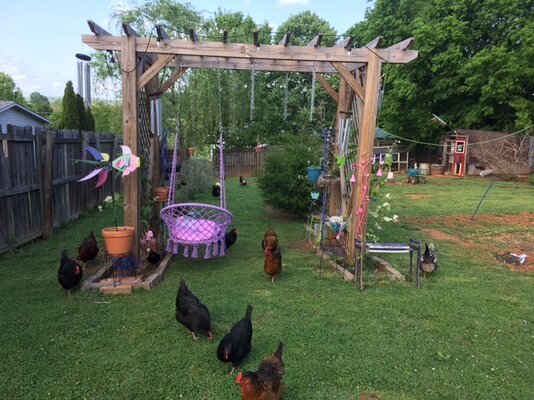
A grape arbor is not only functional as a trellis for the grapes to grow on, but a grape arbor also adds a majestic presence to your backyard or garden. They command attention as you enter their sacred space. To make the most of your time, you can hang a porch swing or hammock swing for a romantic setting. Installing solar lights to the arbor creates a romantic and relaxing seating area in your backyard.

Building a Grape Arbor:
We chose a traditional-style Pergola for our backyard Grape Arbor. I wanted something that would serve as a trellis for grape vines but a place where I could hang some backyard hammock swings. Above is the final completed project of the Arbor in our backyard. It is 8 feet tall and roughly 12 feet long.
Shopping List for the Grape Arbor:


Posts: (4)-4x4 @ 7'6.5" and (8) 2x6 @ 8'
Beams: (2) 4x6 @ 12'
Braces: (11) 2x4s
Runner on to the Arbor: (11) 2x4's @ 5'8" For a decorative look, cut the ends of the 2x4's at a 45-degree angle or bevel. This is optional
1 box of 2" deck screws and 1 box of 4" deck screws.
After we unloaded the wood, we cut the 2x4s and 4x6 beams to the size and beveled the ends at a 45-degree angle.
Before building the Arbor, we prepared the ground by digging the footings. We dug 4 holes at the depth of 4-feet. To accomplish this, we rented Agar to dig the depth of the holes.
Before placing the posts in the holes, using 4" deck screws, we attached two 4x6 boards to the large 4x4 beams. This creates massive beams that will support all the weight of the Grape Arbor. It will take 2-3 strong helpers to lift these beams and position them into the holes.
After the main support beams for the Arbor were placed in the ground, used a concrete mix to set them into position.
After a few days, the support beams were solid in place, forming the foundation of the Arbor. Next, it was time to assemble the canopy of the Grape Arbor.

To form the canopy, we hoisted the large 4x6 beams and set them on top of the 4x4 beams with the attached 2x6 beams. Lifting these beams on top of the grounded 4x4s will take a lot of muscle and grit. Make sure you have plenty of helpers.
After the large 4x6 beams, we attached the 2x4's across the width of the canopy to form a grid that the grapes eventually reach. When the grape vines finally cross this high point, they create a grapevine ceiling shading the arbor beneath.

Next, we attached 4x4 sections to the main support beams using pocket hole screws. Adding buffing support keeps the Arbor stable in wind events. In our area, we are often subject to high wind events. The diamond design also adds a bit of style doesn't hurt.
Finally, after a week of hard work, we added lattice boards and planted the grape vines. The lattice boards give the maturing vines something to attach to as they climb to the canopy. Because our Grape Arbor is so tall, this added some detail.
We chose three varieties of grapes, Muscadine, Concord, and Lakemont. Grapes do better when they can cross-pollinate with other grape varieties. Today, three years after the construction of our backyard Grape Arbor, the plants are prolific and rapidly climbing to the arbor canopy.
Concord grape vine loaded with tiny grapes. I cannot wait till harvest time.

How do the chickens' factor into the backyard Grape Arbor?
My girls work hard to keep the grape vines free of weeds and bugs. They readily eat any bugs crawling on the leaves of the grape vines. When tilling the soil and searching for delectables, they keep the weeds at bay. I lose a few grape bunches that grow on the ground, but I consider this compensation for their hard work. The size of the Grape Arbor assures there is plenty to go around. My girls make a lot of my gardening and edible landscaping dreams possible. They are my garden helpers; I appreciate their "hen-help" so much.
Thanks for taking the time to read about our adventures in building a Backyard Grape Arbor. You can sculpt a Grape Arbor in your backyard garden and reap the benefits of fresh grapes from your grape vines.
~ Noelle Moser (Kuntry Klucker) ~