Keeping water wet, Alaskan style!
Winter in Alaska is no joke, and keeping chickens happy takes some ingenuity, fortunately my DH2B (Dear Hubby To Be) is brilliant and loves a challenge.
Previously I had triedjust about every commercially available heated waterer or water heater. None of them really did the job. One didn't even heat the water enough to keep it liquid. Another was nearly impossible for me to plug in but only took the girls a few seconds to unplug (naturally) I had finally worked out a system where I had 2 waterers, one in the house and one out in the coop. Twice a day I switched them so the outside one could come inside to thaw. Not a perfect system but less frusterating than the alternatives.
Enter the man of my dreams armed with his trusty dusty Dremel. I read about this handy-dandy water heater somewhere on here in the not too distant past so I told him about it. We already had most of the parts so this is what he did.
First we fed the kids all the popcorn from the holiday tin that Grandma brought over (She bought it at Wally world for about $5) Then we scrounged in the garage for a clamp light and a 40 watt bulb that worked.
We made a quick trip to the store for some clay, non clumping cat litter then settled at the dining room table (we didn't have a garage then) and started the assembly.
Using his dremel Tom cut a hole in the side of the tin, a couple inches up from the bottom, big enough to feed the light's plug through. He wrapped DuckTape around the cord in the area where the cord would be resting against the cut edge of the hole. He also used duck tape to wrap the rim of the freshly cut hole ro provide extra protection against cord damage. The clamp was removed from the fixture and repurposed in the garge. Then he poured cat litter in the bottom to act as balast (harder for the chickens to knock over). Next he threaded the cord through the hole, from the inside to the outside.

The tin is just the right size so the light hood fits snug and keeps the light from tipping over in the tin. The cat litter in the bottom helps with that as well since the fixture plunges down in and is essentially help up like a post in the dirt.
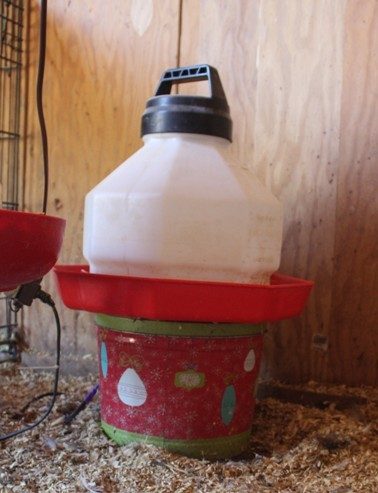
Then we put the lid on the tin, plugged in the light and set the waterer right on top of it. Even at -35F in an uninsulated coop the waterer did not freeze, and it was only an inch or so from the wall. I love this thing!
Winter in Alaska is no joke, and keeping chickens happy takes some ingenuity, fortunately my DH2B (Dear Hubby To Be) is brilliant and loves a challenge.
Previously I had triedjust about every commercially available heated waterer or water heater. None of them really did the job. One didn't even heat the water enough to keep it liquid. Another was nearly impossible for me to plug in but only took the girls a few seconds to unplug (naturally) I had finally worked out a system where I had 2 waterers, one in the house and one out in the coop. Twice a day I switched them so the outside one could come inside to thaw. Not a perfect system but less frusterating than the alternatives.
Enter the man of my dreams armed with his trusty dusty Dremel. I read about this handy-dandy water heater somewhere on here in the not too distant past so I told him about it. We already had most of the parts so this is what he did.
First we fed the kids all the popcorn from the holiday tin that Grandma brought over (She bought it at Wally world for about $5) Then we scrounged in the garage for a clamp light and a 40 watt bulb that worked.
We made a quick trip to the store for some clay, non clumping cat litter then settled at the dining room table (we didn't have a garage then) and started the assembly.
Using his dremel Tom cut a hole in the side of the tin, a couple inches up from the bottom, big enough to feed the light's plug through. He wrapped DuckTape around the cord in the area where the cord would be resting against the cut edge of the hole. He also used duck tape to wrap the rim of the freshly cut hole ro provide extra protection against cord damage. The clamp was removed from the fixture and repurposed in the garge. Then he poured cat litter in the bottom to act as balast (harder for the chickens to knock over). Next he threaded the cord through the hole, from the inside to the outside.
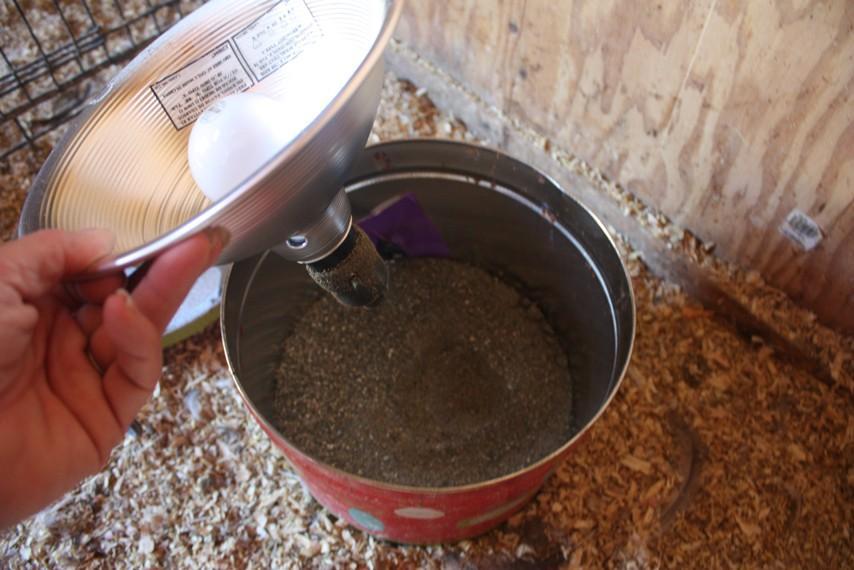
The tin is just the right size so the light hood fits snug and keeps the light from tipping over in the tin. The cat litter in the bottom helps with that as well since the fixture plunges down in and is essentially help up like a post in the dirt.

Then we put the lid on the tin, plugged in the light and set the waterer right on top of it. Even at -35F in an uninsulated coop the waterer did not freeze, and it was only an inch or so from the wall. I love this thing!