If you're having deja vu, that's because I have done this before. I created a DIY Chicken TV Brooder article last year that looks very similar to this, with a brooder that looks very similar to this one. However, this here is the next generation, new and improved, upgraded and expanded, with lessons learned from last time, version 2.0!
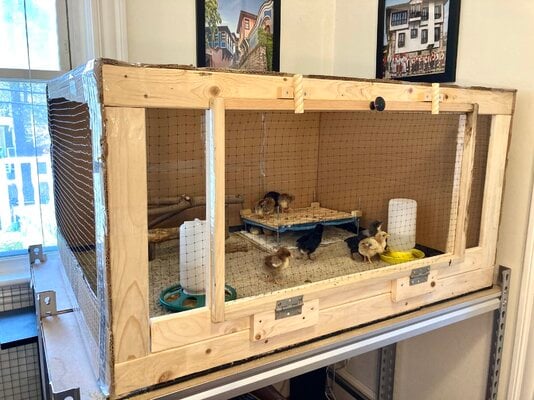
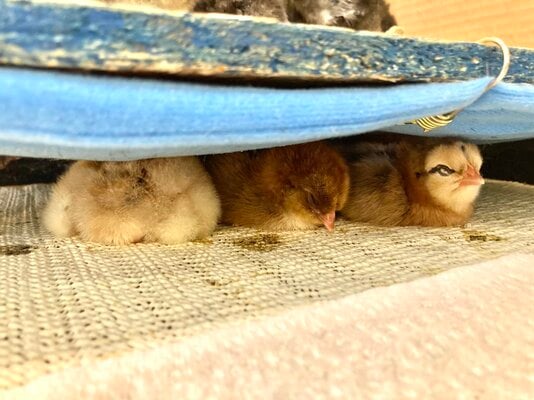
The main premise: a brooder that's easy to see into and reach into, at eye level for my kids, so they (and the whole family) can enjoy the chicks better, seeing them as on a TV instead of just looking down at their backs from the top of a bin. Chicks have an innate fear of death from above (aerial predators), so having a brooder that opens from the top, with your big human hand reaching down from above, is not ideal for the chicks. And it doesn't provide the optimal viewing angle. Because let's face it, gawking at the cute little fuzz balls is a big part of the deal!
So this brooder has the TV display setup and is very easy to see into, as well as reach into for maintenance. The chicks have a good view of us as well, and get used to life in a busy family quickly. The kids love watching them, handling them, and helping scoop the poop. I'm very happy with my new brooder and will definitely save it for future use!
The Build
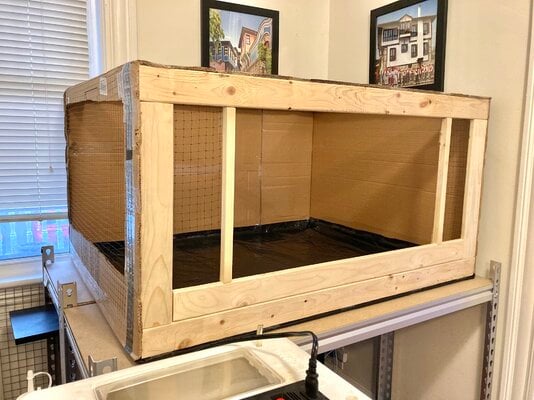
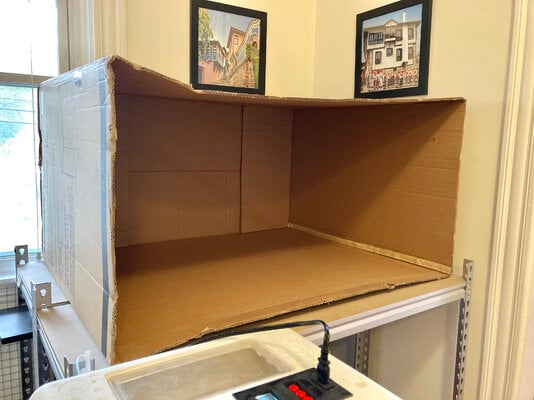
I'd been saving this huge chest freezer cardboard box for many, many years, thinking it's gotta come in handy some day. I'm so glad I did! It's perfect. Big enough to give the chicks lots of room to run around, but not so big that I can't reach all the way back for cleaning. When standing as intended as a freezer box, its front and back sides are bigger than its bottom, so I put it down on its front, to make a bigger floor area for the chicks. Floor area is more important than height. This gives them a floor that's 2x3 feet.

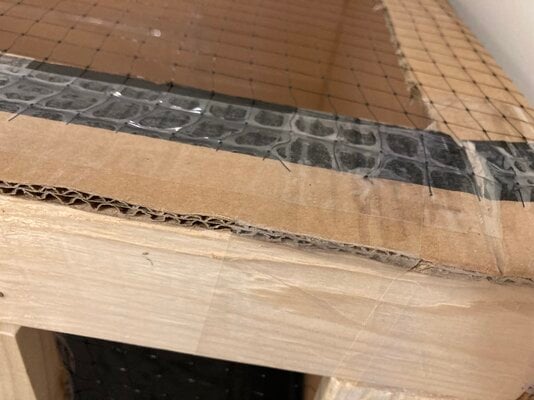
I lined the bottom with heavy duty plastic (contractor's plastic bags) and taped it to the cardboard with packing tape. Like last year, I cut the top out, as well as one of the small sides - the one close to the window - to allow more light into the brooder. I left a wide margin when cutting the sides out though, I didn't cut all the way to the corners. This gives the box more stability where it's missing sides. In the following picture, you can see the plastic lining, as well as the wide margins I left when cutting out the top.
To give the open front stability, I made a frame out of cheap furring strips. I'd saved the door from last year's brooder, and wanted to reuse it, but it was smaller than the front of this one, so I put some cross boards to act as a door frame. I taped the frame to the cardboard using packing tape.
I used bird netting again for the open areas. It's so much easier to work with than any of the metal meshes. I taped it to the cardboard using packing tape (as you have probably noticed, packing tape is my friend!)
I have the door on top of the wooden frame, with short pieces of furring strip nailed to the bottom of the frame where the door's hinges attach to the frame, flush with the door itself. This ensures that the door drops down completely, for easier access (if you don't level the door with the frame, the edge of the door will hit the frame at some point on its way down and won't be able to drop completely).
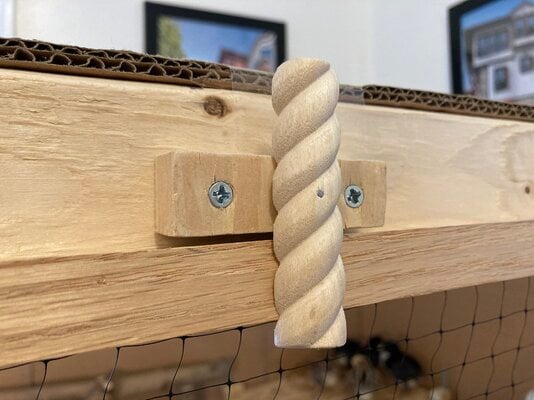
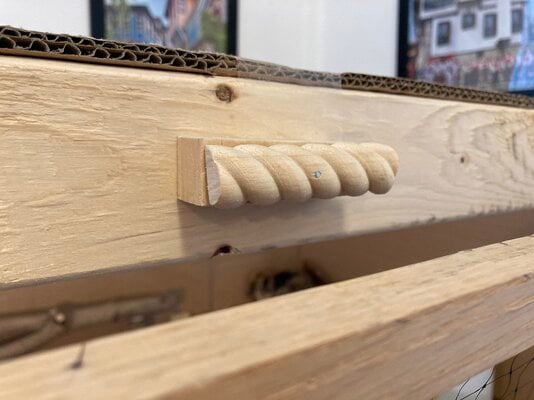
I used the same kind of lock as last year - very simple, just a couple pieces of wood rotating on a nail (I had some twisty trim left over from something, so that's what I used, to make it fancy! ). Again, like with the door hinges, I put pieces of wood along the top of the frame and then nailed the rotating, locking pieces to those, to make them flush with the door so they could rotate on top of it and keep it closed.
I'm using a brooder plate for heat, which I also made myself (inspired by similar ones I've seen here on BYC). I cut a hole in the back of the brooder where the brooder plate would be, and pulled the cord out through it, then closed the hole back up. That way the cord is completely hidden from view.

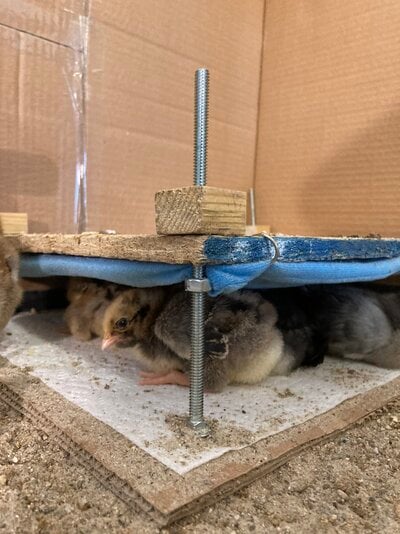
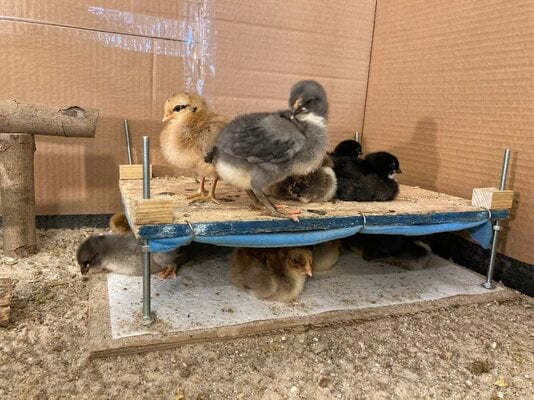
For the brooder plate, I used @aart 's setup with the carriage bolts with nuts that prevent the board from sliding down, and provide an easy way to adjust the height. This year I also added small blocks of wood nailed at the corners of the board, with the hole for the bolt going through both the board and the blocks. This provides more stability for the bolts. Otherwise, the board itself was too thin to keep them stable and they would wobble a lot, causing the whole setup to skew and tilt and feel unstable. The blocks really helped and now it feels solid. I put the whole construction on a piece of cardboard with paper towel on it, to keep the legs from sinking in the sand. In the picture below, the blanket is getting pinched between the nut and the board a bit, but it doesn't matter. The important thing is that it can't slide down.
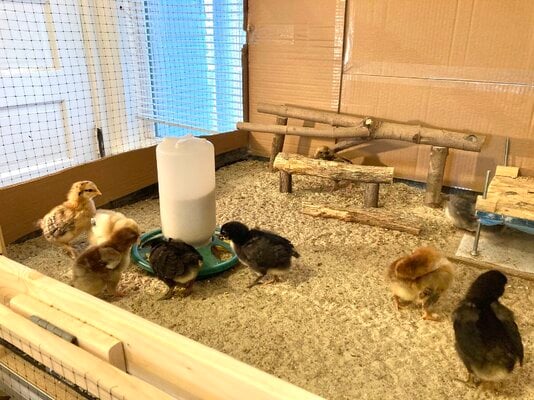
I'm using sand again in the brooder, because I loved it so much last year. It's play sand from Home Depot. It's VERY easy to clean - scoop it like a kitty litter box, but with a reptile scoop. They have smaller holes, so the tiny little poops don't fall out. No soiled bedding to perpetually remove and replace and waste. Just scoop and you're done. It does not get smelly or dusty, and the chicks love scratching and dust-bathing in it! I just put paper towels on top of it for the first few days, until the chicks learned what food was, so they wouldn't eat it. Then I took the paper towels out. The chicks were fine.
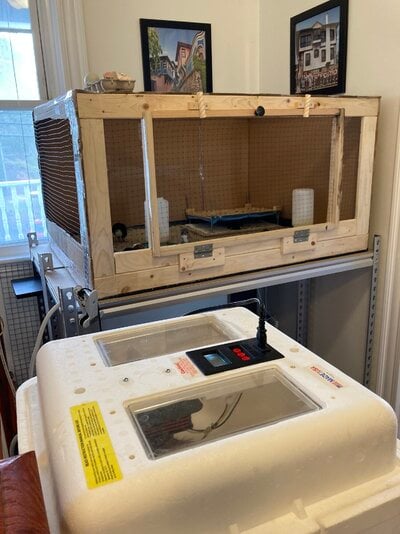
I placed the brooder and the incubator close together, so it would be a quick move from the bator to the brooder as the chicks started hatching.
At 1 week old, the chicks are already starting to jump in the doorway and try to fly out when I open the door, so I did what I did last year - put some plastic 3M hooks on the sides of the door frame and hung a piece of hardware cloth while the door is open, so they can't jump out while I'm cleaning. I even have the same piece of 1" hardware cloth - the bigger spacing makes it easier to hook it onto the hooks. This year's design doesn't have a solid wall on either side of the door, so I couldn't put the hooks in the same place, as now I only have the door frame, and the door sits on top of it. So I had to tweak my design. I put the hooks on the outside of the door frame's side pieces of wood, not on the front, and bent the HC at a right angle along the outside edges to go around the wood. I cut a bit from the wire to make a hook, so I could hang it by sliding it straight down instead of having to bend it out to go around the hook. The tweak worked great and now I can hang the barrier easily.

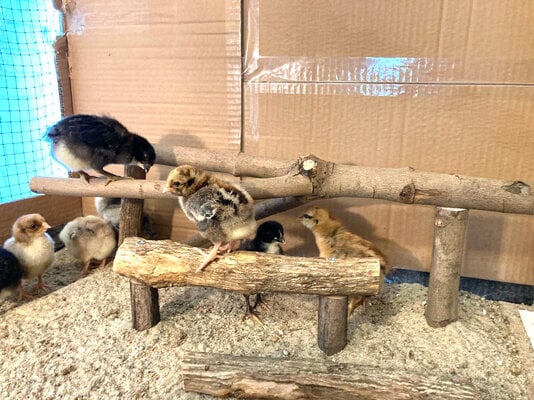
The chicks outgrew their baby roost in just a few days, so I built them some monkey bars again. They love climbing on them. All the pieces have boards that they're nailed to on the bottom, perpendicular to the roosts, for stability. They are just hidden under the sand.
And that is my new and improved brooder! My chicks are one week old and having a blast in there. So much room to run around in! I have 11 in there right now, but 6 of them I hatched for a friend and she's picking them up next week. So my 5 chicks will have the brooder all to themselves after that. I made it big so I could keep them in the house longer than last year's 3 weeks. We all love having them in the house and want to keep them here longer!
I lined the bottom with heavy duty plastic (contractor's plastic bags) and taped it to the cardboard with packing tape. Like last year, I cut the top out, as well as one of the small sides - the one close to the window - to allow more light into the brooder. I left a wide margin when cutting the sides out though, I didn't cut all the way to the corners. This gives the box more stability where it's missing sides. In the following picture, you can see the plastic lining, as well as the wide margins I left when cutting out the top.
To give the open front stability, I made a frame out of cheap furring strips. I'd saved the door from last year's brooder, and wanted to reuse it, but it was smaller than the front of this one, so I put some cross boards to act as a door frame. I taped the frame to the cardboard using packing tape.
I used bird netting again for the open areas. It's so much easier to work with than any of the metal meshes. I taped it to the cardboard using packing tape (as you have probably noticed, packing tape is my friend!)
I have the door on top of the wooden frame, with short pieces of furring strip nailed to the bottom of the frame where the door's hinges attach to the frame, flush with the door itself. This ensures that the door drops down completely, for easier access (if you don't level the door with the frame, the edge of the door will hit the frame at some point on its way down and won't be able to drop completely).
I used the same kind of lock as last year - very simple, just a couple pieces of wood rotating on a nail (I had some twisty trim left over from something, so that's what I used, to make it fancy!
). Again, like with the door hinges, I put pieces of wood along the top of the frame and then nailed the rotating, locking pieces to those, to make them flush with the door so they could rotate on top of it and keep it closed.
I'm using a brooder plate for heat, which I also made myself (inspired by similar ones I've seen here on BYC). I cut a hole in the back of the brooder where the brooder plate would be, and pulled the cord out through it, then closed the hole back up. That way the cord is completely hidden from view.
For the brooder plate, I used @aart 's setup with the carriage bolts with nuts that prevent the board from sliding down, and provide an easy way to adjust the height. This year I also added small blocks of wood nailed at the corners of the board, with the hole for the bolt going through both the board and the blocks. This provides more stability for the bolts. Otherwise, the board itself was too thin to keep them stable and they would wobble a lot, causing the whole setup to skew and tilt and feel unstable. The blocks really helped and now it feels solid. I put the whole construction on a piece of cardboard with paper towel on it, to keep the legs from sinking in the sand. In the picture below, the blanket is getting pinched between the nut and the board a bit, but it doesn't matter. The important thing is that it can't slide down.
I'm using sand again in the brooder, because I loved it so much last year. It's play sand from Home Depot. It's VERY easy to clean - scoop it like a kitty litter box, but with a reptile scoop. They have smaller holes, so the tiny little poops don't fall out. No soiled bedding to perpetually remove and replace and waste. Just scoop and you're done. It does not get smelly or dusty, and the chicks love scratching and dust-bathing in it! I just put paper towels on top of it for the first few days, until the chicks learned what food was, so they wouldn't eat it. Then I took the paper towels out. The chicks were fine.
I placed the brooder and the incubator close together, so it would be a quick move from the bator to the brooder as the chicks started hatching.
At 1 week old, the chicks are already starting to jump in the doorway and try to fly out when I open the door, so I did what I did last year - put some plastic 3M hooks on the sides of the door frame and hung a piece of hardware cloth while the door is open, so they can't jump out while I'm cleaning. I even have the same piece of 1" hardware cloth - the bigger spacing makes it easier to hook it onto the hooks. This year's design doesn't have a solid wall on either side of the door, so I couldn't put the hooks in the same place, as now I only have the door frame, and the door sits on top of it. So I had to tweak my design. I put the hooks on the outside of the door frame's side pieces of wood, not on the front, and bent the HC at a right angle along the outside edges to go around the wood. I cut a bit from the wire to make a hook, so I could hang it by sliding it straight down instead of having to bend it out to go around the hook. The tweak worked great and now I can hang the barrier easily.
The chicks outgrew their baby roost in just a few days, so I built them some monkey bars again. They love climbing on them. All the pieces have boards that they're nailed to on the bottom, perpendicular to the roosts, for stability. They are just hidden under the sand.
And that is my new and improved brooder! My chicks are one week old and having a blast in there. So much room to run around in! I have 11 in there right now, but 6 of them I hatched for a friend and she's picking them up next week. So my 5 chicks will have the brooder all to themselves after that. I made it big so I could keep them in the house longer than last year's 3 weeks. We all love having them in the house and want to keep them here longer!
Lessons Learned
I was really happy with my brooder from last year, and if I'd known that I'd be hatching again so soon, I would've saved it, but now I'm glad I threw it out because it gave me a chance to build something bigger and better! Here are the lessons I learned from the old brooder, and the improvements I made to the new one.
1. Go Bigger
Last year I had more chicks hatch than I expected to (shipped eggs), plus a friend gave me some eggs to hatch for her along with mine, and I ended up with a lot of chicks. The brooder wasn't small, but they still outgrew it quickly, and we had to move them out even though we would've loved to keep them in the house longer than those 3 weeks, and cuddle them whenever we want So this year I went bigger. A LOT bigger. Plus I was planning on fewer chicks, so that would give them even more room. Last year I started out with 15 and 4 went back to my friend, leaving me with 11. This year I'm starting out with 11, 6 of which will go back to that friend again, so I'll have 5, in a space that's much bigger. So I'm hoping to keep them with us for at least a month. Also, this time I'll save the brooder when I'm done with it. I love this experience so much that this couldn't possibly be my last hatch
2. Kick Guard
In my last brooder, I left what I thought was a tall enough margin of cardboard along the bottom of the walls to keep the sand in. Turns out, it wasn't enough. The chicks' favorite spot to dust bathe was right by the door, and they'd kick a bunch of sand out. This year I made the kick guard twice as tall. So we'll see if that's enough.
3. Hinges
Last year the whole brooder was cardboard except for the door, and I didn't want to bother putting reinforcements to add hinges, so I used zip ties for the door instead. They worked okay. Allowed the door to open and close, but I had to keep realigning the door because it would shift a bit. It was annoying enough that this year I used proper hinges. Worked better because I have a wooden frame now, and could just screw them in.
4. The Ugly Cord
Last year I had the cord of the heated blanket snaking up along the corner of the back wall and out through the top of the brooder. It's in every cute picture of the chicks and it looks UGLY!!! So this year I cut a hole in the cardboard behind the plate and pulled the cord out through that. Now you can't see it at all!
5. Better Bungees
This isn't really about the brooder per se, but the brooder plate. Last year I had these big a$$ bungees that were too thick, long and clunky. I had the two ends hooked to each other on top, so I put a second board on top of them to hide them and protect them, so the chicks wouldn't poop all over them. It was ugly. This year, I have a much more elegant design. Just a single board, with the heating pad underneath, and skinny, short bungees with small (but still sturdy) hooks. The bungees are the exact size of the board and hook to its edges instead of to each other over the top. So you can barely see them! That, plus the stabilizing blocks for the legs, and the hidden cord, and I'm a lot happier with my brooder plate setup now.
1. Go Bigger
Last year I had more chicks hatch than I expected to (shipped eggs), plus a friend gave me some eggs to hatch for her along with mine, and I ended up with a lot of chicks. The brooder wasn't small, but they still outgrew it quickly, and we had to move them out even though we would've loved to keep them in the house longer than those 3 weeks, and cuddle them whenever we want
So this year I went bigger. A LOT bigger. Plus I was planning on fewer chicks, so that would give them even more room. Last year I started out with 15 and 4 went back to my friend, leaving me with 11. This year I'm starting out with 11, 6 of which will go back to that friend again, so I'll have 5, in a space that's much bigger. So I'm hoping to keep them with us for at least a month. Also, this time I'll save the brooder when I'm done with it. I love this experience so much that this couldn't possibly be my last hatch 2. Kick Guard
In my last brooder, I left what I thought was a tall enough margin of cardboard along the bottom of the walls to keep the sand in. Turns out, it wasn't enough. The chicks' favorite spot to dust bathe was right by the door, and they'd kick a bunch of sand out. This year I made the kick guard twice as tall. So we'll see if that's enough.
3. Hinges
Last year the whole brooder was cardboard except for the door, and I didn't want to bother putting reinforcements to add hinges, so I used zip ties for the door instead. They worked okay. Allowed the door to open and close, but I had to keep realigning the door because it would shift a bit. It was annoying enough that this year I used proper hinges. Worked better because I have a wooden frame now, and could just screw them in.
4. The Ugly Cord
Last year I had the cord of the heated blanket snaking up along the corner of the back wall and out through the top of the brooder. It's in every cute picture of the chicks and it looks UGLY!!! So this year I cut a hole in the cardboard behind the plate and pulled the cord out through that. Now you can't see it at all!
5. Better Bungees
This isn't really about the brooder per se, but the brooder plate. Last year I had these big a$$ bungees that were too thick, long and clunky. I had the two ends hooked to each other on top, so I put a second board on top of them to hide them and protect them, so the chicks wouldn't poop all over them. It was ugly. This year, I have a much more elegant design. Just a single board, with the heating pad underneath, and skinny, short bungees with small (but still sturdy) hooks. The bungees are the exact size of the board and hook to its edges instead of to each other over the top. So you can barely see them! That, plus the stabilizing blocks for the legs, and the hidden cord, and I'm a lot happier with my brooder plate setup now.