Holy "insert-swear-word" insert-good-word" "dont-insert-anything"
Call me naive, call me a little overeager, call me "New Chicken Owner Crazy", call me "COVID Bored to Tears"...........I'm just not sure what possessed me........but here we go.....
I don't know which category to put my coop in because I have no idea what constitutes small, medium or large. I'm not even certain of my coop dimension. Headed out to measure it now that I've got to thinkin' about it.
The coop is HUGE for me, probably small for those coops I've seen on this forum that are almost a barn, and to my 6 week old chickens - well - they hang inside the coop much of the time during the day, and love love love love love love their run, but at beddy-bye time they actually use their talons, hanging to the edge of the door, to stop me from putting them inside the coop. I'm going with Medium
So - Should there be a new category? The Little Coop that Could (i think i can, i think i can)? The Coop from Crap (i mean, Scrape) Laying Around? The Optimistic Coop-er? If I Can Do This, You Can Do This Coop? I like the last one because my message here is: Really, don't be intimidated, you can build your own coop.
VOTE PLEASE") After reading this article weigh in on the name of the new category for my coop!
After reading this article weigh in on the name of the new category for my coop!
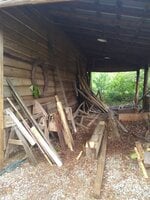
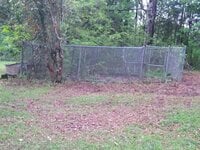
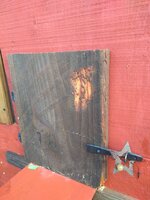
The Inspiration: Surely all this wood left by the previous owner could be put to good use:

Here's what i thought:
A little wood, a couple nails, a saw here and there, and in a few hours A COOP- HA, BAHHHHHAAAAAA, HA HA HA HA HA HA. I had no idea what i was doing. I've never built anything before - EVER - except maybe one of those module shelf things with all the pieces and hardware and impossible-to-read instructions. And it didn't turn out so well as I recall. So what ever possessed me???
And.... i was going to do this coop at no cost. Just stuff I had on hand. HA, BAHHHHHAAAAAA, HA HA HA HA HA HA
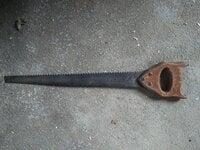
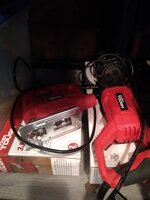
And..... y'all, I didn't (notice past tense) even own an electric type saw. I started cutting the first pieces of wood with the hand saw pictured.
And...... I had this crazy design in my head. Chicken scratch drawn on a piece of paper. I thought, coop, nesting boxes, perch - how hard can that be?
And...... My chicken brooder was getting way too small, way too fast for my babies.
Yep - N A I V E. But oh, what comes from such pure unadulterated ignorance.
Here's what happened:
A lot of wood, nails, splinters, bruises, heavy lifting, hard work and about 5 10 HOUR days of work. Exhaustion at its best! My hands will never be the same.
Everything was not done just once, sometimes not just twice, many times three times, and in a few spots FOUR TIMES! Nail in, realize how it wouldn't work, un-nail, remeasure, find a new piece of wood, nail in, un-nail, re-cut, nail in - you get the picture.
1) Barn Red paint from ACE Hardware $21;
2) A piece of plywood on my second trip to ACE: $30;
3) chicken wire, then realize i needed that more dense stuff - is it called hardware cloth? then I realize i need something to protect the top of the run (bird netting), then i realize i really needed way more than i bought - anyway about $100;
4) Hand sawing is really for someone way more a) patient b) strong c) wholesome, than I am. A jigsaw and up and down sawie thing from Walmart $50
5) Me actually building the coop - priceless (couldn't resist )
)
Lets go wtih $201.00!!!! Could have been $250; could have been $180 - I'm not pulling out the receipts to add it up exactly - close enough! Not "no cost"!
I did not take any pictures along the way. I so wish I would have. Note to those who decide to take this on: take pictures/videos along the way.
The only proof I have that I built this thing is my neighbors for about 100 miles around heard me swearing, some pretty bad bruises, and my boyfriend, bless his heart, would come out, look at me, shake is head, and say "I really want to help". In the end I caved. I was simply not strong enough or tall enough to do some of the work. So he helped me put the roof on and add some of the tall supports. He also did not want me using the jigsaw because he really wants me to keep my fingers, so he cut all the pieces that required the jigsaw.
All of the wood came from scrap around the barn, except the roof. I messed up the measurement of one side and cut the plywood incorrectly. Would have had enough scrap wood to complete the top without that mishap - CUT TWICE and MEASURE SHORT - wait, CUT ONCE after GENERAL MEASUREMENTS - something like that!
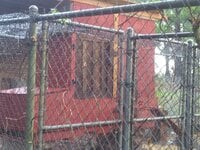
Oh, and we had an old, existing, covered in weeds dog run. So we built the coop in there - AND GUESS WHAT, it wont ever come out of there -LOL. Seriously, was not the plan.
drrrrrrrrrrrrrrrrrrrrrrrrrrrrrrrrrrrrr...... here it is:
WARNING: Contains poorly cut wood, sharp edges, out of square corners. Not for the perfectionist.
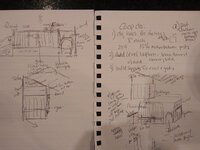
The plans (if that's what you want to call these):
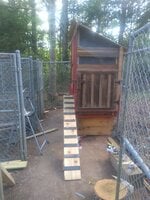
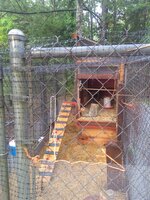
The run:
Original plan was to dig the supports into the ground, only to find that the dog run had concrete under all the built up of dirt. The supports were put on their side and the coop placed on top.
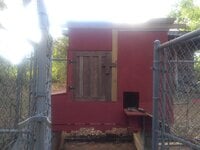
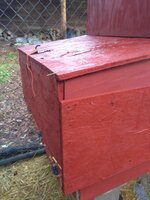
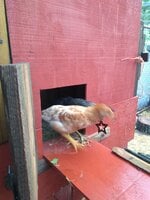
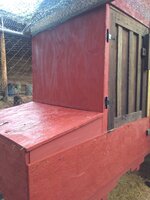
The coop:
The gates/doors were repurposed. They were in the barn. Notice the drawing has 3 gates. Squaring up the frame to get the gates to work properyly proved too much for me. So there are only two. Plus, don't think there was enough room for the 3rd gate. The bottom was a delivery box for a door, I think.
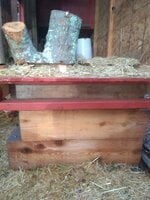
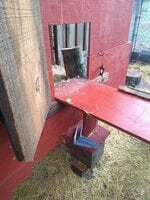
I had to look up how steep, how long, what material to build the "ladder". I discovered chickens can get up just about anything, so all that research time was for naught. The "ladder" rungs are from an old broken shutter. The best I could figure to hold up ladder was the platform pictured. I later found the brackets. Maybe the next upgrade? Most often the chickens perch on the platform. Way better to put the ladder directly into the coop but there was no room to construct it that way. Professionals, please don't judge. I'm new to all this. The latch to secure their door - well - it works!
All the hardware was found hanging around the little nooks and crannies of our house. The orange ties to secure the gate and nesting box was the string used to hold down my trunk with the plywood in the car.
I have to figure out a way to keep ventilation and cover up the triangle screens above the gate and nesting boxes. Its a work in progress.
Inside; there is a bar to eventually hang water and food. Do you put the food an water inside or out? The perch, may be a little to close to their door. Though long enough for all of them they tend to all crowd to the front side of the perch.
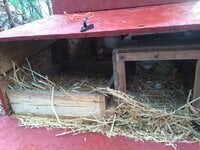
Nesting boxes:
I couldn't figure out how hinge the top. I hinged the front. Why does no one do this? There must be a reason. I will learn soon enough. One of the nesting boxes is an old drawer and the other is a box that was sitting around. I have no idea what it was used for. I have no idea if this will work. Time will tell.
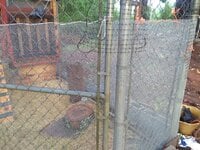
Predator proofing:
Believe it or not, this was the most challenging and expensive part. Kept finding gaps in the coop just big enough for a critter to maybe breach. I just put wood over it. The run had gaps at the gates, posts, the top, the bottom - ummmmm - everywhere. I just kept buying more wire. I dug it deep around the base and covered it with dirt. It seems to be working, as I found evidence of a critter trying to dig into it with no success.
THE VERDICT:
Now that its all over, the bruises are fading, and I have just one more very deep stubborn splinter left: IT WAS SO WORTH IT!!! If it lasts one day (ok, its been a week so we've passed that milestone) or 10 years doesn't matter. It was FUNrustrating. I've learned so much.
I DID IT!
The bond/understanding I have with the whole process of raising chickens is on an entirely different level.
Tiny little coops from big box stores cost more than the dollars I have in this coop.
It may not be perfect, there are a million things i could have done differently. But it works for now.
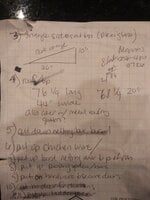
Oh - and the dimensions (all approximate due to already mentioned poor measuring skills) :
89 inches long from end to end
89 inches from top to bottom of front
65 inches from nesting box side to end (the interior not including nesting boxes)
50 inches from top to bottom in back
35 inches wide

Call me naive, call me a little overeager, call me "New Chicken Owner Crazy", call me "COVID Bored to Tears"...........I'm just not sure what possessed me........but here we go.....
I don't know which category to put my coop in because I have no idea what constitutes small, medium or large. I'm not even certain of my coop dimension. Headed out to measure it now that I've got to thinkin' about it.
The coop is HUGE for me, probably small for those coops I've seen on this forum that are almost a barn, and to my 6 week old chickens - well - they hang inside the coop much of the time during the day, and love love love love love love their run, but at beddy-bye time they actually use their talons, hanging to the edge of the door, to stop me from putting them inside the coop. I'm going with Medium
So - Should there be a new category? The Little Coop that Could (i think i can, i think i can)? The Coop from Crap (i mean, Scrape) Laying Around? The Optimistic Coop-er? If I Can Do This, You Can Do This Coop? I like the last one because my message here is: Really, don't be intimidated, you can build your own coop.
VOTE PLEASE
After reading this article weigh in on the name of the new category for my coop!The Inspiration: Surely all this wood left by the previous owner could be put to good use:

Here's what i thought:
A little wood, a couple nails, a saw here and there, and in a few hours A COOP- HA, BAHHHHHAAAAAA, HA HA HA HA HA HA.
I had no idea what i was doing. I've never built anything before - EVER - except maybe one of those module shelf things with all the pieces and hardware and impossible-to-read instructions. And it didn't turn out so well as I recall. So what ever possessed me???And.... i was going to do this coop at no cost. Just stuff I had on hand. HA, BAHHHHHAAAAAA, HA HA HA HA HA HA
And..... y'all, I didn't (notice past tense) even own an electric type saw. I started cutting the first pieces of wood with the hand saw pictured.

And...... I had this crazy design in my head. Chicken scratch drawn on a piece of paper. I thought, coop, nesting boxes, perch - how hard can that be?
And...... My chicken brooder was getting way too small, way too fast for my babies.
Yep - N A I V E. But oh, what comes from such pure unadulterated ignorance.
Here's what happened:
A lot of wood, nails, splinters, bruises, heavy lifting, hard work and about 5 10 HOUR days of work. Exhaustion at its best! My hands will never be the same.
Everything was not done just once, sometimes not just twice, many times three times, and in a few spots FOUR TIMES! Nail in, realize how it wouldn't work, un-nail, remeasure, find a new piece of wood, nail in, un-nail, re-cut, nail in - you get the picture.
1) Barn Red paint from ACE Hardware $21;
2) A piece of plywood on my second trip to ACE: $30;
3) chicken wire, then realize i needed that more dense stuff - is it called hardware cloth? then I realize i need something to protect the top of the run (bird netting), then i realize i really needed way more than i bought - anyway about $100;
4) Hand sawing is really for someone way more a) patient b) strong c) wholesome, than I am. A jigsaw and up and down sawie thing from Walmart $50

5) Me actually building the coop - priceless (couldn't resist
)Lets go wtih $201.00!!!! Could have been $250; could have been $180 - I'm not pulling out the receipts to add it up exactly - close enough! Not "no cost"!
I did not take any pictures along the way. I so wish I would have. Note to those who decide to take this on: take pictures/videos along the way.
The only proof I have that I built this thing is my neighbors for about 100 miles around heard me swearing, some pretty bad bruises, and my boyfriend, bless his heart, would come out, look at me, shake is head, and say "I really want to help". In the end I caved. I was simply not strong enough or tall enough to do some of the work. So he helped me put the roof on and add some of the tall supports. He also did not want me using the jigsaw because he really wants me to keep my fingers, so he cut all the pieces that required the jigsaw.
All of the wood came from scrap around the barn, except the roof. I messed up the measurement of one side and cut the plywood incorrectly. Would have had enough scrap wood to complete the top without that mishap - CUT TWICE and MEASURE SHORT - wait, CUT ONCE after GENERAL MEASUREMENTS - something like that!
Oh, and we had an old, existing, covered in weeds dog run. So we built the coop in there - AND GUESS WHAT, it wont ever come out of there -LOL. Seriously, was not the plan.
drrrrrrrrrrrrrrrrrrrrrrrrrrrrrrrrrrrrr......
here it is:WARNING: Contains poorly cut wood, sharp edges, out of square corners. Not for the perfectionist.
The plans (if that's what you want to call these):


The run:
Original plan was to dig the supports into the ground, only to find that the dog run had concrete under all the built up of dirt. The supports were put on their side and the coop placed on top.


The coop:
The gates/doors were repurposed. They were in the barn. Notice the drawing has 3 gates. Squaring up the frame to get the gates to work properyly proved too much for me. So there are only two. Plus, don't think there was enough room for the 3rd gate. The bottom was a delivery box for a door, I think.


I had to look up how steep, how long, what material to build the "ladder". I discovered chickens can get up just about anything, so all that research time was for naught. The "ladder" rungs are from an old broken shutter. The best I could figure to hold up ladder was the platform pictured. I later found the brackets. Maybe the next upgrade? Most often the chickens perch on the platform. Way better to put the ladder directly into the coop but there was no room to construct it that way. Professionals, please don't judge. I'm new to all this. The latch to secure their door - well - it works!


All the hardware was found hanging around the little nooks and crannies of our house. The orange ties to secure the gate and nesting box was the string used to hold down my trunk with the plywood in the car.
I have to figure out a way to keep ventilation and cover up the triangle screens above the gate and nesting boxes. Its a work in progress.
Inside; there is a bar to eventually hang water and food. Do you put the food an water inside or out? The perch, may be a little to close to their door. Though long enough for all of them they tend to all crowd to the front side of the perch.

Nesting boxes:
I couldn't figure out how hinge the top. I hinged the front. Why does no one do this? There must be a reason. I will learn soon enough. One of the nesting boxes is an old drawer and the other is a box that was sitting around. I have no idea what it was used for. I have no idea if this will work. Time will tell.


Predator proofing:
Believe it or not, this was the most challenging and expensive part. Kept finding gaps in the coop just big enough for a critter to maybe breach. I just put wood over it. The run had gaps at the gates, posts, the top, the bottom - ummmmm - everywhere. I just kept buying more wire. I dug it deep around the base and covered it with dirt. It seems to be working, as I found evidence of a critter trying to dig into it with no success.


THE VERDICT:


Now that its all over, the bruises are fading, and I have just one more very deep stubborn splinter left: IT WAS SO WORTH IT!!! If it lasts one day (ok, its been a week so we've passed that milestone) or 10 years doesn't matter. It was FUNrustrating. I've learned so much.
I DID IT!
The bond/understanding I have with the whole process of raising chickens is on an entirely different level.
Tiny little coops from big box stores cost more than the dollars I have in this coop.
It may not be perfect, there are a million things i could have done differently. But it works for now.
Oh - and the dimensions (all approximate due to already mentioned poor measuring skills) :
89 inches long from end to end
89 inches from top to bottom of front
65 inches from nesting box side to end (the interior not including nesting boxes)
50 inches from top to bottom in back
35 inches wide